




Have you ever taken that first bite of a dessert so rich, creamy, and downright indulgent that it instantly becomes your new favorite? That’s exactly what this Peanut Butter Butterfinger Cheesecake Delight delivers — a perfect balance of smooth peanut butter cheesecake, crunchy Butterfinger candy pieces, and a luscious Oreo crust that practically melts in your mouth.
If you’re a fan of peanut butter desserts or love the nostalgic crunch of Butterfinger bars, this cheesecake will feel like a sweet trip down memory lane. It’s that crowd-pleasing dessert you can proudly bring to holidays, potlucks, or family celebrations — and trust me, everyone will ask for the recipe.
What makes this cheesecake so special isn’t just its irresistible flavor, but also its versatility. You can make it ahead, chill it overnight, and serve it effortlessly the next day — a true make-ahead dessert dream come true. Whether you drizzle it with melted peanut butter or top it with extra candy bar crunch, this Butterfinger cheesecake turns every bite into a moment worth savoring.
Key Benefits & Why You’ll Love This Recipe
If you adore the creamy richness of peanut butter cheesecake and the nostalgic crunch of Butterfinger candy bars, this dessert will feel like a sweet hug in every bite. The Peanut Butter Butterfinger Cheesecake Delight is more than just a treat — it’s a show-stopping centerpiece that’s surprisingly simple to make.
Here’s why you’ll absolutely love it:
- Incredible flavor balance: The smooth, tangy cream cheese blends perfectly with creamy peanut butter, while chunks of Butterfinger add a delightful, crunchy contrast.
- Decadent yet approachable: Despite its bakery-quality look, this cheesecake uses simple ingredients and straightforward steps — perfect for home bakers of any skill level.
- Make-ahead magic: Cheesecakes need time to chill, making this an ideal make-ahead dessert for holidays, parties, or when you just want to impress without the last-minute rush.
- Crowd-pleasing perfection: Whether served at a family gathering or weekend get-together, it’s one of those desserts that disappears quickly — and sparks recipe requests every time.
- Customizable sweetness: Add more chopped Butterfinger for extra candy crunch or drizzle a bit more melted peanut butter for that Instagram-worthy finish.
💡 Pro tip: Let your cheesecake chill overnight for the best texture and flavor. When you finally slice into it, the creamy peanut butter filling and crunchy Oreo crust will reward your patience in the most delicious way possible.
This dessert isn’t just a cheesecake — it’s a peanut butter lover’s dream, wrapped in chocolate, crunch, and pure comfort.
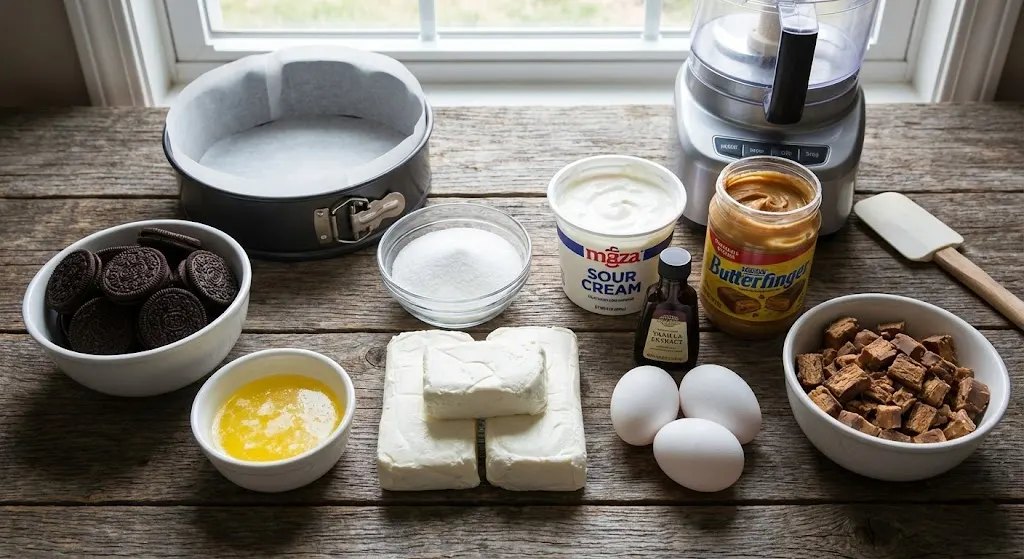
Ingredients for Peanut Butter Butterfinger Cheesecake Delight
Before you begin, gather everything you’ll need — having your ingredients prepped and ready makes the process smoother and more enjoyable. Each ingredient plays a special role in creating that perfect balance of creamy, crunchy, and chocolatey goodness.
For the Crust:
- 22 Oreo cookies (regular, not Double-Stuf) – provide the classic chocolate base with a subtle sweetness.
- 5 tablespoons (71 g) unsalted butter, melted – binds the cookie crumbs for a firm, flavorful crust.
For the Cheesecake Filling:
- 24 oz (678 g) cream cheese, softened – gives the cheesecake its signature creamy texture.
- 1 cup (200 g) granulated sugar – balances the tang of the cream cheese and enhances flavor.
- ¾ cup (180 g) full-fat sour cream or plain yogurt, room temperature – adds richness and helps keep the texture smooth.
- ½ cup (125 g) creamy peanut butter – the star ingredient that adds that irresistible nutty depth.
- 2 teaspoons pure vanilla extract – enhances sweetness and aroma.
- 3 large eggs, room temperature – create structure while keeping the filling velvety.
- 12 fun-size (or 5 full-size) Butterfinger bars, chopped – bring in that signature candy crunch and caramelized peanut flavor.
For the Topping (Optional but Highly Recommended):
- ¼ cup melted peanut butter – perfect for a warm drizzle that ties everything together.
- Reserved chopped Butterfinger pieces – for a gorgeous, crunchy finish.
💡 Ingredient Tip:
Always use room-temperature dairy (cream cheese, sour cream, and eggs) — it helps your batter mix evenly and prevents lumps. And if you’re feeling adventurous, try swapping Oreos for chocolate graham crackers or experimenting with almond butter for a twist on the classic flavor.
This ingredient lineup is your secret to creating a rich, creamy peanut butter cheesecake that tastes like a dream come true — no bakery required.
Step-by-Step Instructions
Let’s bring your Peanut Butter Butterfinger Cheesecake Delight to life! Follow these simple steps for a creamy, bakery-quality cheesecake with the perfect texture and that signature candy bar crunch.
1. Preheat & Prepare the Pan
- Preheat your oven to 350°F (177°C).
- Lightly grease a 9-inch springform pan with nonstick spray.
- Wrap the outside with heavy-duty aluminum foil — this keeps water from seeping in during baking.
💡 Pro tip: Wrapping the pan securely is key to preventing a soggy crust. Double-layering the foil is worth the extra minute!
2. Make the Oreo Crust
- Pulse 22 Oreo cookies (with the filling) in a food processor until you have about 2 cups of fine crumbs.
- Mix the crumbs with 5 tablespoons of melted butter until evenly coated.
- Press the mixture firmly into the bottom and slightly up the sides of your pan.
- Bake for 10 minutes, then set aside to cool. Keep the oven on.
Tip: Use the bottom of a measuring cup to press the crust evenly — it helps create a smooth, compact layer.
3. Prepare the Cheesecake Filling
- In a large mixing bowl, beat cream cheese and sugar on medium speed for 2–3 minutes, until smooth and creamy.
- Blend in sour cream, peanut butter, and vanilla extract until just combined.
- Add eggs one at a time, mixing on low speed. Avoid overbeating — that’s what causes cracks later!
- Gently fold in ¾ of the chopped Butterfingers, saving the rest for garnish.
Tip: Folding the candy by hand keeps the pieces intact, ensuring crunchy pockets in every bite.
4. Bake in a Water Bath
- Pour the batter over your cooled crust and smooth the top.
- Place the springform pan inside a larger roasting pan.
- Pour about 1 inch of hot water into the outer pan to create a water bath (bain-marie).
- Bake for 50–60 minutes, or until the center is almost set but still slightly wobbly.
Pro tip: The gentle steam from the water bath helps your cheesecake bake evenly and prevents cracks.
5. Cool & Chill
- Turn off the oven and crack the door open slightly. Let the cheesecake rest inside for 1 hour.
- Remove it, cool completely at room temperature, then refrigerate for at least 6 hours — overnight is best.
Tip: Patience pays off! Cooling slowly prevents sinking and ensures a smooth, creamy texture.
6. Finish & Serve
- Release the cheesecake from the springform pan.
- Drizzle with melted peanut butter and top with the reserved Butterfinger pieces.
- Slice with a clean, warm knife for perfect edges, and serve chilled.
Storage Tip: Keep leftovers covered in the refrigerator for up to 4 days. The flavor actually deepens as it chills, making every slice even better the next day!
Pro Tips & Creative Variations
Baking cheesecake might seem intimidating, but with a few smart tricks, you’ll master this Peanut Butter Butterfinger Cheesecake Delight like a pro. These insights will help you perfect the texture, prevent cracks, and even inspire a few creative twists for future batches.
Pro Tips for Perfect Results
- Use room-temperature ingredients: Cold cream cheese or eggs can lead to lumps and uneven mixing. Let everything sit out for 30–45 minutes before starting.
- Avoid overmixing: Beat the batter just until smooth — too much air creates cracks while baking.
- Don’t skip the water bath: It keeps the oven’s heat gentle and even, ensuring a creamy, crack-free cheesecake.
- Chill overnight: The texture and flavor improve dramatically after resting. It’s the secret behind that luscious, melt-in-your-mouth finish.
- Slice cleanly: Dip your knife in warm water and wipe between cuts for those perfect bakery-style slices.
Fun Flavor Variations
Ready to make this cheesecake your own? Try these easy swaps and add-ons:
- Chocolate Lover’s Twist: Add ½ cup of melted semi-sweet chocolate to the batter for a richer, mocha-like flavor.
- Nutty Upgrade: Sprinkle crushed peanuts or chopped pretzels over the top for extra crunch and a salty-sweet contrast.
- Mini Cheesecakes: Divide the mixture into muffin tins lined with cupcake liners for party-ready single servings.
- No-Bake Shortcut: Skip the oven and use a no-bake cheesecake filling (cream cheese, whipped cream, and peanut butter) for a quicker version that still tastes divine.
- Candy Bar Remix: Swap Butterfingers for Reese’s, Snickers, or Crunch bars — the peanut butter base pairs beautifully with nearly any candy bar.
Serving Enhancements
- Drizzle with warm chocolate ganache or caramel sauce for an extra layer of decadence.
- Add a dollop of whipped cream or a scoop of vanilla ice cream when serving for a dessert that’s downright irresistible.
✨ Expert Insight: Cheesecake is a patient baker’s dessert — it rewards care, time, and a little love. Follow these tips and tweaks, and you’ll not only get a flawless result but also make this Butterfinger cheesecake entirely your own signature creation.
Serving & Pairing Suggestions
Once your Peanut Butter Butterfinger Cheesecake Delight is perfectly chilled and ready to serve, it’s time to turn dessert into an experience. This rich, creamy treat pairs beautifully with complementary flavors and textures that elevate every bite — whether you’re hosting guests or enjoying a quiet moment of indulgence.
How to Serve It Best
- Serve chilled: This cheesecake is at its dreamiest when cold. The creamy peanut butter filling firms up while the Butterfinger pieces stay delightfully crunchy.
- Perfect slices: Warm your knife under hot water, wipe it dry, and cut clean slices for that professional, picture-perfect presentation.
- Finishing touches: Just before serving, drizzle with melted peanut butter or chocolate sauce, and sprinkle a few extra Butterfinger crumbles on top for irresistible texture and shine.
Pairing Ideas to Complement the Flavors
- Coffee & Espresso: The bold bitterness of coffee balances the sweetness beautifully — a perfect match for the peanut butter cheesecake base.
- Milkshakes or Chocolate Milk: A nostalgic combo that brings out the candy bar flavor even more.
- Vanilla Ice Cream: Serve a small scoop beside each slice for an extra creamy contrast.
- Caramel Latte or Mocha: Enhance the dessert’s caramel-peanut notes with a rich, café-style drink.
Occasions to Serve It
This Butterfinger cheesecake fits seamlessly into almost any celebration:
- Holiday dinners or family gatherings
- Birthday parties or potlucks
- Valentine’s Day dessert table
- Weekend baking projects or cozy date nights
Serving Tip: Add a touch of elegance by garnishing each slice with a swirl of whipped cream and a mini Butterfinger piece. It’s a simple detail that makes your dessert look as impressive as it tastes.
Whether paired with coffee after dinner or shared with loved ones at a special event, this Peanut Butter Butterfinger Cheesecake Delight is guaranteed to steal the show — one creamy, crunchy, peanut-buttery bite at a time.
Tools & Equipment Guide
Creating a flawless Peanut Butter Butterfinger Cheesecake Delight isn’t just about the ingredients — it’s also about having the right tools to make the process smooth, efficient, and enjoyable. Here’s a guide to the essential equipment you’ll need, along with tips for getting the best results from each one.
Mixing & Prep Essentials
- Electric hand mixer or stand mixer: Helps achieve a perfectly smooth, lump-free cheesecake filling without overmixing.
- Large mixing bowls: Use separate bowls for your crust, filling, and toppings to keep your prep organized and clean.
- Rubber spatula: Ideal for folding in chopped Butterfinger pieces and scraping every bit of creamy batter from the bowl.
- Measuring cups & spoons: Precision matters in cheesecake baking — especially for ingredients like butter and sugar.
For the Crust & Baking
- Food processor: Quickly crushes the Oreos into fine crumbs for that smooth, even crust. (No processor? A zip-top bag and rolling pin work just as well!)
- 9-inch springform pan: The must-have pan for any cheesecake. Its removable sides make serving neat and easy.
- Roasting pan: Used for the water bath to help your cheesecake bake gently and prevent cracks.
- Heavy-duty aluminum foil: Wrap the outside of your springform pan tightly to stop water from leaking into the crust.
For Cooling & Serving
- Cooling rack: Allows air to circulate around the cheesecake as it cools, helping to prevent sogginess.
- Sharp knife or cake slicer: For clean, picture-perfect slices — dip in warm water between cuts for best results.
- Offset spatula: Great for smoothing the top of your cheesecake or spreading melted peanut butter on top.
💡 Pro Tip: If you bake cheesecakes often, invest in a leak-proof springform pan — it’s a small upgrade that saves frustration and ensures a flawless crust every time.
With these tools on hand, making your Butterfinger cheesecake will feel effortless from start to finish — letting you focus on the fun part: baking, decorating, and of course, enjoying every delicious bite.
Troubleshooting Common Cheesecake Issues
Even experienced bakers encounter a few hiccups when making cheesecake, but don’t worry — most issues have simple fixes. Here’s how to handle the most common challenges while creating your Peanut Butter Butterfinger Cheesecake Delight.
1. Cracks on the Cheesecake Surface
- Cause: Overmixing the batter or baking at too high a temperature.
- Solution: Beat ingredients on low speed just until combined, and always bake in a water bath. Cooling the cheesecake slowly in the oven for an hour before refrigeration also helps prevent cracks.
2. Sunken or Soggy Center
- Cause: Overbaking or removing the cheesecake from the oven too quickly.
- Solution: Check for a slight wobble in the center — it will set as it chills. Let it cool gradually in the oven with the door slightly open, then refrigerate 6 hours or overnight.
3. Crust Too Soft or Soggy
- Cause: Insufficient baking time or excess moisture from the water bath.
- Solution: Press the Oreo crust firmly into the pan and pre-bake for 10 minutes before adding the filling. Ensure the foil wrapping is secure to prevent water from seeping in.
4. Butterfinger Pieces Losing Crunch
- Cause: Candy bars mixed too early or melted during baking.
- Solution: Fold in most of the candy gently, reserving some for topping after baking. This maintains the signature crunchy texture in every bite.
5. Difficulty Slicing Cleanly
- Cause: Cheesecake too cold or knife not clean.
- Solution: Dip a sharp knife in warm water, wipe it dry, and slice slowly. Repeat between cuts for smooth, neat slices.
💡 Extra Tip: Keep a notebook of adjustments and observations. Every oven behaves differently, and small tweaks can make your Butterfinger cheesecake even better the next time.
By anticipating these common issues and following these solutions, your cheesecake will not only taste incredible but also look as stunning as it does in your favorite dessert magazines.
FAQs: Your Cheesecake Questions Answered
Baking a Peanut Butter Butterfinger Cheesecake Delight comes with plenty of questions — whether you’re a first-time cheesecake baker or a seasoned pro. Here are answers to the most common queries to help you achieve dessert perfection.
1. Can I make this cheesecake ahead of time?
Absolutely! In fact, cheesecake tastes even better after chilling overnight. Prepare it a day in advance, refrigerate for at least 6 hours, and serve the next day for perfect texture and flavor.
2. Can I freeze the cheesecake?
Yes! Wrap the cooled cheesecake tightly in plastic wrap and aluminum foil. Freeze for up to 2 months. Thaw in the refrigerator overnight before slicing.
3. Can I substitute the Butterfinger bars?
Definitely. You can use Reese’s, Snickers, or Crunch bars for a different candy crunch while keeping the peanut butter base delicious.
4. What if I don’t have a springform pan?
You can use a deep-dish pie pan, but a springform pan is ideal for easy removal and clean presentation. If using a pie pan, be extra careful with water bath setup to avoid leaks.
5. How do I prevent cracks in the cheesecake?
Use room-temperature ingredients, avoid overmixing, bake in a water bath, and let the cheesecake cool gradually in the oven with the door slightly open before refrigerating.
6. Can I make a smaller or mini version?
Yes! Divide the batter into muffin tins lined with cupcake liners to create individual cheesecakes. Adjust baking time to about 20–25 minutes for mini cheesecakes.
💡 Extra Tip: Keep leftover slices covered in the refrigerator for up to 4 days. The flavors deepen, making each bite even more indulgent.
This FAQ section ensures that whether it’s your first time or your fifth, your Butterfinger cheesecake comes out perfect every time — creamy, crunchy, and irresistible.
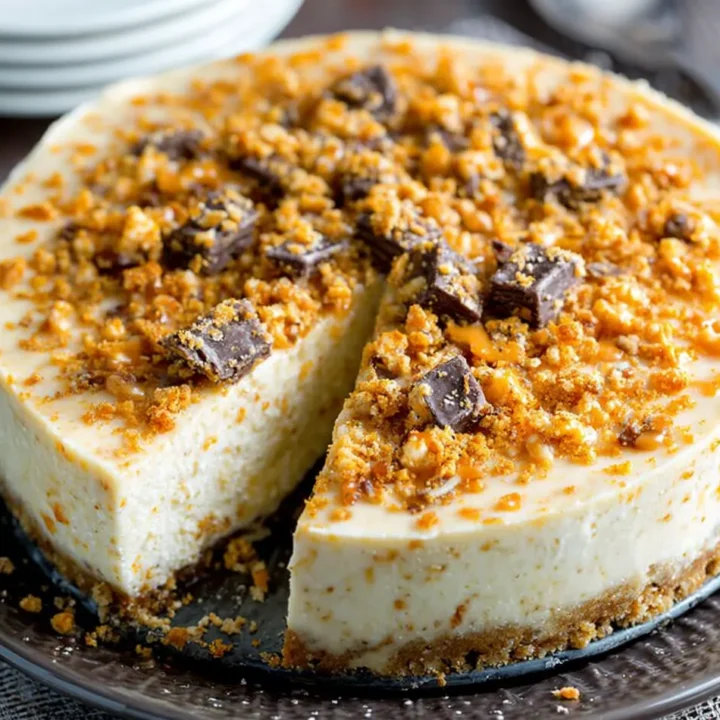
Peanut Butter Butterfinger Cheesecake Delight
If you adore the creamy richness of peanut butter cheesecake and the nostalgic crunch of Butterfinger candy bars, this dessert will feel like a sweet hug in every bite. The Peanut Butter Butterfinger Cheesecake Delight is more than just a treat — it’s a show-stopping centerpiece that’s surprisingly simple to make.
Ingredients
For the Crust:
- 22 Oreo cookies (regular)
- 5 tablespoons (71 g) unsalted butter, melted
For the Filling:
- 24 oz (678 g) cream cheese, softened
- 1 cup (200 g) granulated sugar
- ¾ cup (180 g) full-fat sour cream or plain yogurt, room temperature
- ½ cup (125 g) creamy peanut butter
- 2 teaspoons pure vanilla extract
- 3 large eggs, room temperature
- 12 fun-size or 5 full-size Butterfinger bars, chopped
For the Topping (Optional):
- ¼ cup melted peanut butter
- Reserved chopped Butterfinger pieces
Instructions
Preheat & Prepare Pan:
- Heat oven to 350°F (177°C). Grease a 9-inch springform pan and wrap with heavy-duty foil.
Make the Crust:
- Pulse Oreos in a food processor into fine crumbs.
- Mix crumbs with melted butter and press firmly into pan.
- Bake 10 minutes; set aside to cool.
Prepare Cheesecake Filling:
- Beat cream cheese and sugar until smooth.
- Add sour cream, peanut butter, and vanilla; mix until just combined.
- Add eggs one at a time on low speed. Fold in ¾ of the Butterfinger pieces.
Bake in Water Bath:
- Pour batter over crust; smooth top.
- Place pan in a larger roasting pan and add 1 inch of hot water.
- Bake 50–60 minutes until center is slightly wobbly.
Cool & Chill:
- Cool in oven with door cracked for 1 hour.
- Refrigerate 6+ hours or overnight.
Finish & Serve:
- Release from pan. Drizzle with melted peanut butter and top with reserved Butterfinger pieces.
- Slice and serve chilled.
Notes
- Room Temperature Ingredients: Ensure cream cheese, sour cream, and eggs are at room temperature to avoid lumps.
- Water Bath: Prevents cracks and promotes creamy texture.
- Chill Overnight: Enhances flavor and makes slicing cleaner.
- Variations: Swap Butterfingers for Reese’s or Snickers; try mini cheesecakes in muffin tins.
- Serving Tip: Warm knife under hot water for perfect slices.
Nutrition Information:
Yield: 12 Serving Size: 1Amount Per Serving: Calories: 520Total Fat: 32gSaturated Fat: 15gCholesterol: 110mgSodium: 220mgCarbohydrates: 48gFiber: 1gSugar: 35gProtein: 10g