




If you love chilled desserts that feel like a treat without demanding hours in the kitchen, this Layered Brownie Refrigerator Cake might become your new go-to. Think of it as the perfect blend of a rich brownie base, silky cream cheese filling, and a luscious pudding layer—all stacked into a cold, creamy slice of comfort. Have you ever taken a bite of a dessert so nostalgic and satisfying that it instantly felt like home? That’s exactly the experience this recipe delivers.
What I adore about this no-bake-style layered creation (besides how stunning it looks when sliced) is its undeniable versatility. Whether you’re hosting a potluck, craving an easy make-ahead treat, or simply want a chilled chocolate dessert to enjoy after dinner, this refrigerator cake checks all the boxes. It’s simple, crowd-pleasing, and packed with flavors that taste like they took far more effort than they actually did.
So grab your baking dish, clear a little space in your fridge, and let’s dive into a dessert that’s equal parts decadent, playful, and unbelievably easy to love.
Key Benefits & Why You Will Love This Recipe
If you’re the kind of person who appreciates a dessert that looks impressive but comes together with minimal stress, this Layered Brownie Refrigerator Cake is going to feel like a small victory in your kitchen. It combines the richness of a baked brownie base with the creamy layers you’d expect from a classic refrigerator cake—giving you the best of both worlds in one chilled, sliceable treat.
Here’s why this recipe is so easy to fall in love with:
A Make-Ahead Dream
Refrigerator cakes truly shine when you need a dessert that works for you.
You can assemble the entire thing in advance, pop it in the fridge, and let the layers firm up naturally. This makes it perfect for:
- potlucks
- family gatherings
- busy weeknights
- holidays where oven space is limited
Layered Texture That Wows
Every bite brings something different and delightful:
- fudgy brownie base
- smooth cream cheese layer
- silky chocolate-and-vanilla pudding
- cool, airy whipped topping
It feels decadent without being overwhelmingly sweet—just the right balance of rich and refreshing.
Beginner-Friendly, Yet Crowd-Pleasing
Even if you’re not a confident baker, you’ll breeze through this recipe.
The steps are straightforward, the ingredients are familiar, and the results feel impressive. It’s a win for anyone who loves a beautiful layered dessert without fussing over complicated techniques.
Versatile and Customizable
Want to add crushed cookies, chopped nuts, or a flavored pudding layer?
This recipe is flexible enough to welcome all kinds of variations, so you can tailor it to your taste or the occasion.
Perfectly Chilled & Refreshing
Because it’s served cold, this dessert is especially great for warmer months—but honestly, it’s just as comforting during the holidays when you want something creamy, chocolatey, and indulgent without being heavy.
Ingredients
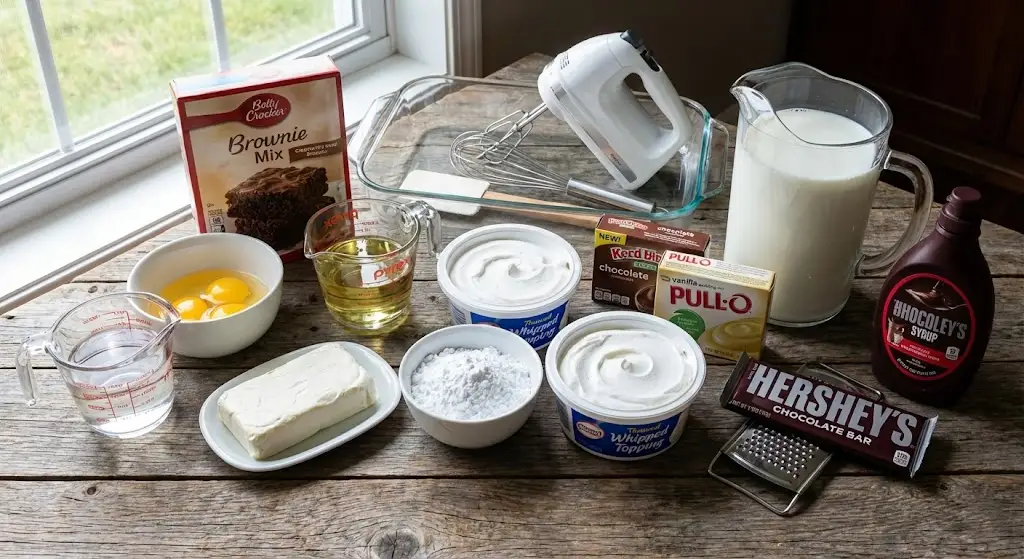
Before we start layering this chilled brownie dessert, let’s take a quick look at everything you’ll need. I like to keep ingredients visually organized because it makes prep smoother and helps ensure nothing gets missed—especially when working with multiple layers.
For the Brownie Base
- 1 box brownie mix (for a 9×13 pan)
- Ingredients listed on the box (usually oil, water, eggs)
- 1 extra-large egg (adds richness and improves the brownie texture)
For the Cream Cheese Layer
- 1 package (8 oz) cream cheese, softened
- 1 cup powdered sugar
- 1 container (8 oz) whipped topping, thawed
For the Pudding Layer
- 1 package (3 oz) chocolate instant pudding mix
- 1 package (3 oz) vanilla instant pudding mix
- 3 ½ cups cold milk
For the Topping
- 1 container (8 oz) whipped topping, for the final layer
- 1 Hershey’s bar for shaving or chocolate syrup for garnish
Instructions
Think of this recipe as a gentle layering journey—each step builds flavor, texture, and structure. Take your time, enjoy the process, and let the fridge do most of the work for you.
1. Bake the Brownie Layer
- Preheat your oven according to the instructions on the boxed brownie mix.
- Prepare the batter as directed, then mix in the extra-large egg for added richness and a slightly denser texture.
- Pour the batter into a greased and lightly floured 9×13-inch baking dish.
- Bake as the package instructs, then set the pan aside to cool completely.
- Tip: Cooling fully prevents the cream cheese layer from melting or slipping.
2. Prepare the Cream Cheese Layer
- In a medium bowl, beat the softened cream cheese with the powdered sugar until smooth and lump-free.
- Gently fold in one container of whipped topping until the mixture becomes light and fluffy.
- Spread this creamy layer evenly over the cooled brownie base.
- Tip: Use an offset spatula for a smoother finish.
3. Mix the Pudding Layer
- In a large bowl, whisk together the chocolate pudding mix, vanilla pudding mix, and cold milk.
- Continue whisking until the mixture thickens and looks glossy—this usually takes about 1–2 minutes.
- Spread the pudding mixture over the cream cheese layer.
- Tip: Work gently to avoid mixing the layers.
4. Top It Off
- Spread the remaining whipped topping evenly over the pudding layer.
- Add a finishing touch by shaving a Hershey’s bar over the top or drizzling chocolate syrup for a quick garnish.
5. Chill & Serve
- Cover the dessert and refrigerate for at least 2 hours, though overnight chilling gives the best structure.
- Slice into clean, even squares and enjoy this layered brownie refrigerator cake cold and creamy.
Pro Tips and Variations
Every great layered dessert has a few insider tricks that make the process smoother and the results even better. Here are some practical tips and fun variations to help you customize this Layered Brownie Refrigerator Cake and ensure each slice turns out beautifully.
Pro Tips for Perfect Layers
- Let the brownie base cool fully
Warm brownies will cause the cream cheese layer to melt or slide. Cool completely—even chill for 15 minutes if needed. - Use cold milk for the pudding
Instant pudding thickens best with cold milk. If the milk isn’t cold enough, the pudding layer may stay too runny. - Fold, don’t mix, the whipped topping
Folding keeps the cream cheese layer airy and prevents it from becoming dense. - Spread each layer gently
Use a spatula and slow motions to avoid blending layers together. Smooth surfaces help the cake slice cleanly. - Chill long enough
Two hours works, but 4+ hours gives the best structure. Overnight chilling produces restaurant-worthy layers.
Flavor Variations to Try
- Peanut Butter Brownie Delight
Add ¼ cup melted peanut butter to the cream cheese layer or swirl it into the brownie batter. - Mocha Lovers Version
Replace vanilla pudding with mocha pudding or mix 1 teaspoon instant espresso into the chocolate pudding. - Cookies & Cream Layer
Fold crushed chocolate sandwich cookies into the cream cheese layer for texture and crunch. - Mint Chocolate Twist
Swap the vanilla pudding for mint pudding and add a sprinkle of crushed peppermint candies on top. - Salted Caramel Drizzle
Finish with caramel sauce and a light pinch of flaky salt for a sweet-salty contrast.
Diet-Friendly Adjustments
- Lightened-Up Option
Use reduced-fat cream cheese, sugar-free pudding, and light whipped topping. The dessert stays creamy and refreshing while cutting down on calories. - Gluten-Free Version
Simply swap the brownie mix for a gluten-free box mix—everything else is naturally gluten-free.
Serving & Pairing Suggestions
One of the best things about this Layered Brownie Refrigerator Cake is how effortlessly it fits into almost any occasion. Since it’s served chilled, it brings a refreshing, creamy finish to meals year-round—and pairs beautifully with a variety of flavors, textures, and beverages. Here’s how to make each slice feel even more special.
How to Serve This Dessert Like a Pro
- Cut with a warm knife for clean layers
Dip a sharp knife in warm water, wipe it dry, and slice. Repeat between cuts for picture-perfect squares. - Serve chilled straight from the fridge
The layers hold their shape best when cold, giving you that velvety pudding texture and a firm brownie base. - Garnish right before serving
A quick sprinkle of shaved chocolate, a drizzle of syrup, or even fresh berries adds visual appeal and a pop of flavor.
Perfect Pairings
- Fresh berries
Strawberries, raspberries, or blueberries add brightness that balances the rich chocolate layers. - Hot beverages
Pair with:
- freshly brewed coffee
- café mocha
- black tea
- hot cocoa
The warmth contrasts beautifully with the cool, creamy dessert.
- Cold pairings for summer
Try serving it alongside:
- iced coffee
- cold brew
- vanilla iced latte
- chocolate milk for kids
It becomes an instant warm-weather favorite.
Occasions This Dessert Shines
This layered refrigerator cake is a natural crowd-pleaser for:
- potlucks
- holiday gatherings
- birthdays
- casual dinners with friends
- BBQs and summer parties
- dessert buffets
Tools and Equipment Guide
You don’t need anything fancy to make this Layered Brownie Refrigerator Cake, but having the right tools nearby makes the layering process smoother and the results cleaner. Think of this section as your simple, go-to checklist before you begin.
Essential Tools
- 9×13-inch baking dish
This is the foundation of the recipe. Glass or ceramic works best for even chilling and clean layering. - Mixing bowls (at least two)
You’ll need separate bowls for the cream cheese mixture and the pudding layer. - Electric mixer or hand whisk
An electric mixer helps create a silky cream cheese layer, but a whisk works fine for the pudding. - Spatula or offset spatula
A must-have for spreading layers evenly without disturbing the one below it. - Measuring cups and spoons
Accuracy matters, especially for the milk used in the pudding. - Sharp knife
Ideal for cutting neat, satisfying squares once the cake is chilled.
Helpful (But Optional) Extras
- Stand mixer
Great if you want ultra-smooth cream cheese filling with minimal effort. - Bench scraper
Useful for creating perfectly level layers across the top. - Microplane or vegetable peeler
Perfect for shaving a Hershey’s bar into delicate chocolate curls. - Plastic wrap or airtight lid
Keeps the dessert fresh and prevents fridge odors from affecting the flavor.
Why These Tools Matter
Having the right equipment makes a big difference with layered desserts. Smooth layers, clean edges, and consistent textures all depend on using tools that help you spread, whisk, and chill efficiently. With this simple setup, you’ll be fully prepared to assemble a chilled, picture-perfect brownie refrigerator cake from start to finish.
Troubleshooting Common Issues
Layered desserts can look effortless, but a few small hiccups can happen along the way—especially with pudding textures and cream cheese layers. Don’t worry; these problems are easy to fix. Here’s a friendly guide to help you troubleshoot any bumps so your Layered Brownie Refrigerator Cake turns out picture-perfect every time.
“My pudding layer is too runny.”
This is the most common issue, and usually the easiest to solve.
Possible causes:
- The milk wasn’t cold enough.
- You overmixed or undermixed the pudding.
- You added too much liquid.
How to fix or prevent it:
- Use very cold milk straight from the fridge.
- Whisk just until thickened—about 1–2 minutes.
- If the pudding still seems loose, let it sit for a few minutes before spreading.
“My layers are mixing together.”
Layer blending often happens when one layer is too soft or the layer below is still warm.
Fix it by:
- Ensuring the brownie base is completely cooled—chilling it briefly helps.
- Spreading each layer slowly and gently with a spatula.
- Chilling the cake between layers if the kitchen feels warm.
“My cream cheese layer is lumpy.”
Lumps come from cream cheese that’s still too cold.
Avoid lumps by:
- Letting the cream cheese soften fully at room temperature.
- Beating it with powdered sugar until completely smooth before adding whipped topping.
“The cake isn’t slicing cleanly.”
This happens when the dessert hasn’t chilled long enough.
For clean, photogenic slices:
- Chill for at least 2 hours, but 4–6 hours is ideal.
- Use a sharp knife dipped in warm water, wiping between cuts.
“My brownie base is too hard to cut.”
A firm base can make slicing difficult once the dessert is chilled.
Simple fix:
- Let the cake sit at room temperature for 5–10 minutes before slicing.
“The topping looks uneven or messy.”
This is usually just a spreading issue.
Make it smooth by:
- Using an offset spatula for even coverage.
- Swirling the whipped topping lightly for a decorative look.
- Adding chocolate shavings or drizzle to hide imperfections (your secret is safe!).
FAQs
These frequently asked questions will help you feel fully confident when making this Layered Brownie Refrigerator Cake, whether it’s your first time or your fiftieth. Each answer is clear, practical, and designed to guide you through the most common concerns home cooks have with layered, chilled desserts.
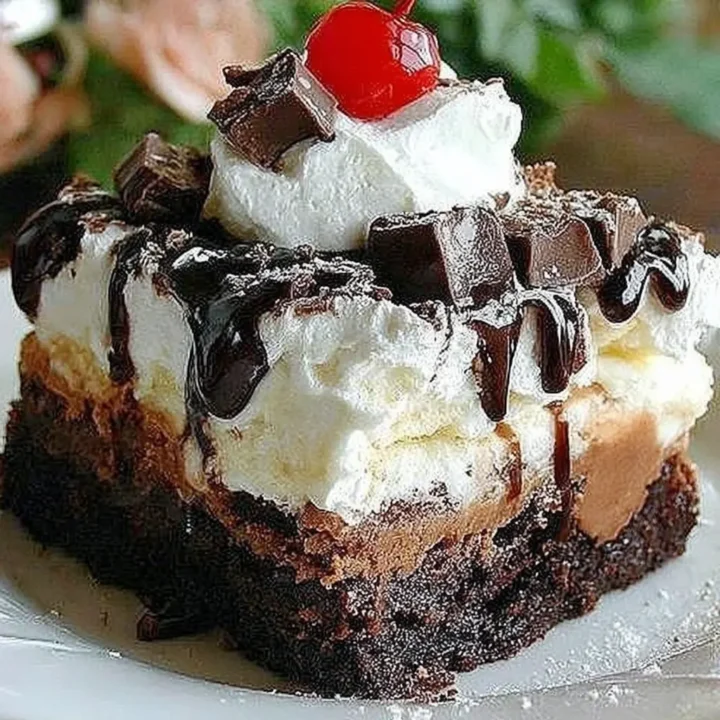
Layered Brownie Refrigerator Cake
If you’re the kind of person who appreciates a dessert that looks impressive but comes together with minimal stress, this Layered Brownie Refrigerator Cake is going to feel like a small victory in your kitchen.
Ingredients
Brownie Base:
- 1 box brownie mix (9x13 size)
- Ingredients listed on the box
- 1 extra-large egg
Cream Cheese Layer:
- 1 package (8 oz) cream cheese, softened
- 1 cup powdered sugar
- 1 container (8 oz) whipped topping, thawed
Pudding Layer:
- 1 package (3 oz) chocolate instant pudding
- 1 package (3 oz) vanilla instant pudding
- 3 ½ cups cold milk
Topping:
- 1 container (8 oz) whipped topping
- Shaved Hershey’s chocolate or chocolate syrup
Instructions
1. Bake the Brownie Layer
- Preheat oven according to the brownie mix instructions.
- Prepare batter as directed, adding an extra-large egg for a richer texture.
- Bake in a greased 9x13-inch dish.
- Cool completely before layering.
2. Make the Cream Cheese Layer
- Beat cream cheese and powdered sugar until smooth.
- Fold in one container of whipped topping.
- Spread evenly over the cooled brownie layer.
3. Prepare the Pudding Layer
- Whisk chocolate pudding, vanilla pudding, and cold milk until thickened.
- Spread gently over the cream cheese layer.
4. Top & Chill
- Spread the second container of whipped topping over the pudding.
- Add chocolate shavings or syrup.
- Refrigerate for at least 2 hours (overnight preferred).
- Slice and serve chilled.
Notes
- Use cold milk for the pudding to ensure it sets properly.
- Cool the brownie layer fully to prevent melting the cream cheese mixture.
- For clean slices, dip a sharp knife into warm water and wipe between cuts.
- Make-ahead friendly: this dessert is best when chilled for several hours.
- To lighten the recipe, use reduced-fat cream cheese, sugar-free pudding, or light whipped topping.
Nutrition Information:
Yield: 16 Serving Size: 1Amount Per Serving: Calories: 360Total Fat: 18gSaturated Fat: 9gSodium: 260mgCarbohydrates: 48gFiber: 2gSugar: 32gProtein: 4g