




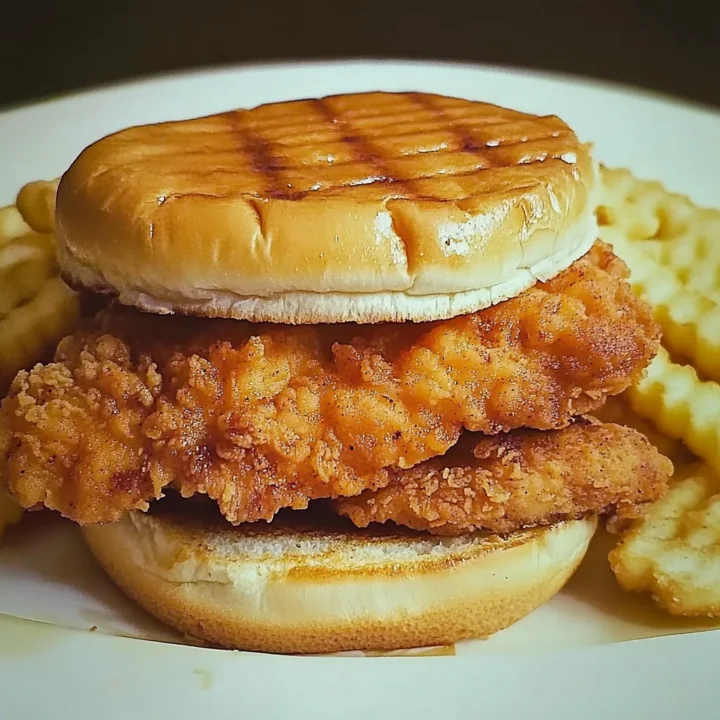
Ever walk through a mall food court and wonder how they get that fried chicken sandwich so impossibly crispy, juicy, and downright irresistible? This mall-style fried chicken sandwich brings that same nostalgic crunch right into your own kitchen — no long lines, no mystery ingredients, just simple techniques that make every bite feel like comfort food bliss.
What I love most about this recipe is how the magic happens long before the chicken ever hits the hot oil. A quick soak in pickle brine adds that signature tangy flavor and keeps the meat unbelievably tender, while a sweet-savory flour coating creates that iconic golden, crunchy crust you expect from a classic mall favorite. It’s the kind of sandwich that checks every box: crispy on the outside, juicy in the center, and stacked on a warm toasted bun with just the right touch of dill pickles.
If you’ve been craving a copycat chicken sandwich that’s easy enough for a weeknight but satisfying enough to impress guests, you’re in the right place. Let’s dive into the simple steps that turn everyday ingredients into a food-court-style masterpiece.
Key Benefits & Why You’ll Love This Recipe
If you’ve ever wished you could recreate that irresistible mall-style fried chicken sandwich at home, this recipe delivers all the crunch, comfort, and nostalgia you’re craving — without the food-court frenzy. What makes it so special isn’t just the crispy coating or the juicy center, but how effortlessly everything comes together with pantry-friendly ingredients and a few smart techniques.
Here’s why this sandwich earns a permanent spot in your recipe rotation:
- Perfectly Crispy, Never Greasy:
The double-dredge method creates a light, craggy crust that stays crunchy thanks to proper oil temperature and a quick rest on a cooling rack. - Juicy, Flavor-Packed Chicken:
A simple pickle brine marinade infuses tangy flavor and keeps the chicken tender, giving you that signature mall-style bite every single time. - Fast, Foolproof, and Family-Friendly:
With minimal prep and straightforward steps, this recipe is approachable for beginners while still satisfying seasoned cooks who love a good copycat chicken sandwich moment. - Customizable to Your Mood:
Prefer it spicy? Want extra crunch? Craving different toppings? This recipe adapts effortlessly without losing its classic charm. - Budget-Friendly Comfort Food:
No need to buy an expensive sandwich when you can make a fresher, hotter, crispier version at home for a fraction of the cost.
Whether you’re cooking for a quick weeknight dinner or recreating your favorite mall food court classic for a fun weekend treat, this sandwich brings bold flavor and satisfying texture to the table every time.
Ingredients
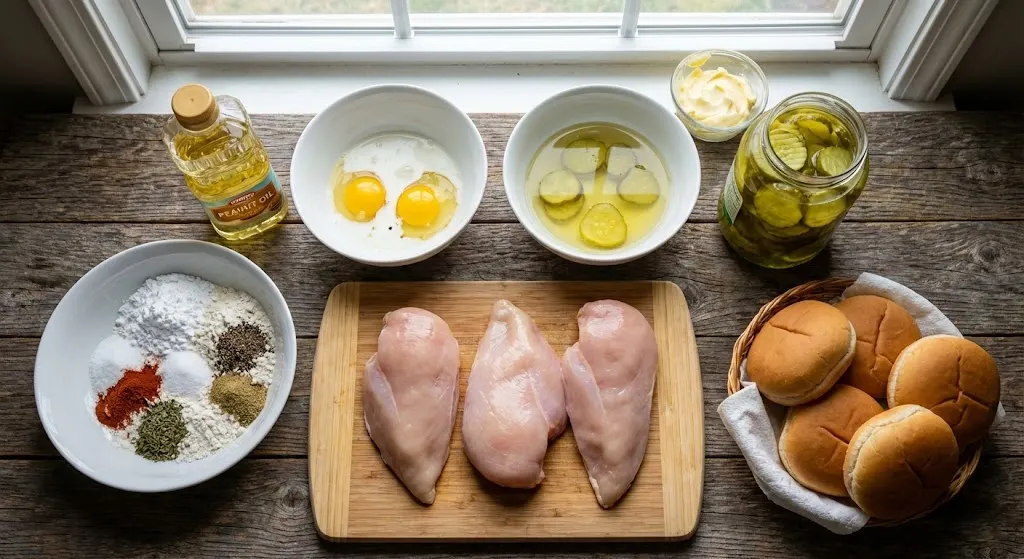
Before we jump into the cooking, here’s everything you’ll need to recreate this crispy mall-style fried chicken sandwich at home. The list is simple, approachable, and built around ingredients you probably already have — plus a few that make all the difference in flavor and crunch.
For the Chicken
- 3 skinless, boneless chicken breast halves
- 12 dill pickle slices (plus some of the pickle brine for marinating)
- Peanut oil, for frying
For the Coating
- 1 cup all-purpose flour
- 2 tablespoons powdered sugar
- 1 teaspoon salt
- Paprika, to taste
- ½ teaspoon ground black pepper
- ½ teaspoon celery salt
- ½ teaspoon dried basil
- 2 large eggs
- A splash of milk
Why this coating works:
The blend of flour, powdered sugar, and savory spices helps you achieve that signature golden, crispy crust typical of a mall-style chicken sandwich — lightly sweet, deeply flavorful, and perfectly crisp.
For Assembly
- 2 tablespoons softened butter
- 6 sandwich buns
Instructions
Making your own mall-style fried chicken sandwich is simpler than it looks. Follow these clear, step-by-step directions, and you’ll end up with crispy, juicy chicken every time.
1. Prep the Chicken
- Place each chicken breast between two sheets of plastic wrap.
- Gently pound to an even thickness — this helps the chicken cook evenly and stay tender.
- Cut each breast in half to create sandwich-sized portions.
- Add the chicken to a bowl or bag and pour in enough pickle brine to cover.
- Marinate for 1 hour to infuse that signature tangy flavor.
2. Mix the Coating
- In a large bowl, whisk together:
- flour
- powdered sugar
- salt
- paprika
- black pepper
- celery salt
- dried basil
- In a separate bowl, beat the eggs and add a splash of milk to create your egg wash.
Tip: The small amount of powdered sugar gives the crust that slightly sweet, mall-style finish while helping it brown beautifully.
3. Prepare for Frying
- Drain the chicken and give each piece a quick rinse to remove excess brine.
- Pat dry and shake off any extra moisture — dry chicken = crispier coating.
- Heat peanut oil in a deep skillet or pot to 350°F (175°C).
4. Coat the Chicken
- Dredge each piece in the seasoned flour mixture.
- Dip into the egg-milk mixture.
- Return to the flour mixture for a second coating.
- For extra crunch, repeat the process one more time.
Double-dredging is the secret to that craggy, crispy texture you see in your favorite food court chicken sandwiches.
5. Fry to Crispy Perfection
- Carefully lower the chicken into the hot oil.
- Fry for 2–3 minutes per side, until golden brown.
- Check that the internal temperature reaches 165°F (74°C).
- Transfer to a cooling rack and rest for 5 minutes to keep the crust crisp.
6. Assemble the Sandwich
- Spread softened butter on the cut sides of the buns.
- Toast in a skillet until golden and warm.
- Add two pickle slices to the bottom bun.
- Place the chicken on top, then finish with the top bun.
Pro Tips & Variations
Creating the perfect mall-style fried chicken sandwich comes down to a few simple techniques that elevate flavor, texture, and consistency. These tips will help you achieve that iconic crispy finish every single time — and give you fun ways to customize the recipe to match your cravings.
Pro Tips for the Best Results
- Keep the Oil at the Right Temperature
Aim for 350°F (175°C) throughout frying. If the oil drops too low, the chicken absorbs more grease; too high, and the crust burns before the inside cooks. - Don’t Skip the Pickle Brine
This quick marination step adds flavor and helps tenderize the chicken. Even 30 minutes makes a noticeable difference in juiciness. - Use a Cooling Rack, Not Paper Towels
Letting the chicken rest on a rack keeps the crust crisp instead of trapping steam underneath. - Press the Flour On Gently
When dredging, use light pressure to help the coating stick and create those delicious craggy edges that fry up super crispy. - Toast the Buns for Texture
A lightly buttered, golden bun adds warmth and prevents sogginess — small step, big improvement.
Easy Variations to Try
- Spicy Mall-Style Sandwich
Add cayenne pepper or chili powder to the flour mixture, or drizzle with your favorite hot sauce before serving. - Extra-Crispy Version
Do a full triple-dredge: flour → egg wash → flour → egg wash → flour. Perfect for crunch lovers. - Garlic-Herb Twist
Mix garlic powder and dried oregano into the coating for a more savory, Italian-style flavor. - Sandwich Toppings Upgrade
Try coleslaw, shredded lettuce, melted cheese, honey mustard, or a spicy mayo for a gourmet feel. - Gluten-Free Adaptation
Swap the all-purpose flour for a gluten-free flour blend that’s suitable for frying.
Serving & Pairing Suggestions
The beauty of a mall-style fried chicken sandwich is that it’s satisfying on its own, yet pairs effortlessly with a variety of sides and sauces. Whether you’re planning a casual weeknight dinner or recreating a nostalgic food-court experience at home, these serving ideas help you build the perfect plate.
Classic Pairings
- Crispy fries or potato wedges:
A timeless combo that matches the sandwich’s crunch. - Coleslaw:
Adds cool, creamy contrast to the hot, crispy chicken. - Pickle spears:
Bright acidity enhances the tangy brined chicken.
Beverages That Work Beautifully
- Fresh lemonade for a refreshing balance
- Iced tea (sweet or unsweet) for a true food-court feel
- Sparkling water with citrus for something lighter
Sauce Ideas for Dipping or Drizzling
- Honey mustard for sweet-savory lovers
- Spicy mayo for a little heat
- Classic ranch for creamy comfort
- BBQ sauce for smoky-sweet depth
Make It a Full Meal
Pair your sandwich with sides like:
- Corn on the cob
- Simple green salad
- Macaroni and cheese
- Roasted vegetables
Tools and Equipment Guide
You don’t need a commercial kitchen to make a perfectly crispy mall-style fried chicken sandwich, but having the right tools makes the whole process smoother, safer, and far more enjoyable. Here’s a simple guide to the equipment that truly makes a difference — especially when frying at home.
Essential Tools
- Heavy-Bottomed Skillet or Dutch Oven
A sturdy pot helps maintain a steady oil temperature, which is key for achieving that golden, crispy crust. - Deep-Fry or Instant-Read Thermometer
Oil temperature control is everything. A thermometer ensures you stay right around 350°F, preventing soggy chicken or burnt coating. - Cooling Rack + Baking Sheet
Resting the chicken on a rack instead of paper towels keeps the crust crunchy by allowing air to circulate underneath. - Mixing Bowls
You’ll need at least two — one for the seasoned flour mixture and another for the egg-milk wash. - Tongs
Perfect for safe, easy flipping without disturbing the coating.
Helpful Extras
- Meat Mallet or Rolling Pin
For pounding the chicken evenly so it cooks consistently. - Kitchen Towel or Paper Towels
Useful for patting the chicken dry before coating — moisture is the enemy of crispiness. - Slotted Spoon or Spider Strainer
Helps lift the chicken out of the oil cleanly while allowing excess oil to drain. - Skillet or Griddle for Toasting Buns
A warm, buttery bun elevates the entire sandwich experience.
Troubleshooting Common Issues
Even with a solid recipe, frying chicken at home can come with a few surprises. If your mall-style fried chicken sandwich isn’t turning out as crispy, juicy, or golden as you’d like, these troubleshooting tips will help you correct the issue quickly and confidently.
Issue: The Coating Falls Off
What’s Happening:
The chicken may have been too wet, or the coating wasn’t pressed on firmly enough.
How to Fix It:
- Pat the chicken completely dry before dredging.
- Gently press the flour mixture onto the surface.
- Avoid handling the chicken too much once it’s coated — let it sit for 2–3 minutes before frying to “set” the crust.
Issue: The Chicken Turns Out Soggy
What’s Happening:
The oil temperature is likely too low, causing the coating to absorb oil rather than crisp up.
How to Fix It:
- Keep your oil steady at 350°F (175°C) using a thermometer.
- Avoid overcrowding the skillet — too many pieces at once lower the temperature.
- Rest the chicken on a cooling rack, not paper towels, to maintain crispiness.
Issue: The Outside Burns Before the Inside Cooks
What’s Happening:
The oil is too hot, or the chicken pieces are uneven in thickness.
How to Fix It:
- Pound the chicken to an even thickness before marinating.
- Reduce the heat slightly and allow the oil to stabilize between batches.
Issue: The Chicken Tastes Too Salty or Too Bland
What’s Happening:
Pickle brines vary widely in saltiness, and seasoning can settle unevenly.
How to Fix It:
- Rinse the chicken lightly after marinating to avoid excess salt.
- Taste your flour mixture before dredging and adjust spices to your liking.
Issue: The Coating Isn’t Crispy Enough
What’s Happening:
There may not be enough texture in the dredge, or the coating didn’t have time to adhere.
How to Fix It:
- Add a second or third dredge cycle for extra crunch.
- Let coated chicken rest briefly before frying.
- Ensure the flour mixture has enough paprika, pepper, and seasoning to add structure and flavor.
FAQs
Here are some helpful answers to the most common questions about making a mall-style fried chicken sandwich at home. These quick tips will guide you through substitutions, storage, and the small details that make a big difference.
Mall-Style Fried Chicken Sandwich
If you’ve ever wished you could recreate that irresistible mall-style fried chicken sandwich at home, this recipe delivers all the crunch, comfort, and nostalgia you’re craving — without the food-court frenzy.
Ingredients
For the Chicken:
- 3 skinless, boneless chicken breast halves
- 12 dill pickle slices (plus pickle brine for marinating)
- Peanut oil, for frying
For the Coating:
- 1 cup all-purpose flour
- 2 tablespoons powdered sugar
- 1 teaspoon salt
- Paprika, to taste
- ½ teaspoon ground black pepper
- ½ teaspoon celery salt
- ½ teaspoon dried basil
- 2 large eggs
- Splash of milk
For Assembly:
- 2 tablespoons softened butter
- 6 sandwich buns
Instructions
1. Prepare the Chicken
- Pound chicken breasts between plastic sheets to an even thickness.
- Cut each breast in half to create 6 portions.
- Place chicken in a bowl and cover with pickle brine.
- Marinate for 1 hour.
2. Mix the Coating
- Combine flour, powdered sugar, salt, paprika, black pepper, celery salt, and basil in a bowl.
- In another bowl, whisk the eggs with a splash of milk.
3. Prepare for Frying
- Drain and lightly rinse the chicken.
- Pat dry to remove excess moisture.
- Heat peanut oil to 350°F (175°C).
4. Dredge the Chicken
- Toss chicken in the flour mixture.
- Dip into the egg-milk wash.
- Return to the flour and coat again.
- Optionally repeat for an extra-crispy crust.
5. Fry
- Carefully lower the chicken into the hot oil.
- Fry 2–3 minutes per side until golden.
- Ensure the internal temperature reaches 165°F (74°C).
- Transfer to a cooling rack for 5 minutes.
6. Assemble the Sandwich
- Butter the sandwich buns and toast until golden.
- Add two pickle slices to the bottom bun.
- Place the fried chicken on top and finish with the top bun.
Notes
- Pickle Brine Is Key: It tenderizes the chicken and gives that nostalgic mall-style tang.
- Oil Temperature Matters: Keep it near 350°F for crisp results without greasy coating.
- Don’t Skip the Cooling Rack: This prevents sogginess by allowing steam to escape.
- Customize the Flavor: Add cayenne for heat, garlic powder for savory depth, or double-dredge for maximum crunch.
- Toast the Buns: A warm, buttery bun holds up better and adds restaurant-style texture.
Nutrition Information:
Yield: 6 Serving Size: 1Amount Per Serving: Calories: 480Total Fat: 21gCarbohydrates: 38gFiber: 2gSugar: 5gProtein: 32g