




If you’re anything like me, you can’t resist a crispy chicken sandwich that’s so satisfying it practically requires both hands to hold it. There’s something irresistible about that first bite — the crunch of panko-fried chicken, the melty cheddar, the soft toasted roll — all stacked into a sandwich that feels like a homemade upgrade from anything you’d grab at a drive-thru.
What I love most about these Two-Handed Crispy Fried Chicken Sandwiches is how simple they are to make, yet they deliver the kind of bold flavor and texture you’d expect from your favorite diner. With a quick skillet fry and just a handful of ingredients, you get a sandwich that’s golden, juicy, and perfect for weeknights, casual get-togethers, or those moments when you want something comforting but still crave a little crunch.
So if you’ve been looking for a homemade fried chicken sandwich that checks all the boxes — easy, crispy, cheesy, and undeniably satisfying — you’re in the right place. Let’s dive in and build a sandwich worthy of two hands and zero leftovers.
Why You’ll Love These Two-Handed Crispy Fried Chicken Sandwiches
There’s something undeniably satisfying about a crispy chicken sandwich you can barely contain with both hands. This recipe delivers that experience in the best way — crunchy, juicy, cheesy, and incredibly easy to pull together on a busy weeknight. If you enjoy meals that feel indulgent without requiring complicated steps, this sandwich is about to become a favorite.
Here’s what makes it truly special:
- Unbeatable crunch: The panko coating fries up beautifully in a skillet, giving you that golden, crispy exterior without deep frying.
- Simple ingredients, big flavor: A few pantry staples — chicken breasts, panko, cheddar, and green onions — come together to create a sandwich that tastes restaurant-worthy.
- Quick and reliable: From seasoning to assembly, this homemade fried chicken sandwich requires minimal prep and cooks fast, making it perfect for last-minute cravings.
- Easy to customize: Prefer American cheese? Want a different roll? Craving a spicy twist? This recipe adapts effortlessly to your taste.
And perhaps the best part? You get a sandwich with real personality — stacked, melty, and deliciously messy in all the right ways. It’s the kind of meal you make once and immediately want to recreate for friends, because it’s just that good.
If you’ve been craving a crispy, skillet-fried chicken sandwich that delivers both comfort and crunch, you’ll love every bite of this two-handed masterpiece.
Ingredients
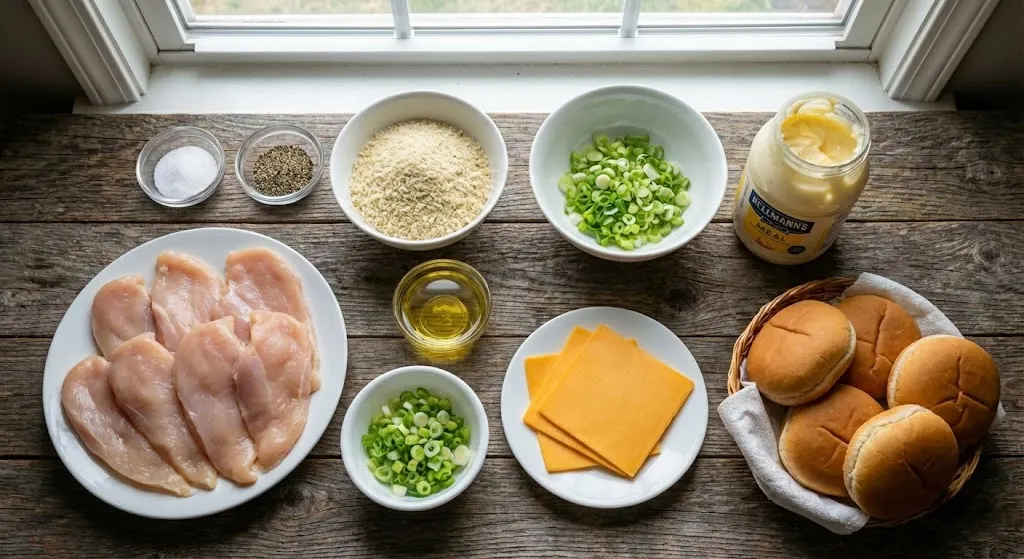
Here’s everything you’ll need to create these ultra-crisp, cheesy, two-handed chicken sandwiches. The ingredient list is intentionally simple, using everyday items that pack in flavor without complicating the process.
For the Chicken
- 4 thinly sliced chicken breasts, halved
- Salt and ground black pepper, to taste
- 1 cup Italian-style panko bread crumbs
- 3 tablespoons peanut oil
For Assembly
- 2 green onions, thinly sliced
- 4 slices Cheddar cheese
- 4 hamburger rolls, split
- ¼ cup mayonnaise
Why these ingredients work:
- Thin chicken breasts cook quickly and evenly, making them ideal for achieving a crispy exterior.
- Panko bread crumbs create that signature crunch you love in a crispy chicken sandwich.
- Peanut oil gives excellent browning and crispiness when skillet-frying, but you can easily swap it with olive oil if preferred.
- Cheddar cheese and green onions add bold, melty flavor and a touch of freshness.
- Soft hamburger rolls balance the crispy chicken with a tender bite and hold the sandwich together — though sturdier rolls like Kaiser buns work just as well.
Instructions
Follow these simple, step-by-step directions to build a crispy chicken sandwich that’s crunchy on the outside, juicy on the inside, and stacked with flavor. Think of this as cooking with a friend — clear guidance, no fuss, and plenty of helpful tips along the way.
1. Season & Coat the Chicken
- Pat the chicken breasts dry to help the coating stick.
- Sprinkle both sides with salt and ground black pepper.
- Add the panko bread crumbs to a shallow dish, then press each piece of chicken firmly into the crumbs.
- Flip and press again to ensure every surface gets coated — this is what gives your crispy chicken sandwich its signature crunch.
Tip: Let the coated chicken rest for 2–3 minutes before frying. It helps the crumbs cling better.
2. First Fry — Build the Crunch
- Heat the peanut oil in a large skillet over medium-high.
- Once the oil shimmers, lay the chicken pieces in the pan without overcrowding.
- Fry for 4–5 minutes, or until the bottom is golden brown and crispy.
- Resist the urge to move them too much — stillness = better crust.
3. Flip, Top & Finish Cooking
- Carefully turn each chicken piece over.
- Top four of the pieces with sliced green onions and a slice of Cheddar cheese.
- Cook for another 4–5 minutes, allowing the cheese to melt while the chicken turns fully golden and cooks through.
Tip: If you want extra melty cheese, cover the skillet for the last minute of cooking.
4. Assemble the Two-Handed Sandwich
- Spread mayonnaise on both sides of each hamburger roll.
- Add one cheese-topped chicken piece and one plain piece to the bottom bun.
- Cap it with the top bun and give it a gentle press to settle everything together.
Pro Tips & Variations
Making a great crispy fried chicken sandwich is all about small, smart techniques that elevate flavor and texture. Here are some helpful tips and easy variations to make this recipe truly your own:
Pro Tips for Extra-Crispy, Extra-Delicious Results
- Press the panko firmly onto the chicken.
This ensures a tight, even coating that won’t fall off in the skillet. - Don’t overcrowd the pan.
Giving each piece space helps maintain heat and promotes better browning and crunch. - Use medium-high heat for the perfect fry.
Too low and the chicken absorbs oil; too high and the coating burns before the inside cooks. - Toast the buns for added texture.
A quick toast on the skillet adds warmth and prevents sogginess, especially once the mayo hits the bread. - Let the chicken rest for a minute.
This brief pause keeps the coating crisp and allows melted cheese to settle beautifully.
Easy Variations You’ll Love
- Swap the cheese:
Try American cheese for a classic diner-style melt, or go bold with pepper jack for a spicy kick. - Change the roll:
Kaiser rolls or brioche buns make great options if you want something sturdier or slightly sweet. - Switch the spread:
Replace mayonnaise with ranch dressing, spicy mayo, or even honey mustard for new flavor profiles. - Add heat:
Sprinkle cayenne into the panko or drizzle hot sauce over the finished sandwich for a fiery upgrade. - Make it lighter:
Use an air fryer for a crisp finish with less oil — just lightly spray the chicken with cooking oil and cook until golden.
Serving & Pairing Suggestions
A sandwich this bold and crispy deserves sides and pairings that complement every crunchy, melty bite. Here are some delicious ways to round out your crispy chicken sandwich meal, whether you’re keeping it casual or turning dinner into a comfort-food feast.
Perfect Sides to Serve With Your Sandwich
- Crispy fries or potato wedges:
A classic pairing that mirrors the sandwich’s crunch and makes the meal feel complete. - Coleslaw:
Its cool, creamy texture balances the warm, crispy chicken beautifully. - Pickles or pickle chips:
Add a bright, tangy contrast that cuts through the richness. - Simple green salad:
A lighter option that freshens the plate without competing with the sandwich. - Corn on the cob:
Sweet, buttery, and perfect for summertime meals.
Sauces & Flavor Boosters
- Spicy mayo for heat
- Honey mustard for a sweet–tangy combo
- BBQ sauce for smoky depth
- Ranch dressing for a cool, creamy finish
A small drizzle or a side for dipping instantly gives your sandwich a new personality.
Drink Pairings
- Iced tea or lemonade for a refreshing balance
- Craft beer with light hops to cut through the richness
- Sparkling water with citrus for a clean, bright finish
Tools & Equipment Guide
Having the right tools makes the cooking process smoother, quicker, and far more enjoyable — especially when you’re aiming for that perfect crispy chicken sandwich texture. You don’t need anything fancy here, just a few reliable kitchen staples that help you achieve even browning, consistent crunch, and effortless assembly.
Essential Tools for This Recipe
- Large Skillet
A sturdy skillet (nonstick or cast-iron) ensures the chicken cooks evenly and develops that golden, crispy crust. Cast iron holds heat exceptionally well, making it ideal for skillet-fried chicken. - Tongs
Perfect for flipping the chicken without disturbing the panko coating. They give you control and help keep the crust intact. - Shallow Dishes or Bowls
Use these for seasoning and coating the chicken. Wide bowls make it easier to press the panko crumbs onto the surface. - Meat Thermometer (optional but helpful)
If you want extra assurance, check that the chicken reaches an internal temperature of 165°F (74°C). It’s a great tool for beginners and pros alike. - Paper Towels
Ideal for blotting the chicken dry before coating — this simple step helps the panko stick better and enhances crispiness. - Toaster or Skillet for the Buns
Lightly toasting the rolls adds structure and prevents sogginess once the sandwich is assembled.
Why These Tools Matter
Using the right equipment helps you:
- Maintain steady heat for even frying
- Prevent soggy breading or undercooked centers
- Achieve that signature crunch of a well-made skillet-fried chicken sandwich
- Build a sandwich that holds together beautifully from first bite to last
Troubleshooting Common Issues
Even with a straightforward recipe like this crispy fried chicken sandwich, a few small missteps can affect the final result. Here’s how to avoid the most common problems and keep every sandwich crunchy, flavorful, and perfectly assembled.
1. The Breading Falls Off
What happened:
The chicken was too wet, or the crumbs didn’t have enough time to adhere.
How to fix it:
- Pat the chicken completely dry before seasoning.
- Press the panko firmly onto both sides.
- Let the coated chicken rest for a few minutes before frying.
These small steps create a secure, even crust that stays put.
2. The Chicken Isn’t Crispy Enough
What happened:
The oil wasn’t hot enough, or the pan was overcrowded.
How to fix it:
- Heat the oil until it shimmers before adding the chicken.
- Give each piece space — crowding the pan traps moisture and softens the crust.
- Avoid flipping too early; crispiness develops best when undisturbed.
3. The Cheese Won’t Melt
What happened:
Your heat may be too low or the pan wasn’t covered.
How to fix it:
- After topping with cheese, cover the skillet for 30–60 seconds.
- Or briefly splash a teaspoon of water into the pan and cover it — the steam melts cheese quickly.
4. The Sandwich Gets Soggy
What happened:
The rolls weren’t toasted or the sandwich sat too long before serving.
How to fix it:
- Toast both sides of the bun to create a protective layer.
- Assemble just before serving to preserve that two-handed crunch.
5. The Chicken Cooks Unevenly
What happened:
The pieces weren’t uniformly sized.
How to fix it:
- Use thinly sliced chicken breasts or gently pound them for even thickness.
- This ensures the chicken cooks at the same rate and stays juicy.
FAQs
Here are answers to some of the most common questions home cooks ask when making a crispy chicken sandwich. Each one is designed to help you cook with confidence and customize the recipe to your taste.
Two-Handed Crispy Fried Chicken Sandwiches
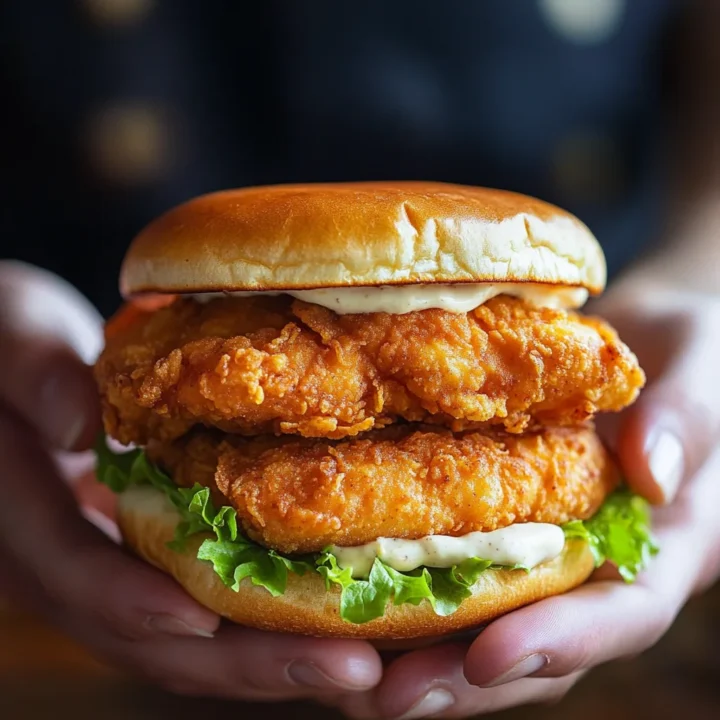
There’s something undeniably satisfying about a crispy chicken sandwich you can barely contain with both hands.
Ingredients
For the Chicken:
- 4 thinly sliced chicken breasts, halved
- Salt and ground black pepper, to taste
- 1 cup Italian-style panko bread crumbs
- 3 tablespoons peanut oil
For Assembly:
- 2 green onions, thinly sliced
- 4 slices Cheddar cheese
- 4 hamburger rolls, split
- ¼ cup mayonnaise
Instructions
1. Season & Coat
- Pat chicken dry and season both sides with salt and pepper.
- Press each piece firmly into the panko crumbs, coating all sides evenly.
2. First Fry
- Heat peanut oil in a large skillet over medium-high heat.
- Fry chicken for 4–5 minutes or until the bottom is golden and crispy.
3. Flip & Finish
- Turn each piece over.
- Top four of the pieces with sliced green onions and Cheddar cheese.
- Cook another 4–5 minutes until chicken is cooked through and cheese is melted.
4. Assemble
- Spread mayonnaise on both sides of each roll.
- Stack one cheese-topped chicken piece and one plain piece onto each bottom bun.
- Add the top bun and serve warm.
Notes
- For extra crunch: Let the breaded chicken rest 2–3 minutes before frying.
- Oil alternatives: Olive oil works well if you don’t have peanut oil.
- Roll options: Brioche or Kaiser rolls add extra structure and flavor.
- Cheese swaps: American cheese melts beautifully for a diner-style sandwich.
- Make it spicy: Add cayenne to the panko or drizzle hot sauce before serving.
- Gluten-free option: Use gluten-free panko and buns.
Nutrition Information:
Yield: 4 Serving Size: 1Amount Per Serving: Calories: 520Total Fat: 28gSaturated Fat: 7gCarbohydrates: 33gFiber: 2gSugar: 3gProtein: 34g