




There’s something unforgettable about biting into a crispy fried chicken sandwich that’s golden on the outside and unbelievably juicy at its center. Maybe it’s the crackle of the seasoned crust, or the way the heat from a spicy sriracha mayo meets the cool snap of tangy pickles—but this is the kind of comfort food that instantly wins people over. If you’ve ever wished you could recreate that restaurant-style fried chicken sandwich at home, you’re in the right place.
This recipe delivers everything you love about a classic—big flavor, incredible crunch, and a simple method that even beginners can master. I’ll walk you through the same foolproof steps I use in my kitchen, from setting up the perfect dredging station to achieving that crave-worthy golden crust. And the best part? These sandwiches are versatile enough for busy weeknights, game-day spreads, or anytime you’re craving something irresistibly satisfying.
So grab your potato rolls, warm up the skillet, and let’s make the best-ever fried chicken sandwiches—the kind that make everyone ask, “When are you making these again?”
What Makes These the Best-Ever Fried Chicken Sandwiches?
If you love a sandwich that’s crispy, juicy, and full of bold flavor, you’re going to fall head over heels for this one. These crispy fried chicken sandwiches strike the perfect balance between crunch and tenderness, giving you that irresistible, restaurant-style bite without the fuss. Every step in this recipe is designed to help you succeed—even if frying isn’t usually your comfort zone.
Here’s why this recipe stands out:
- Foolproof crispiness: The triple-layer dredging system creates a sturdy, golden crust that stays crunchy long after cooking.
- Incredible flavor in every bite: The ranch-seasoned coating and spicy sriracha mayo add layers of tangy, creamy heat without complicating the process.
- Juicy, tender chicken every time: Splitting the breasts not only reduces cooking time but ensures more even frying and perfectly cooked centers.
- Beginner-friendly method: With shallow-frying and oven-finishing, you get reliable results—even without deep-fryer experience.
- Perfectly balanced toppings: Cool dill pickles and soft potato rolls complement the chicken’s richness and bring everything together.
Whether you’re cooking for a crowd, treating yourself after a long day, or recreating your favorite fast-food style chicken sandwich at home, this recipe delivers consistent, crave-worthy results. It’s the kind of sandwich that disappears fast—so don’t be surprised if you end up making a second batch sooner than planned!
Ingredients You’ll Need
Before we jump into the cooking, let’s make sure you have everything ready to build the perfect crispy fried chicken sandwich. This short and simple ingredient list proves that you don’t need anything fancy to create big, bold flavor at home. Think of this as your roadmap—each component plays a role in achieving that golden crust, juicy center, and signature kick of heat.
For the Chicken:
- 1½ cups all-purpose flour, divided
Helps create a sturdy, crunchy coating through a three-step dredging process. - 1 egg
Acts as the binding layer to help the seasoned flour cling beautifully. - ¼ cup ranch dressing mix (Hidden Valley® or similar)
Brings savory depth and a tangy boost to the crust. - 2 chicken breasts
Split into four pieces for quicker, more even cooking and the perfect sandwich size. - 1 cup vegetable oil
Ideal for shallow frying and achieving that restaurant-style golden crust.
For the Spicy Mayo:
- ½ cup mayonnaise
Creamy, smooth, and the base of your flavorful sandwich sauce. - ¼ cup sriracha sauce
Adds a bold, spicy kick that cuts through the richness of the fried chicken.
For Assembly:
- 4 potato rolls
Soft, slightly sweet, and perfect for holding all that crisp, juicy goodness. - 16 dill pickle chips
Add tang, crunch, and balance to every bite.
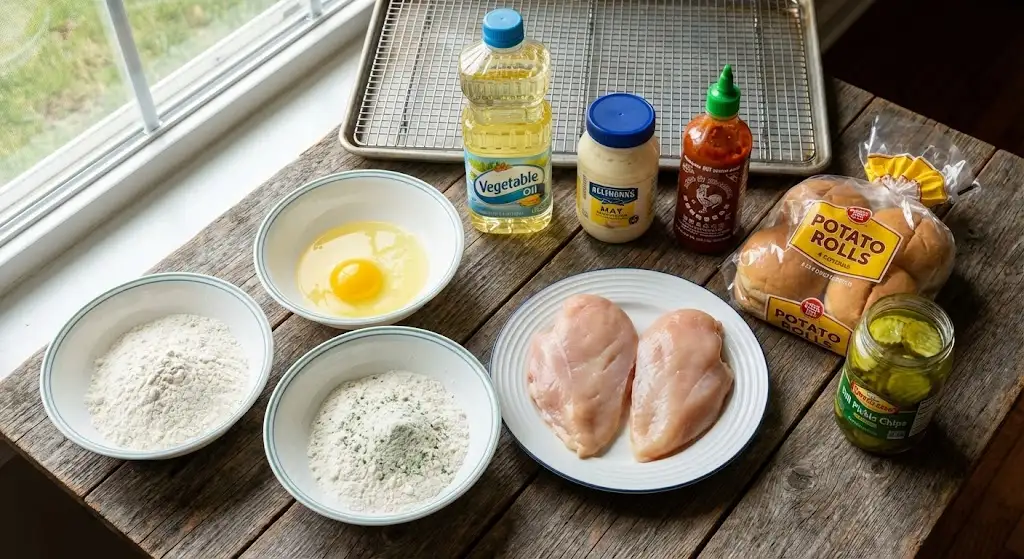
How to Make the Best-Ever Fried Chicken Sandwiches
Ready to bring these crispy, golden sandwiches to life? This step-by-step guide walks you through the entire process—from prepping your dredging station to assembling the final bite. Follow along, and you’ll have restaurant-style fried chicken sandwiches right from your own kitchen.
1. Preheat the Oven
Start by preheating your oven to 350°F (175°C).
This ensures you can finish the chicken in the oven after frying, giving you a juicy center without over-browning the crust.
2. Set Up Your Dredging Stations
Creating a clean, organized workspace makes coating the chicken easier and more consistent. Prepare three separate bowls:
- Bowl 1: ½ cup all-purpose flour
- Bowl 2: 1 beaten egg
- Bowl 3: 1 cup all-purpose flour mixed with the ranch dressing mix
This three-step method is the secret behind that crispy, crunchy chicken coating.
3. Prep the Chicken
Split the two chicken breasts horizontally to create four even pieces.
This helps them cook faster and ensures every sandwich gets the perfect portion.
4. Coat the Chicken
Follow this order for each piece:
- Coat in plain flour
- Dip into the beaten egg
- Press into the flour–ranch mixture to fully cover
Set each coated piece on a wire rack placed over a rimmed baking sheet.
This keeps the breading intact and helps the coating adhere before frying.
5. Fry Until Golden
Heat the vegetable oil in a large saucepan until it’s hot but not smoking.
Working in batches:
- Fry 2 pieces at a time for about 5 minutes, turning once
- Remove when lightly golden and place back onto the wire rack
- Repeat with the remaining chicken
This shallow-frying method keeps everything perfectly crisp without needing a deep fryer.
6. Finish in the Oven
Transfer the rack with the chicken to the preheated oven.
Bake for about 10 minutes, or until the juices run clear.
This step ensures the interior stays juicy while the exterior stays crunchy.
7. Make the Spicy Mayo
In a small bowl, mix:
- ½ cup mayonnaise
- ¼ cup sriracha sauce
This creamy, spicy spread ties the whole sandwich together.
8. Assemble the Sandwiches
Now for the fun part:
- Spread the spicy mayo generously on both sides of the potato rolls
- Layer 4 dill pickle chips onto each roll
- Top with a freshly fried chicken piece
Pro Tips & Delicious Variations
If you want to take your crispy fried chicken sandwiches from great to unforgettable, these expert tips and simple variations will help you customize the recipe to your taste—without adding extra stress to the process. Think of this section as your behind-the-scenes guide to making the most satisfying chicken sandwich every single time.
Pro Tips for Guaranteed Success
- Let the coating rest before frying:
After dredging, leave the chicken on a wire rack for a few minutes. This helps the crust adhere better so it won’t fall off during frying. - Monitor your oil temperature:
Too hot, and the crust burns before the inside cooks; too cool, and the coating absorbs excess oil. Aim for a steady medium-high heat for that perfect golden crust. - Don’t crowd the pan:
Frying in small batches keeps the oil hot and ensures each piece develops that signature crunch. - Use a wire rack instead of paper towels:
Paper towels make the bottom of the chicken steamy and soft. A rack keeps everything crisp. - Toast the buns:
Lightly toasting potato rolls adds structure and prevents the sauce from soaking into the bread too quickly.
Flavorful Variations to Try
- Make it extra spicy:
Add cayenne pepper or smoked paprika to the flour mixture for more punch. - Swap the sauce:
Try honey mustard, chipotle mayo, ranch sauce, or even a garlic aioli for a different flavor profile. - Go crunchy deluxe:
Add shredded lettuce, coleslaw, or crispy onions on top to introduce more texture. - Use brioche or sesame buns:
Potato rolls are classic, but switching up the bread can change the whole vibe of the sandwich. - Air-fryer alternative:
If you want a lighter version, spray the coated chicken with oil and cook it in the air fryer at 380°F (193°C) for 12–15 minutes, flipping halfway.
Serving & Pairing Suggestions
Once your crispy fried chicken sandwiches are hot, crunchy, and ready to go, the right sides and pairings can turn them into a full, satisfying meal. Here are some simple yet crowd-pleasing ideas that complement the sandwich’s bold flavors and textures without stealing the spotlight.
Perfect Side Dishes
- Crispy French fries:
A classic pairing that matches the sandwich’s crunch and soaks up any extra spicy mayo. - Sweet potato wedges:
Their natural sweetness balances the heat from the sriracha sauce beautifully. - Creamy coleslaw:
Adds a cool, refreshing contrast and a welcome crunch. - Pickle spears:
If you love the tang of dill pickles on the sandwich, serve extra on the side.
Fresh, Lighter Options
- Simple green salad:
A crisp salad with lemon vinaigrette helps cut through the richness of the fried chicken. - Cucumber ribbons or tomato slices:
Light, refreshing, and great for balancing the meal.
Drinks That Complement the Flavor
- Iced tea or lemonade:
Both add a sweet, refreshing counterpoint to the sandwich’s heat. - Sparkling water with citrus:
Cleanses the palate between bites.
How to Serve for the Best Experience
- Serve the sandwiches immediately for maximum crunch.
- Keep the chicken on a wire rack if you’re waiting to assemble—this prevents the underside from softening.
- Add the pickles and sauce right before serving to keep ingredients fresh and vibrant.
Tools & Equipment Guide
Having the right tools on hand makes the process smoother, safer, and far more enjoyable—especially when you’re aiming for that restaurant-style crispy fried chicken sandwich at home. Here’s a quick guide to what you’ll need and why each item makes a difference.
Essential Equipment
- Wire rack:
This simple tool is key for keeping your chicken crispy. It allows air to circulate underneath, preventing soggy bottoms both before and after frying. - Rimmed baking sheet:
Perfect for supporting the wire rack and catching any excess flour or oil. It also transitions beautifully into the oven for the finishing bake. - Large saucepan or deep skillet:
Ideal for shallow frying. It gives your chicken enough room to cook evenly without overcrowding. - Kitchen thermometer (optional but helpful):
Great for monitoring oil temperature and ensuring the chicken reaches a safe internal temperature without overcooking.
Helpful Extras
- Tongs:
For turning the chicken easily and safely while frying. - Mixing bowls:
You’ll need three for your dredging station—essential for building that crunchy, flavorful crust. - Small bowl for sauce:
Makes mixing and spreading your spicy sriracha mayo a breeze. - Toasting pan or skillet:
For lightly toasting the potato rolls to give them structure and enhance their flavor.
Troubleshooting Common Issues
Even with a straightforward recipe, a few small hiccups can happen—especially when frying chicken at home. Here’s how to avoid the most common problems and keep your crispy fried chicken sandwiches turning out perfectly every time.
1. The Breading Falls Off
This is one of the most common frustrations. Here’s how to prevent it:
- Let the coated chicken rest on a wire rack for a few minutes before frying.
- Avoid touching or flipping too often—one turn is usually enough.
- Make sure the chicken is dry before starting the dredging process.
2. The Crust Burns Before the Inside Cooks
Burnt outside, raw inside? That’s a sign the oil is too hot.
- Use medium-high heat, not full blast.
- A kitchen thermometer helps keep the oil around a stable temperature.
- Don’t fry too many pieces at once—the oil temperature drops dramatically when overcrowded.
3. The Chicken Turns Out Greasy
Greasy chicken usually means the oil wasn’t hot enough.
- Make sure the oil shimmers before adding the chicken.
- Let the chicken drain on a wire rack, not paper towels, to preserve crispiness.
4. The Chicken Isn’t Crispy
If your chicken isn’t as crunchy as you hoped:
- Ensure the pieces are fully coated during dredging.
- Let the crust set for a few minutes before frying.
- Keep the chicken warm and crisp in the oven until serving.
5. The Chicken Overcooks or Dries Out
This recipe finishes in the oven, which helps, but:
- Check for doneness around the 8-minute mark depending on your oven.
- Split chicken breasts cook quickly—keep an eye on them.
FAQs
Here are some of the most common questions home cooks ask when making crispy fried chicken sandwiches. These quick answers will help you cook with confidence and troubleshoot on the fly.
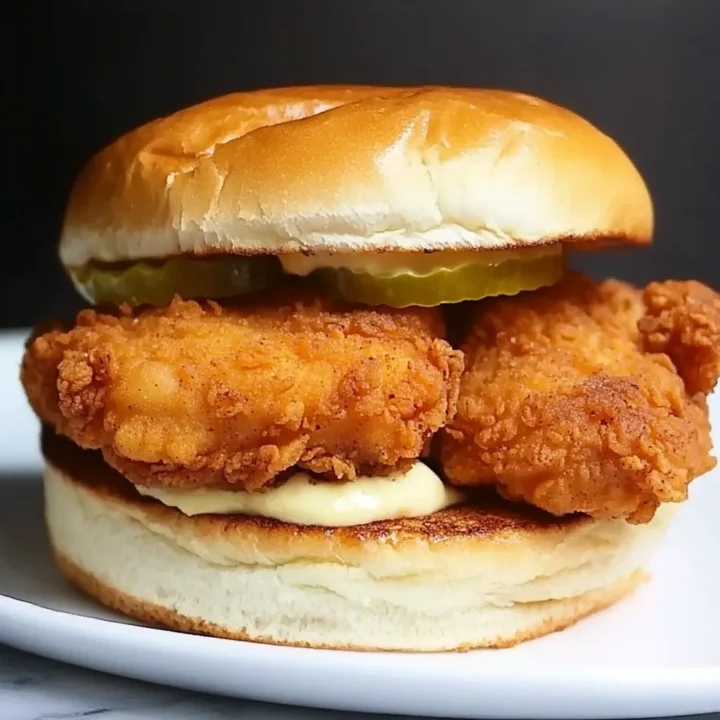
Best-Ever Fried Chicken Sandwiches
If you love a sandwich that’s crispy, juicy, and full of bold flavor, you’re going to fall head over heels for this one. These crispy fried chicken sandwiches strike the perfect balance between crunch and tenderness, giving you that irresistible, restaurant-style bite without the fuss.
Ingredients
For the Chicken:
- 1½ cups all-purpose flour, divided
- 1 egg
- ¼ cup ranch dressing mix (Hidden Valley® or similar)
- 2 chicken breasts (split to create 4 pieces)
- 1 cup vegetable oil
For the Spicy Mayo:
- ½ cup mayonnaise
- ¼ cup sriracha sauce
For Assembly:
- 4 potato rolls
- 16 dill pickle chips
Instructions
1. Preheat
Preheat your oven to 350°F (175°C).
2. Prepare Dredging Stations
Set up three bowls:
- ½ cup flour
- 1 beaten egg
- 1 cup flour mixed with ranch dressing mix
3. Coat the Chicken
- Coat each chicken piece in plain flour.
- Dip in egg.
- Press into the flour–ranch mixture. Place on a wire rack over a baking sheet.
4. Fry
Heat vegetable oil in a saucepan. Fry 2 pieces at a time for about 5 minutes, turning once, until lightly golden. Return fried pieces to the wire rack and repeat with remaining chicken.
5. Bake
Transfer the rack to the oven and bake for 10 minutes, or until the chicken is fully cooked and juices run clear.
6. Make the Sauce
Mix mayonnaise and sriracha in a small bowl.
7. Assemble
- Spread spicy mayo on the rolls.
- Add 4 dill pickle chips to each.
- Top with a crispy chicken piece and close the sandwich.
Notes
- Rest the coated chicken for a few minutes before frying to help the crust adhere.
- Avoid overcrowding the pan to maintain proper oil temperature and get consistent browning.
- Use a wire rack, not paper towels, to keep your chicken crunchy.
- Toast the buns lightly for extra flavor and structure.
- For a milder version, reduce the sriracha or replace with honey mustard or ranch.
- For a spicier version, add cayenne or smoked paprika to the flour mixture.
Nutrition Information:
Yield: 4 Serving Size: 1Amount Per Serving: Calories: 620Total Fat: 35gSaturated Fat: 6gCholesterol: 95mgSodium: 1,120mgCarbohydrates: 52gFiber: 2gSugar: 6gProtein: 28g