




Have you ever bitten into a dessert so small yet so ridiculously satisfying that you immediately wished you’d made a double batch? These Chocolate-Dipped Peanut Butter Cheesecake Bites are exactly that kind of treat. They’re the perfect mash-up of a creamy peanut butter cheesecake center and a rich, chilled chocolate shell, with just enough crunch from honey-roasted peanuts to keep each bite interesting.
What I love most about these little no bake cheesecake bites is how effortlessly they slide into any occasion. Need a freezer-friendly dessert for last-minute guests? Planning a sweet snack for a movie night? Craving something bite-sized that still tastes like a full dessert experience? These do it all, and they don’t ask much in return.
They’re simple, they’re indulgent, and they deliver that sweet-salty chocolate peanut butter magic we all secretly hope for in a homemade treat. Let’s dive in.
Key Benefits and Why You’ll Love This Recipe
If you’re anything like me, you appreciate a dessert that feels impressive without demanding a whole afternoon in the kitchen. These Chocolate-Dipped Peanut Butter Cheesecake Bites check every one of those boxes, and then some. They deliver that dreamy combo of creamy peanut butter cheesecake and a crisp chocolate shell, but in a fun, bite-sized format that’s perfect for snacking, sharing, or stashing in the freezer for later.
Here’s why these little no bake cheesecake bites are about to become your new go-to treat:
- Effortless prep. No ovens, water baths, or complicated steps. Just mix, freeze, dip, chill, and done. Even beginners feel like pros with this recipe.
- Bite-sized convenience. They’re easy to portion, easy to serve, and even easier to eat. Great for parties, holidays, or late-night cravings.
- A texture lover’s dream. You get a smooth, creamy center, a snappy chocolate coating, and a sprinkle of crunchy honey-roasted peanuts on top. Every bite feels like a layered experience.
- Make-ahead friendly. These cheesecake bites store beautifully in the fridge or freezer, making them a smart dessert choice for busy schedules.
- Crowd-pleasing flavor combo. Chocolate, peanut butter, and cheesecake rarely disappoint. Put them together, and you’ve got a guaranteed hit.
- Customizable. Switch up the chocolate, try different nut toppings, or add a swirl of flavor to the base. These bites are forgiving and flexible.
Ingredients
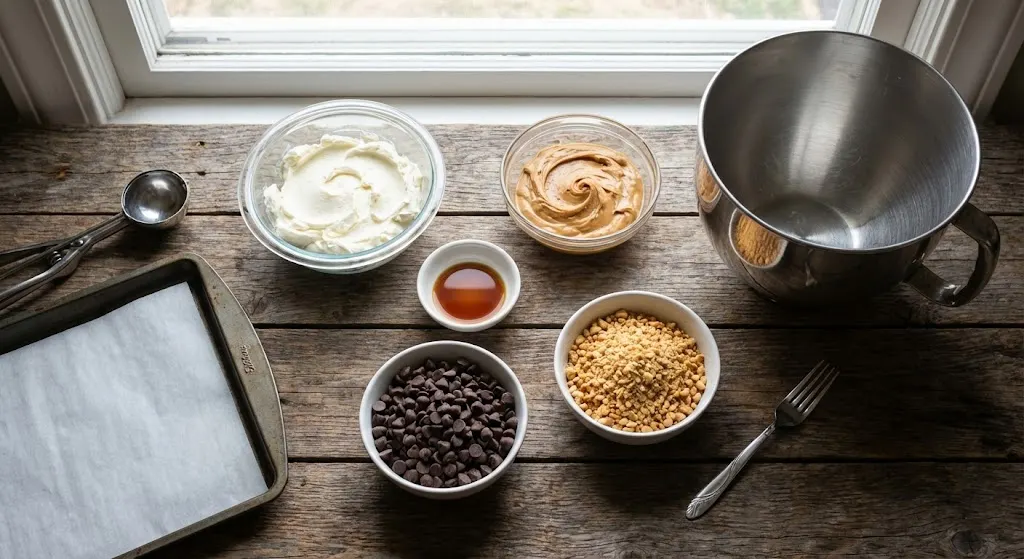
Before you dive in, here’s a quick, tidy rundown of everything you’ll need to make these Chocolate-Dipped Peanut Butter Cheesecake Bites. The list is short, the flavors are big, and each ingredient plays its part in creating that creamy center and crisp chocolate shell.
For the Cheesecake Bites:
- 16 oz cream cheese, softened
This gives the bites their signature smooth, velvety texture. Softened cream cheese blends more easily and creates a fluffier base. - 1 cup natural peanut butter (honey-sweetened if you can find it)
Adds richness and that classic peanut butter flavor without overwhelming the tangy cream cheese. - ½ tbsp vanilla extract
A small touch that rounds out the flavor and enhances the sweetness.
For the Coating:
- 12 oz semi-sweet chocolate (chips or chopped bars work great)
Perfect for melting and dipping. Semi-sweet keeps the bites balanced rather than overly sweet. - ½ cup honey-roasted peanuts, finely crushed
These add texture, flavor, and a little sparkle on top once the chocolate sets.
Instructions
Making these Chocolate-Dipped Peanut Butter Cheesecake Bites is surprisingly simple, and once you get into the rhythm, the whole process feels relaxing. Here’s your step-by-step guide, laid out clearly so you can breeze through it without second-guessing a thing.
1. Make the Cheesecake Base
Start by combining the essentials:
- Add the softened cream cheese, peanut butter, and vanilla extract to a stand mixer fitted with the paddle attachment.
- Beat the mixture until it becomes completely smooth, fluffy, and well blended.
If you’re using a hand mixer, no worries. It works just as well — just give it an extra minute or two to reach that silky consistency.
2. Shape and Freeze
This is where the bites start taking form:
- Line a baking sheet with parchment paper.
- Scoop about 2 tablespoons of the cheesecake mixture for each portion, rolling or shaping them into neat balls.
- Set them on the prepared sheet and pop the whole tray into the freezer.
- Freeze for 1 to 2 hours, or until the cheesecake balls are firm enough to handle without sticking.
3. Melt the Chocolate
While the bites chill, get your chocolate ready:
- Place the chocolate in a heatproof bowl over a pot of gently simmering water. Stir until smooth and glossy.
- Prefer the microwave? Melt in short bursts, about 15 to 20 seconds at a time, stirring in between to avoid scorching.
4. Dip and Coat
Now comes the satisfying part:
- Remove a few cheesecake balls from the freezer at a time so they don’t soften too quickly.
- Using a fork, dip each ball into the melted chocolate, letting the excess drip off with a gentle tap.
- Set them back onto the parchment and sprinkle immediately with crushed peanuts before the chocolate firms up.
5. Chill and Serve
You’re almost there:
- Transfer the coated bites to the fridge to set completely.
- Serve them chilled straight from the fridge or let them soften slightly for an ultra-creamy, melt-in-your-mouth moment.
Pro Tips and Variations
Think of this section as your little toolbox for making these Chocolate-Dipped Peanut Butter Cheesecake Bites even better. These tricks keep the process smooth, the texture perfect, and the flavors customizable so you can tailor each batch to whatever mood you’re in.
Pro Tips
- Freeze long enough for clean dipping. If the cheesecake base is too soft, it’ll slide off the fork or melt into the chocolate. A solid 1 to 2 hours in the freezer makes dipping a breeze.
- Keep the chocolate warm and silky. If it starts thickening, set the bowl over warm water for a minute or give it a quick microwave burst to loosen it up again.
- Work in small batches. Only remove a few cheesecake balls from the freezer at a time so they stay firm while you dip.
- Tap off excess chocolate gently. A light tap on the bowl’s edge gives your bites an even coating and a cleaner finish.
- Let them chill fully before serving. The chocolate shell sets best when the bites rest in the fridge for at least 20 to 30 minutes after dipping.
Variations
- White chocolate lovers: Swap the semi-sweet chocolate for white chocolate and top with crumbled graham crackers for a sweeter spin.
- Dark chocolate twist: Use 70 percent dark chocolate for a richer, more grown-up flavor profile.
- Crunch add-ins: Mix mini chocolate chips, chopped pretzels, or toasted coconut into the cheesecake base before freezing.
- Swirl it up: Add a swirl of caramel, honey, or berry jam into the peanut butter mixture for extra flair.
- Nut-free option: Substitute sunflower seed butter or cookie butter for the peanut butter and skip the peanut topping.
Serving and Pairing Suggestions
These Chocolate-Dipped Peanut Butter Cheesecake Bites might be small, but they play surprisingly well in all kinds of settings. Whether you’re hosting friends, building a dessert board, or sneaking a sweet bite between errands, here are some easy ways to serve and pair them so they shine every time.
How to Serve
- Straight from the fridge: This is where they hit peak creaminess, with the chocolate shell giving you that perfect snap.
- Slightly softened: Let them sit at room temperature for 5 minutes if you want a softer, meltier center.
- Dressed up on a platter: Arrange them with chopped peanuts, chocolate shavings, or a drizzle of melted chocolate for a more polished presentation.
- As part of a dessert board: Pair them with fresh berries, pretzels, mini cookies, or chocolate bark for a fun, snacking-style setup.
Perfect Pairings
- Coffee or espresso: The bitterness of coffee balances the rich peanut butter cheesecake center.
- Cold milk: A classic duo, especially if you want that nostalgic peanut butter and chocolate moment.
- Hot chocolate: For a dessert-on-dessert pairing, go all-in with a cozy mug of cocoa.
- Fresh fruit: Strawberries, sliced bananas, and raspberries add a bright, refreshing contrast.
Tools and Equipment Guide
You don’t need a fully stocked kitchen to make these Chocolate-Dipped Peanut Butter Cheesecake Bites turn out beautifully. A few simple tools will help you mix, shape, dip, and chill with ease. Here’s a quick guide so you can gather everything ahead of time and keep the process smooth from start to finish.
Essential Tools
- Stand mixer or hand mixer
Either one works perfectly for whipping the cream cheese and peanut butter into that smooth, fluffy base. - Mixing bowls
You’ll need one for the cheesecake mixture and another heatproof bowl for melting the chocolate. - Parchment-lined baking sheet
This keeps the bites from sticking and makes it easy to transfer them in and out of the freezer. - Cookie scoop or tablespoon
Helps you portion the cheesecake mixture into evenly sized bites without the mess. - Fork or dipping tool
A simple fork is great for dipping the firm cheesecake balls into melted chocolate and letting the excess drip off. - Microwave or double boiler
Either method works for melting chocolate. Use whatever you’re most comfortable with. - Freezer and refrigerator
Essential for setting the bites at different stages so you get the best texture.
Helpful Extras
- Silicone spatula
Great for scraping down bowls and keeping every bit of the mixture together. - Cooling rack
Optional, but can be handy if you want extra airflow around the bites while they set. - Small bowl for toppings
Makes sprinkling the crushed honey-roasted peanuts quick and tidy.
With these tools on hand, the whole recipe feels effortless. Once you’ve got everything gathered, you’re ready to glide into the next stage of the process.
Troubleshooting Common Issues
Even though these Chocolate-Dipped Peanut Butter Cheesecake Bites are simple to make, little hiccups can happen. No stress — here’s a quick guide to help you fix anything that pops up so your bites come out smooth, creamy, and beautifully coated every time.
The cheesecake mixture feels too soft to shape
- Pop the bowl into the fridge for 15 to 20 minutes.
Chilling helps firm up the mixture so it’s easier to scoop and roll. - Check that your cream cheese was softened but not overly warm.
The bites are sticking to your hands while shaping
- Lightly chill your hands under cold water and dry them before rolling.
- Use a small cookie scoop to portion, then gently round the tops instead of rolling full balls.
The cheesecake balls fall apart during dipping
- They weren’t frozen long enough. Give them another 30 to 45 minutes in the freezer.
- Work with only 3 to 4 bites at a time so they stay firm while dipping.
The chocolate looks thick or clumpy
- It may have overheated. Add a teaspoon of coconut oil or gently rewarm using a double boiler to smooth it out.
- Stir frequently while melting to maintain an even temperature.
Chocolate cracks after setting
- This happens when the bites are too cold and the chocolate is too hot. Let the bites sit out for 2 to 3 minutes before dipping.
Toppings won’t stick
- Sprinkle your crushed peanuts immediately after dipping.
If the chocolate starts setting, the toppings won’t adhere.
The bites don’t set or feel too soft
- Make sure the final chill is at least 20 to 30 minutes.
- If storing at room temperature too long, the cheesecake center will soften — keep them refrigerated until serving.
FAQs
Here are some quick answers to the questions people most often have when making these Chocolate-Dipped Peanut Butter Cheesecake Bites. Consider this your little cheat sheet for smooth, stress-free dessert making.
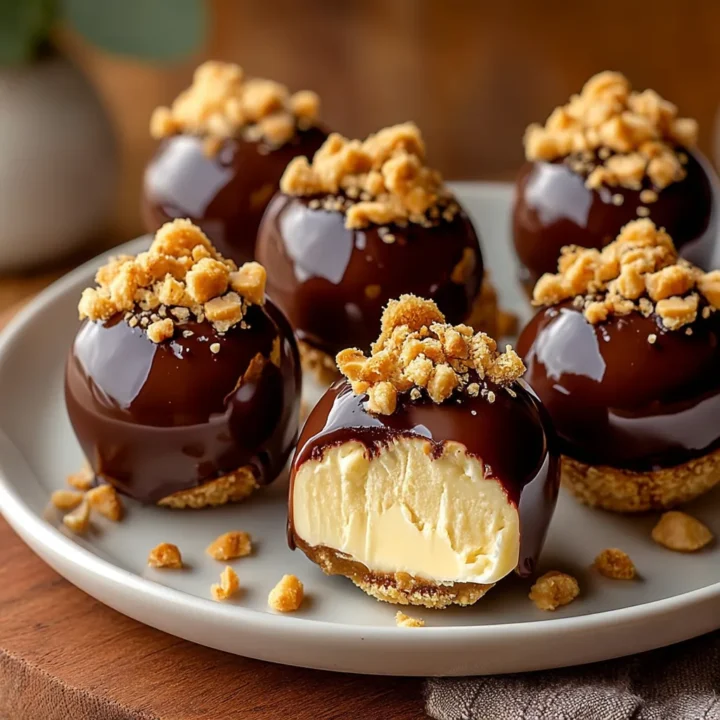
Chocolate-Dipped Peanut Butter Cheesecake Bites
If you’re anything like me, you appreciate a dessert that feels impressive without demanding a whole afternoon in the kitchen. These Chocolate-Dipped Peanut Butter Cheesecake Bites check every one of those boxes, and then some.
Ingredients
Cheesecake Base:
- 16 oz cream cheese, softened
- 1 cup natural peanut butter (honey-sweetened if available)
- ½ tbsp vanilla extract
Chocolate Coating:
- 12 oz semi-sweet chocolate (chips or chopped bars)
- ½ cup honey-roasted peanuts, finely crushed
Instructions
1. Make the Cheesecake Base
- Add softened cream cheese, peanut butter, and vanilla to a stand mixer or use a hand mixer.
- Beat until the mixture becomes smooth, fluffy, and fully combined.
2. Shape and Freeze
- Line a baking sheet with parchment paper.
- Scoop the mixture into 2-tablespoon portions and shape into balls.
- Place on the sheet and freeze for 1 to 2 hours until firm.
3. Melt the Chocolate
- Add chocolate to a heatproof bowl.
- Melt using a double boiler or in microwave bursts, stirring until smooth and glossy.
4. Dip and Coat
- Remove a few cheesecake balls from the freezer at a time.
- Dip each ball into the melted chocolate using a fork, letting excess drip off.
- Return to the parchment and sprinkle with crushed peanuts before the chocolate sets.
5. Chill and Serve
- Refrigerate the dipped bites until completely set.
- Serve chilled or lightly softened for a creamier bite.
Notes
- Freeze thoroughly before dipping so the balls don’t crumble or melt into the chocolate.
- Work in small batches to keep each bite firm during dipping.
- If your chocolate thickens, rewarm gently over simmering water or microwave in short bursts.
- Customize easily: use white chocolate, dark chocolate, or swap the peanut topping for coconut, sprinkles, or crushed cookies.
- Store in the fridge for up to 5 days or freeze for up to 2 months.
Nutrition Information:
Yield: 24 Serving Size: 1Amount Per Serving: Calories: 180Total Fat: 12gSaturated Fat: 5gSodium: 85mgCarbohydrates: 14gFiber: 1gSugar: 10gProtein: 5g