




If you’re craving a quick, creamy dessert that feels special without turning on the oven, these No Bake Mini Peanut Butter Cheesecakes are about to become your new go-to treat. I love that they hit that perfect balance of smooth peanut butter filling, rich chocolate, and a classic graham cracker crust… all in bite-sized form. They’re the kind of chilled dessert you can whip up for parties, late-night cravings, or those moments when you want something sweet but low-effort.
You know how some no-bake recipes feel more like shortcuts than real desserts? Not here. These mini cheesecake bites deliver full cheesecake energy with zero fuss, and you can make them ahead without stressing about cracking, baking times, or water baths. Plus, if you’re a chocolate-and-peanut-butter fan (same), the flavor is incredibly satisfying for such a simple recipe.
Whether you’re hosting, gifting, or just treating yourself, these little cups are fun, versatile, and surprisingly elegant. Let’s get into it.
Key Benefits and Why You’ll Love This Recipe
If you’re into easy no bake desserts that still feel impressive, these mini peanut butter cheesecakes check every box. They’re creamy, chocolatey, and surprisingly quick to pull together, which makes them perfect for anyone who wants a crowd-pleasing treat without the usual cheesecake stress. Think of them as tiny, chilled bites of peanut butter bliss.
Here’s why they’re such a win:
- Zero baking required. No oven, no water bath, no worrying about cracks. Just mix, chill, and enjoy.
- Fast and beginner friendly. The steps are simple, the ingredients are familiar, and the process is super forgiving.
- Bite-sized perfection. Mini cheesecakes are ideal for parties, potlucks, or when you want built-in portion control.
- That classic chocolate and peanut butter combo. The smooth peanut butter filling paired with a glossy chocolate topping makes each bite irresistible.
- Make-ahead convenience. They chill beautifully, so you can prepare them the night before and have dessert totally handled.
If you’ve ever wanted a no bake peanut butter cheesecake that tastes bakery-worthy but doesn’t take all afternoon, this recipe delivers exactly that. Sweet, simple, and guaranteed to disappear fast.
Ingredients
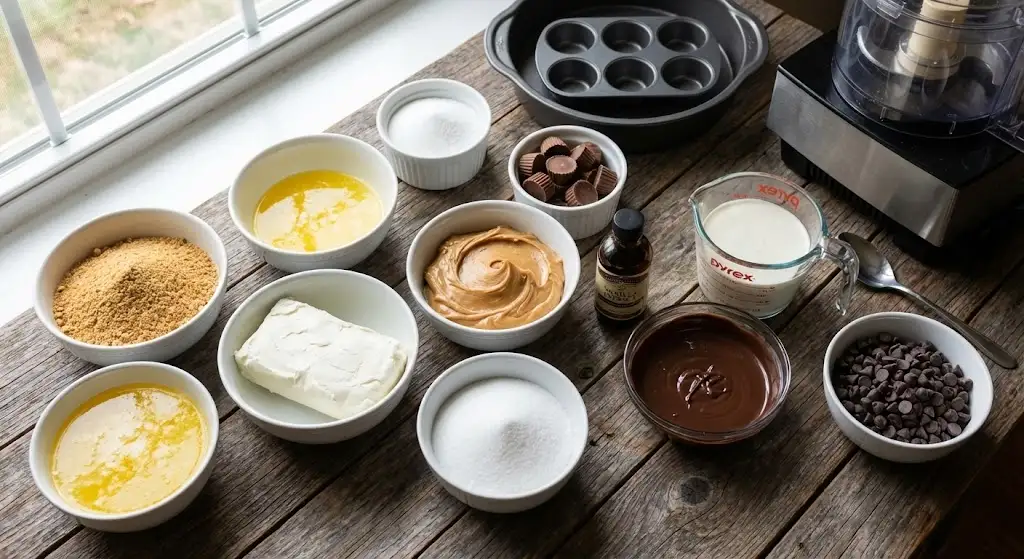
Before you dive in, here’s everything you’ll need to make these mini peanut butter cheesecake bites. The list is short, the ingredients are easy to find, and each one plays a role in giving you that smooth, creamy, no bake texture.
For the Crust
- 1 sleeve (9 cookies) graham crackers
- 4 tbsp (57 g) unsalted butter, melted
For the Cheesecake Filling
- 8 oz (227 g) cream cheese, room temperature
- ⅓ cup (90 g) creamy peanut butter
- ½ cup (100 g) granulated sugar
- 1 tsp vanilla extract
- ⅔ cup (157 ml) heavy cream
- 4 oz (113 g) semisweet chocolate, melted and cooled
For the Topping
- ½ cup (85 g) semisweet chocolate chips
- ¼ cup (58 g) heavy cream
- Mini peanut butter cups
Instructions
Let’s walk through this step by step so your no bake mini peanut butter cheesecakes come out smooth, firm, and absolutely gorgeous. Nothing tricky here, just a little mixing, chilling, and layering.
1. Make the Crust
- Grease a mini cheesecake pan so the crusts release cleanly later.
- Pulse the graham crackers in a food processor until you have fine, sandy crumbs.
- Pour in the melted butter and pulse again until the mixture looks evenly moistened.
- Add about one heaping tablespoon of crust mixture into each cavity. Use the back of a spoon or a shot glass to press it down firmly.
- Set the pan aside while you prep the filling.
2. Make the Cheesecake Filling
- In a large bowl, beat the cream cheese, peanut butter, and sugar until the mixture turns smooth and creamy.
- Add the vanilla and heavy cream, then continue beating until it thickens slightly.
- Pour in the cooled, melted chocolate and mix until everything is fully combined.
- Spoon the filling over the crusts, smoothing out the tops.
- Cover the pan with plastic wrap and refrigerate for at least 4 hours or overnight so they firm up nicely.
3. Prepare the Chocolate Topping
- Add the chocolate chips to a heatproof bowl.
- Warm the heavy cream in a small saucepan just until it begins to simmer.
- Pour the hot cream over the chocolate chips and let it sit for about 3 minutes.
- Stir until the ganache becomes smooth and glossy.
4. Assemble and Serve
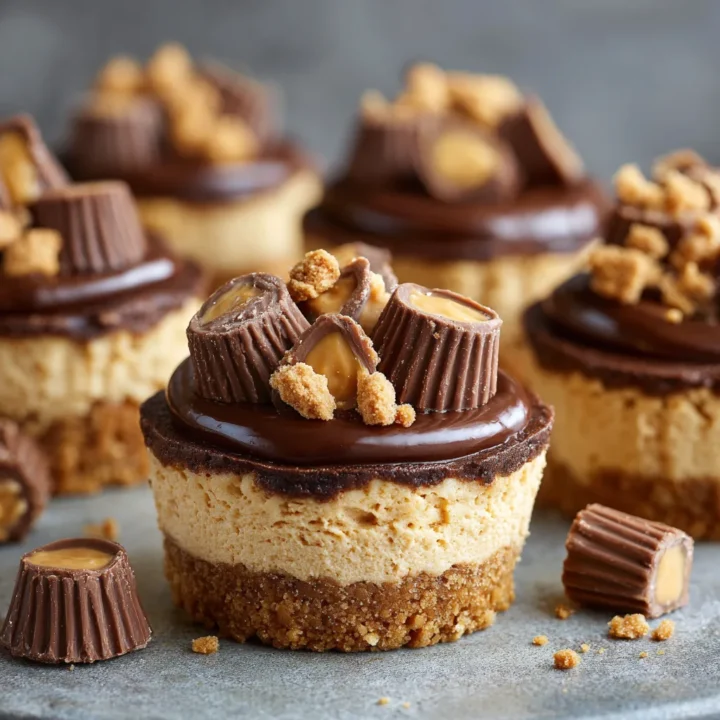
- Spoon the chocolate ganache over each chilled mini cheesecake, letting it drip a little down the sides for that pretty finish.
- Top each one with a mini peanut butter cup.
- Chill until ready to serve. They keep well for up to two days in the fridge.
Pro Tips and Variations
Think of this section as your shortcut to making these mini peanut butter cheesecake bites taste even better and look even sharper. A few tiny tweaks can make a big difference, especially with no bake desserts.
Pro Tips
- Use room-temperature cream cheese. Cold cream cheese won’t blend smoothly and can leave your filling lumpy. Let it soften for the creamiest texture.
- Chill long enough. Four hours is the minimum, but overnight gives you the firmest, cleanest edges when you remove them from the pan.
- Press the crust firmly. A tight, compact crust keeps your cheesecakes from crumbling when you lift them out.
- Don’t overmix the filling. Once the mixture starts to thicken, stop. Overbeating can cause it to loosen again.
- Let the melted chocolate cool. Warm chocolate can affect the texture of your filling, so make sure it’s just slightly warm or fully cooled before adding.
Variations
- Swap the crust. Try chocolate wafer cookies, peanut butter cookies, or even Oreos for a richer base.
- Add mix-ins. Fold in crushed peanut butter cups or chopped peanuts for extra texture.
- Go lighter or richer. Use whipped topping instead of heavy cream for a fluffier filling, or dark chocolate for a more intense chocolate layer.
- Make it nut-free. Substitute sunflower seed butter for the peanut butter. It still gives you a creamy, no bake filling with a similar flavor vibe.
- Turn them into freezer treats. Freeze the finished cheesecakes for a cold, ice cream-style bite that’s perfect in warm weather.
Serving and Pairing Suggestions
These no bake mini peanut butter cheesecakes are already a showstopper on their own, but pairing them thoughtfully can take your dessert game to a whole new level. Think of this as the fun part, where you get to play with flavors, textures, and presentation.
How to Serve
- Chilled and firm. These bites shine when they’re cold, so keep them refrigerated until the moment you’re ready to serve.
- Add a finishing touch. A drizzle of extra chocolate, a sprinkle of crushed peanuts, or a tiny swirl of peanut butter can make them look bakery-worthy.
- Create a dessert board. Arrange them with chocolate-covered pretzels, mini cookies, fresh berries, and peanut butter cups for an easy party spread.
What to Pair Them With
- Fresh fruit. Strawberries or raspberries cut through the richness and add a bright, refreshing contrast.
- Coffee or espresso. The bitterness pairs beautifully with the sweet, creamy filling.
- Cold milk. Classic, simple, and perfect if you’re going for nostalgic comfort.
- Vanilla or chocolate ice cream. For a more indulgent dessert plate, serve each cheesecake bite with a small scoop on the side.
- Salted snacks. Think pretzels, salted peanuts, or even kettle chips. The sweet-salty combo is ridiculously good.
Tools and Equipment Guide
You don’t need anything fancy to make these mini no bake peanut butter cheesecakes, but having the right tools on hand will make the process smoother and the results cleaner. Here’s a quick guide to what you’ll actually use and why it matters.
Essential Tools
- Mini cheesecake pan. This gives you that perfect shape and makes removing each cheesecake much easier than a standard muffin tin. If you only have a muffin tin, use liners so they pop out cleanly.
- Food processor. Ideal for turning graham crackers into fine crumbs in seconds. If you don’t have one, a zip-top bag and rolling pin work too.
- Electric mixer. A hand mixer or stand mixer helps you whip the filling until it’s smooth, creamy, and slightly thickened.
- Heatproof bowl. Needed for melting chocolate and making the ganache topping.
- Small saucepan. Just for warming the heavy cream for the topping.
- Measuring cups and spoons. Accuracy matters, especially with no bake desserts where structure comes from ratios, not heat.
- Spoon or small spatula. Helps you smooth the filling and spread the ganache evenly.
- Shot glass or tamper. Perfect for pressing the crust firmly into each cavity.
Helpful Extras
- Plastic wrap. Keeps the cheesecakes from absorbing fridge odors while they chill.
- Offset spatula. If you have one, it makes smoothing the tops a breeze.
- Cooling rack. Placing the pan on a rack can make lifting and moving it easier once filled.
Troubleshooting Common Issues
No bake desserts are generally forgiving, but every now and then something doesn’t go quite as planned. Here’s a quick guide to help you troubleshoot any hiccups so your mini peanut butter cheesecake bites set properly and look polished.
If the Filling Seems Too Soft
- Not enough chilling time. These cheesecakes need at least 4 hours in the fridge, but overnight is ideal for a firm, clean set.
- Overmixed cream cheese. If the filling gets whipped too long, it can loosen. Mix just until thickened.
- Warm ingredients. Hot melted chocolate or cream that’s too warm can soften the mixture. Let everything cool before combining.
If the Crust Crumbles
- Not pressed firmly enough. Take a moment to really pack the crust down using a spoon or shot glass.
- Too few crumbs. Make sure the graham crackers are processed finely so the butter binds them properly.
If the Cheesecakes Stick to the Pan
- Pan not greased. A light greasing helps a lot.
- Not chilled long enough. A well-chilled cheesecake pops out much more cleanly.
- Using a muffin tin without liners. If you don’t have a mini cheesecake pan, liners are essential.
If the Ganache Splits or Looks Grainy
- Overheated cream. The cream should be hot but not boiling.
- Stirred too early. Letting the chocolate sit under the cream for a couple of minutes helps it melt gently.
- Under-mixed. Keep stirring until it turns glossy and smooth.
If the Cheesecakes Taste Too Sweet
- Use darker chocolate. Semisweet can be swapped for dark chocolate for more balance.
- Add a pinch of salt. Salt enhances peanut butter flavor and tones down sweetness.
FAQs
Here are the most common questions people have about making no bake mini peanut butter cheesecakes, along with simple, practical answers to help you get the best results every time.
No Bake Mini Peanut Butter Cheesecakes
If you’re into easy no bake desserts that still feel impressive, these mini peanut butter cheesecakes check every box. They’re creamy, chocolatey, and surprisingly quick to pull together, which makes them perfect for anyone who wants a crowd-pleasing treat without the usual cheesecake stress.
Ingredients
Crust:
- 1 sleeve (9 cookies) graham crackers
- 4 tbsp (57 g) unsalted butter, melted
Cheesecake Filling:
- 8 oz (227 g) cream cheese, room temperature
- ⅓ cup (90 g) creamy peanut butter
- ½ cup (100 g) granulated sugar
- 1 tsp vanilla extract
- ⅔ cup (157 ml) heavy cream
- 4 oz (113 g) semisweet chocolate, melted and cooled
Topping:
- ½ cup (85 g) semisweet chocolate chips
- ¼ cup (58 g) heavy cream
- Mini peanut butter cups
Instructions
1. Make the Crust
- Grease a mini cheesecake pan.
- Pulse graham crackers into fine crumbs using a food processor.
- Add melted butter and blend until evenly moistened.
- Press about 1 heaping tablespoon into each cavity and compact firmly.
- Set aside.
2. Make the Cheesecake Filling
- Beat cream cheese, peanut butter, and sugar until smooth.
- Add vanilla and heavy cream; beat until slightly thickened.
- Mix in cooled melted chocolate.
- Spoon filling into each cavity and smooth the tops.
- Cover and chill at least 4 hours or overnight.
3. Prepare the Chocolate Topping
- Add chocolate chips to a heatproof bowl.
- Heat heavy cream until just simmering; pour over the chocolate.
- Let sit 3 minutes, then stir until silky and smooth.
4. Assemble
- Spoon ganache over each chilled mini cheesecake.
- Garnish with a mini peanut butter cup.
- Chill until serving.
Notes
- For the cleanest texture: Let the melted chocolate cool fully before adding it to the filling.
- For a firmer set: Chill overnight; no bake cheesecakes strengthen with time.
- Crust alternatives: Swap graham crackers for Oreos, chocolate wafers, or peanut butter cookies.
- Use liners if not using a mini cheesecake pan: This ensures a smooth release.
- Freezer-friendly option: Freeze without the ganache, then top after thawing.
Nutrition Information:
Yield: 12 Serving Size: 1Amount Per Serving: Calories: 285Total Fat: 20gSaturated Fat: 10gSodium: 115mgCarbohydrates: 23gFiber: 1gSugar: 17gProtein: 5g