




There’s something almost magical about watching simple sugar transform into a glossy, amber-gold sauce—don’t you think? This homemade salted caramel sauce is one of those recipes that feels luxurious yet comes together with just a few pantry staples. If you’ve ever wondered how bakeries achieve that silky, rich caramel drizzle on cakes and desserts, you’re about to learn the secret right in your own kitchen.
What I love most about this recipe is its incredible versatility. Whether you’re drizzling it over warm brownies, swirling it into your morning coffee, or gifting it in a little jar, this sweet-salty creation instantly elevates anything it touches. And yes—once you make it from scratch, you may never go back to store-bought again.
Don’t worry if caramel has intimidated you before. With the right tips and a little patience, the whole process becomes surprisingly approachable. By the time you reach that perfect deep amber color, you’ll feel like a pro—and your kitchen will smell absolutely irresistible.
Ready to make a sauce that’s every bit as impressive as it is comforting? Let’s dive in.
Why You’ll Love This Salted Caramel Sauce
If you’ve ever wished for a simple way to elevate everyday desserts, this salted caramel sauce is exactly the kind of kitchen magic you’ll fall in love with. One of the biggest benefits of making caramel at home is that you’re in full control—the flavor, the thickness, the saltiness—all tailored to your taste. And the best part? You only need a handful of basic ingredients to create a sauce that tastes like it came straight from a bakery.
This recipe is especially great for beginners because it uses the dry caramel method, meaning you’re melting sugar on its own before adding butter and cream. It may sound intimidating, but once you understand how sugar behaves, you’ll find it surprisingly approachable. As the sugar melts and turns into a deep amber color, the transformation feels almost magical—and the aroma is even better.
Here’s why this recipe stands out and why you’ll keep coming back to it:
- Simple ingredients, big flavor: Granulated sugar, butter, cream, and sea salt come together to create a sauce with a rich, buttery depth you can’t get from store-bought versions.
- Versatility at its best: Drizzle it over ice cream, swirl it into coffee, spoon it onto cakes, or dip sliced apples for a quick treat.
- A perfect sweet-salty balance: The sea salt enhances the caramel’s natural sweetness, creating a warm, comforting flavor that complements countless desserts.
- Beginner-friendly technique: With just a little patience and attention to color cues, you can master the caramelization process on your first try.
Whether you’re making this for a special occasion or keeping a jar in the fridge for spontaneous cravings, this sauce brings a touch of indulgence to everything it touches. And once you taste its smooth, glossy texture, you’ll understand why homemade caramel has such a devoted fan base.
Ingredients
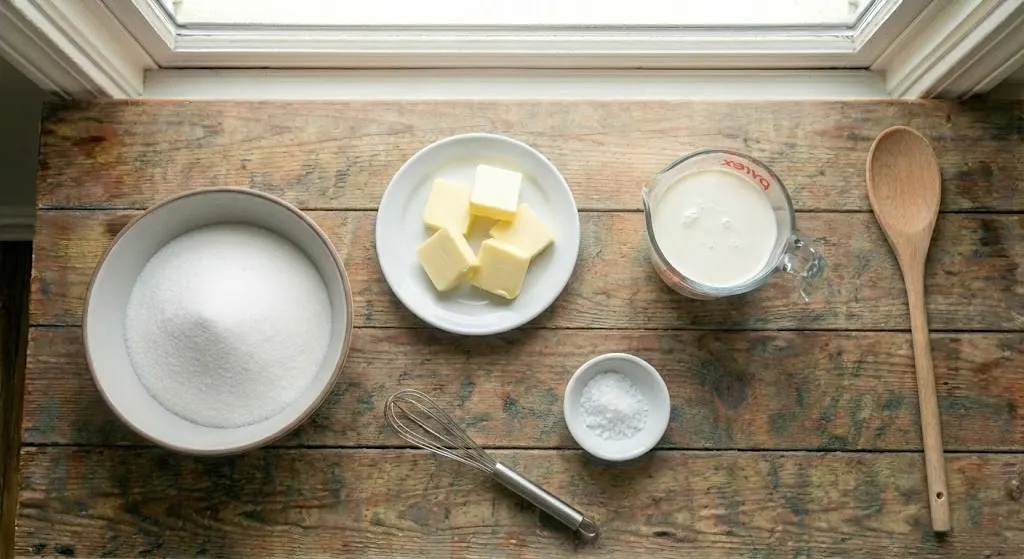
Before you start caramelizing, gather everything you need—caramel moves quickly, so having your ingredients ready makes all the difference. Each component plays a key role in creating that silky, glossy caramel sauce with a perfect sweet-salty balance.
What You’ll Need:
- 1 cup white sugar – This is the base of your caramel. As it melts and darkens, it creates that signature amber color and deep flavor.
- 5 tablespoons butter, sliced – Adds richness and helps create a smooth, velvety consistency. Using slices allows it to melt more evenly.
- ½ cup heavy cream – Gives the caramel its creaminess and helps thin the melted sugar into a pourable sauce.
- 1 tablespoon heavy cream – Added for the perfect finishing texture.
- 1 pinch sea salt (or to taste) – Enhances the flavor and balances sweetness, turning a simple caramel into a salted caramel sauce.
Quick Tip:
Measure everything in advance and keep it close. Once the sugar reaches that deep amber color, you’ll need to move smoothly through each step for the best results.
Instructions
Making caramel is all about timing and confidence, and this step-by-step guide will walk you through the process like we’re standing together at your stovetop. Stay patient, watch the color closely, and you’ll end up with a beautifully smooth homemade salted caramel sauce.
1. Melt the Sugar
Add the white sugar to a heavy-bottomed saucepan and set it over medium-high heat. Stir continuously as the sugar begins to clump, melt, and slowly turn into a clear liquid. This stage takes a few minutes, so keep the sugar moving to prevent scorching.
2. Let It Darken
Once the sugar has fully melted, stop stirring. Allow it to cook undisturbed until it deepens into a rich amber color and starts to release a faint, smoky aroma. This transformation can happen quickly—usually within 3 to 8 minutes—so stay close.
3. Add the Butter
Remove the pan from the heat and wait about 30 seconds. Then whisk in the sliced butter. The mixture will bubble up vigorously, which is normal. Keep whisking until the butter is fully melted and incorporated.
4. Pour in the Cream
Slowly drizzle in the ½ cup plus 1 tablespoon of heavy cream while whisking. The caramel will steam and rise again, so pour carefully. Continue whisking until the sauce becomes smooth and glossy.
5. Season with Salt
Stir in a pinch of sea salt, adjusting to your preferred level of sweetness and saltiness. This small step transforms your caramel into the perfect sweet-salty topping.
6. Cool and Store
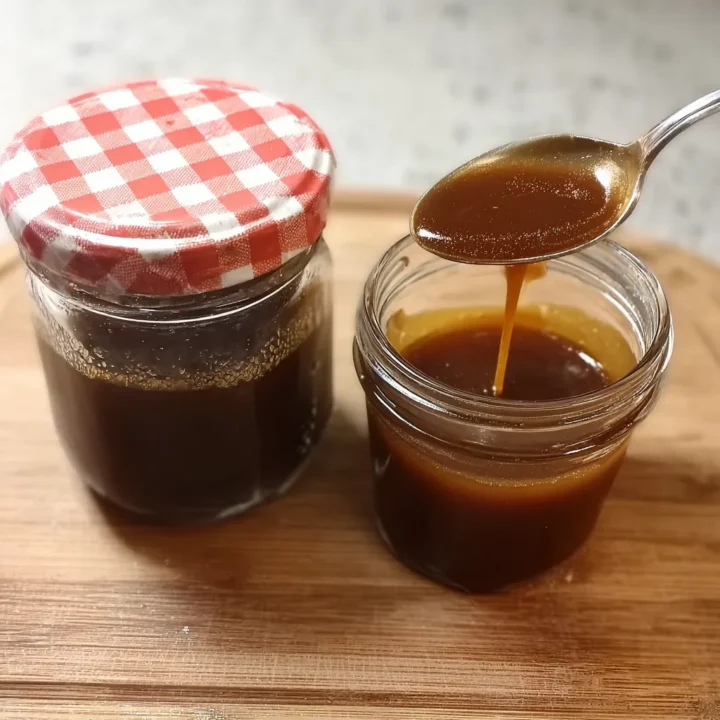
Transfer the sauce to a heat-resistant jar and let it cool completely before refrigerating. As it chills, it will thicken into a luscious, spoonable consistency—ideal for drizzling over desserts or stirring into coffee.
Take your time with each step, trust your senses, and enjoy the reward: a rich, silky caramel sauce you’ll want to make again and again.
Pro Tips and Variations
Mastering caramel is all about understanding the small details that make a big difference. These tips will help you achieve a smooth, glossy sauce every time while giving you fun variations to try when you’re ready to get creative.
Pro Tips for Perfect Salted Caramel Sauce
- Use a heavy-bottomed saucepan:
This ensures even heat distribution and prevents hot spots that can burn the sugar. - Watch the color—not the clock:
Caramel changes rapidly. Look for a deep amber shade rather than relying on exact timing. - Don’t walk away:
Sugar can go from perfect to burnt in seconds. Stay close during the caramelization stage. - Have all ingredients ready:
Once the sugar melts, things move fast. Measured butter and cream help you work confidently and safely. - If the sauce looks lumpy:
Keep whisking gently. Any hardened bits of sugar will usually melt back into the mixture. - Let the sauce cool before judging thickness:
Caramel thickens significantly as it cools, so avoid adding extra cream too early.
Flavor Variations to Try
- Vanilla Salted Caramel:
Stir in 1 teaspoon of vanilla extract after removing the caramel from the heat. - Bourbon Caramel Sauce:
Add 1–2 teaspoons of bourbon for a warm, aromatic depth. - Maple Salted Caramel:
Replace 2 tablespoons of sugar with pure maple syrup for a subtle, earthy sweetness. - Spiced Caramel:
Add a pinch of cinnamon, nutmeg, or cardamom for a cozy flavor twist. - Extra Salty Caramel:
Finish with flaky sea salt for a bold sweet-salty contrast.
Whether you’re keeping it classic or experimenting with new flavors, these tips ensure your caramel stays smooth, rich, and irresistibly delicious every single time.
Serving & Pairing Suggestions
One of the best things about homemade salted caramel sauce is how effortlessly it elevates even the simplest treats. Its rich, buttery flavor and silky texture make it a go-to topping for both everyday indulgences and special occasions. Here are some delicious ways to enjoy it:
Delicious Ways to Serve Your Caramel
- Drizzle over ice cream:
A classic pairing that turns a basic scoop into an indulgent dessert. - Swirl into coffee or lattes:
Add a spoonful to your morning brew for a warm, café-style caramel moment. - Pour over brownies or chocolate cake:
The sweet-salty contrast enhances rich chocolate desserts beautifully. - Use as a dip for fruit:
Apple slices, bananas, and pears pair perfectly with the caramel’s deep amber flavor. - Layer in parfaits or trifles:
Adds a glossy, flavorful element without overpowering lighter components. - Finish breakfast treats:
Drizzle over pancakes, waffles, French toast, or oatmeal for a cozy upgrade.
Creative Pairing Ideas
- Salted caramel milkshake:
Blend a spoonful into vanilla ice cream and milk for a creamy treat. - Caramel popcorn:
Toss warm popcorn with a light drizzle for an irresistible movie-night snack. - Cheesecake topping:
A swirl of caramel adds richness without making the dessert overly sweet. - Gift-worthy jars:
Fill small jars with cooled caramel, add a ribbon, and gift them for holidays or celebrations.
This sauce is endlessly versatile, making it a staple worth keeping in your fridge. No matter how you serve it, each drizzle brings a warm, indulgent burst of flavor that feels like pure comfort.
Tools and Equipment Guide
Having the right tools on hand makes the caramel-making process smoother, safer, and far more enjoyable. Since caramel heats quickly and can bubble intensely, using reliable equipment ensures better control and consistent results. Here’s what you’ll want to gather before you start.
Essential Tools for Making Salted Caramel Sauce
- Heavy-bottomed saucepan:
This is the star of the show. A sturdy pan distributes heat evenly, helping prevent hot spots that can burn the sugar. - Heat-resistant whisk:
Perfect for incorporating the butter and cream smoothly into the melted sugar. - Silicone or wooden spatula:
Helps stir the caramel gently in the early melting stage without scratching your pan. - Measuring cups and spoons:
Accuracy matters when working with caramel, especially when balancing sweetness and texture. - Heatproof jar or container:
Ideal for storing the finished caramel. Glass jars work especially well because they handle heat and seal tightly. - Oven mitts or heat-resistant gloves:
Caramel can bubble vigorously when adding cream—protecting your hands is a must.
Helpful Extras (Optional but Useful)
- Candy thermometer:
Not required for this recipe, but helpful if you like precision. Aim to keep the caramel between 320°F and 350°F for optimal color and flavor. - Silicone mat or trivet:
Gives you a safe place to set your hot saucepan without damaging your counters. - Small pitcher or spouted container:
Makes pouring the finished caramel cleaner and easier.
With these tools ready and within reach, you’ll feel more confident—and more in control—through each stage of caramelization. The right equipment doesn’t just make cooking easier; it also ensures your homemade salted caramel sauce turns out perfectly smooth and irresistibly glossy every time.
Troubleshooting Common Issues
Caramel can be a little unpredictable, even for experienced cooks—but don’t worry. Most problems have simple solutions. Here’s a friendly guide to help you understand what might go wrong and how to fix it, so you can enjoy a smooth, glossy salted caramel sauce every time.
Why Did My Caramel Crystallize?
Crystallization happens when sugar molecules cling together instead of melting smoothly.
Possible causes:
- Stirring too aggressively after the sugar melts
- Using a pan with residue or impurities
- Sugar crystals forming on the sides of the saucepan
How to fix or prevent it:
- Use a clean, dry pan.
- Swirl the pan gently instead of stirring once the sugar has melted.
- If crystals appear on the sides, brush them down with a damp pastry brush.
- If your caramel becomes grainy, keep it on low heat and whisk until smooth again—most crystals will melt back in.
Why Did My Caramel Burn?
Caramel burns quickly because melted sugar becomes extremely hot.
Possible causes:
- Heat was too high
- Walking away during the caramelization stage
- Waiting too long after reaching the amber color
How to prevent it:
- Watch the color instead of relying on a timer.
- Reduce the heat slightly once the sugar melts.
- The moment it reaches a deep amber, remove it from the heat—caramel continues to darken even off the stove.
If it’s already burnt:
Unfortunately, burnt caramel can’t be salvaged. It’s best to start fresh to avoid bitterness.
Why Is My Caramel Too Thin or Too Thick?
The consistency changes as the caramel cools, so always judge texture at room temperature.
If it’s too thin:
- Simmer the sauce for 1–2 minutes to evaporate extra moisture.
- Add a touch more melted sugar if needed (rarely necessary).
If it’s too thick:
- Stir in 1–2 teaspoons of warm heavy cream at a time until it loosens.
Why Is My Caramel Lumpy?
Lumps typically form when the sugar cools too quickly during butter or cream addition.
How to fix it:
- Keep whisking gently over low heat.
- Most lumps will dissolve as the caramel warms and smooths out.
Why Did My Caramel Separate?
Separation happens when the fat and sugar don’t emulsify properly.
Common causes:
- Adding butter or cream too quickly
- Temperature shock (cold ingredients hitting extremely hot sugar)
Solutions:
- Bring butter and cream to room temperature before starting.
- Add both slowly while whisking continuously.
FAQs
Here are some of the most common questions home cooks ask when making salted caramel sauce, along with clear, confidence-boosting answers to help you get perfect results every time.
Salted Caramel Sauce
If you’ve ever wished for a simple way to elevate everyday desserts, this salted caramel sauce is exactly the kind of kitchen magic you’ll fall in love with.
Ingredients
- 1 cup white sugar
- 5 tablespoons butter, sliced
- ½ cup heavy cream
- 1 tablespoon heavy cream
- 1 pinch sea salt (or to taste)
Instructions
- Melt the Sugar: Add the sugar to a heavy-bottomed saucepan over medium-high heat. Stir continuously until the sugar melts completely and turns into a clear liquid.
- Caramelize: Stop stirring and let the melted sugar cook until it reaches a deep amber color and begins to lightly smoke.
- Add Butter: Remove from heat and let the caramel rest for 30 seconds. Whisk in the sliced butter until fully melted and combined.
- Add the Cream: Slowly pour in the ½ cup plus 1 tablespoon of heavy cream while whisking. Expect bubbling—this is normal.
- Salt & Finish: Add a pinch of sea salt and stir until the sauce is smooth and glossy.
- Cool & Store: Transfer to a heatproof jar and allow the caramel to cool before refrigerating. It will thicken as it chills.
Notes
- Watch the color: The amber shade tells you more than the cooking time.
- Use room-temperature cream and butter: Helps prevent separation.
- If caramel crystallizes: Gently heat while whisking until smooth again.
- Adjust salt to taste: Start small—you can always add more.
- Caramel thickens as it cools: Warm slightly before serving if needed.
Nutrition Information:
Yield: 12 Serving Size: 1Amount Per Serving: Calories: 135Total Fat: 7.5gSaturated Fat: 4.8gCarbohydrates: 17.5gSugar: 17gProtein: 0.2g