




If you love easy, crowd-pleasing desserts that never fail, this Pudding Poke Cake Recipe is about to become a new favorite in your kitchen. There’s something almost magical about pouring creamy instant pudding over a warm cake and watching it soak into every little pocket—creating the most tender, moist, and irresistible bite. It’s the kind of dessert you can make with simple ingredients you probably already have, yet it tastes like something you’d bring to a special gathering or potluck.
Have you ever wished for a dessert that’s effortless enough for busy weeknights but impressive enough for parties? That’s exactly why poke cakes have become so popular. They’re customizable, beginner-friendly, and offer endless flavor combinations—from classic chocolate pudding to fun twists like butterscotch, pistachio, or banana. And the best part? The refrigerator does most of the work.
Whether you’re looking for a nostalgic treat, a no-stress dessert for a crowd, or just a fun way to elevate a boxed cake mix, this creamy, chilled poke-and-pour cake delivers every time. Let’s dive into how to make it perfectly soft, flavorful, and melt-in-your-mouth delicious.
Key Benefits & Why You’ll Love This Recipe
If you’re searching for a dessert that’s effortlessly delicious and guaranteed to impress, this Pudding Poke Cake Recipe checks every box. It’s the kind of treat you whip up once and instantly add to your “go-to” list because it’s simple, nostalgic, and always turns out incredibly moist thanks to the creamy pudding that sinks into every hole.
Here’s why this cake becomes a favorite for home bakers of all skill levels:
- It’s unbelievably moist and creamy.
Pouring pudding over a warm cake creates a soft, melt-in-your-mouth texture you won’t get from a standard boxed cake. - Beginner-friendly and stress-free.
No fancy techniques here—just bake, poke, pour, and chill. Even if you’re new to baking, this recipe gives you consistent, no-fail results. - Customizable with endless flavor combinations.
Whether you love classic chocolate pudding, vanilla, banana, pistachio, or butterscotch, you can switch things up based on what you’re craving or what you already have in the pantry. - Perfect for parties, potlucks, and make-ahead desserts.
Since this is a chilled dessert, it’s easy to prep the night before. The longer it rests, the better the flavors come together. - Made with simple ingredients.
A boxed cake mix, instant pudding, milk, and a few basics—nothing complicated, but the results taste like a bakery-style dessert.
And the best part? This poke-and-pour method infuses every slice with rich, creamy pudding, giving you that signature soft texture the dessert is known for. If you love easy dessert recipes, moist cakes, and family-friendly treats that disappear fast, this is one you’ll be making again and again.
Ingredients
Before you start baking, take a moment to gather everything you’ll need. One of the best things about this Pudding Poke Cake Recipe is how simple and accessible the ingredients are—most of them are pantry staples, and the rest are easy to find at any grocery store.
Cake Base
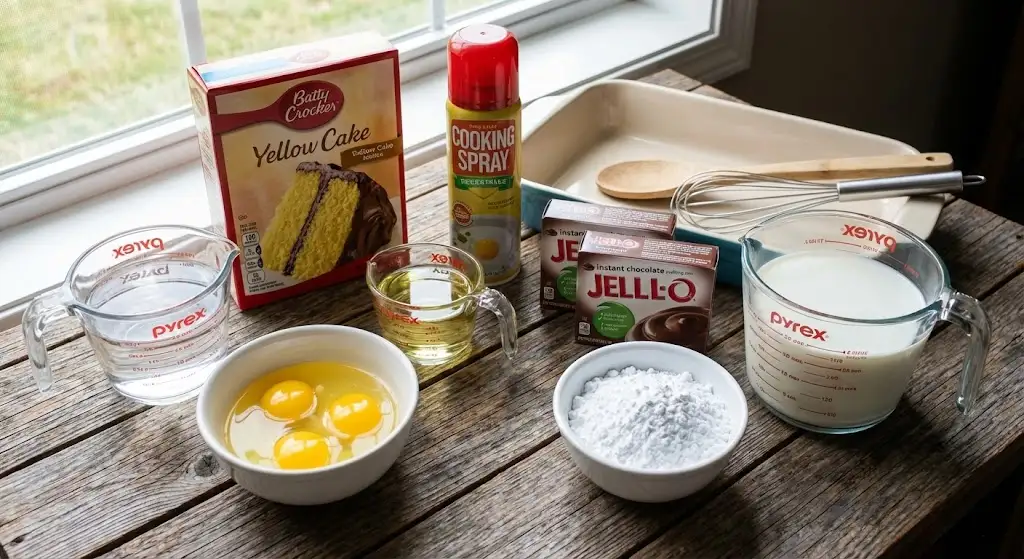
- 1 (15.25 oz) box yellow cake mix
- 1 cup water
- 3 large eggs
- ⅓ cup vegetable oil
Pudding Layer
- 2 (3.9 oz) packages instant chocolate pudding mix
- 1 cup confectioners’ sugar
- 4 cups milk
For the Pan
- Cooking spray (for greasing the 9×13-inch baking dish)
Optional Flavor Variations
If you’d like to switch things up, try pairing the cake mix with different pudding flavors:
- Yellow or white cake: butterscotch, pistachio, banana, coconut, or vanilla pudding
- Chocolate cake: chocolate, vanilla, or coconut pudding
Instructions
Making this Pudding Poke Cake is wonderfully simple, and the results are always impressive. Just follow these steps, and you’ll have a soft, creamy, chilled dessert ready to enjoy.
1. Prepare the Oven & Baking Dish
- Preheat your oven to 350°F (175°C).
- Lightly coat a 9×13-inch baking dish with cooking spray to prevent sticking and ensure an easy release later.
2. Make the Cake Batter
- In a large mixing bowl, combine the yellow cake mix, water, eggs, and vegetable oil.
- Mix on low speed for 30 seconds to bring everything together.
- Increase to medium speed and beat for 2 minutes until the batter is smooth and fluffy.
- Pour the batter into your prepared baking dish, spreading it evenly.
3. Bake the Cake
- Place the dish in the oven and bake for 21–25 minutes.
- To check for doneness, insert a toothpick into the center—if it comes out clean or with a few crumbs, the cake is ready.
- Remove the cake from the oven and keep it warm for the next step.
4. Create the Signature “Poke” Holes
- While the cake is still warm, use the rounded handle of a wooden spoon to poke holes across the entire surface.
- Space the holes about 1 inch apart and make sure each one reaches all the way to the bottom of the cake.
- This ensures the pudding seeps deeply into every bite, giving the cake its signature moist texture.
5. Prepare the Pudding Mixture
- In a clean bowl, whisk together the instant chocolate pudding mix and confectioners’ sugar.
- Gradually pour in the milk, stirring continuously.
- Mix on low speed for 1 minute—be careful not to overbeat, as the pudding should remain pourable at this stage.
6. Assemble the Poke Cake
- Immediately pour half of the pudding mixture over the warm cake, aiming for the holes so the pudding fills them evenly.
- Allow the remaining pudding to thicken for a few minutes.
- Once it reaches a soft, spoonable consistency, spread it gently over the top as a smooth, creamy layer.
7. Chill & Serve
- Refrigerate the cake for at least 1 hour to set the pudding completely.
- Slice, serve, and enjoy.
- Store any leftovers in the refrigerator—this cake tastes even better the next day as the flavors meld and the texture becomes even creamier.
Pro Tips and Variations
If you want to take your Pudding Poke Cake from delicious to unforgettable, these simple tips and creative variations will help you customize the dessert to your taste and guarantee perfect results every time.
Pro Tips for the Best Texture and Flavor
- Poke the holes while the cake is still warm.
Warm cake absorbs the pudding more effectively, giving you that ultra-moist, pudding-filled texture poke cakes are known for. - Make the holes deep and evenly spaced.
Use the handle of a wooden spoon and go all the way to the bottom of the cake. This ensures every slice gets an even distribution of pudding. - Avoid overmixing the pudding.
Beat it just until combined. Overmixing causes the pudding to thicken too quickly, making it harder to pour into the holes. - Let the cake chill long enough.
At least 1 hour is essential, but if you can wait longer, the results only get better. A fully chilled pudding cake slices more cleanly and tastes creamier. - Use whole milk for the richest consistency.
Lower-fat milks work, but whole milk creates a thicker, silkier pudding layer.
Flavor Variations to Try
If you enjoy experimenting in the kitchen, poke cakes offer endless flavor combinations. Try pairing different cake mixes with unique pudding flavors to create a dessert that suits any occasion.
With Yellow or White Cake:
- Butterscotch pudding
- Pistachio pudding
- Banana pudding
- Coconut pudding
- Vanilla pudding
With Chocolate Cake:
- Chocolate pudding for a rich, double-chocolate version
- Vanilla pudding for a classic contrast
- Coconut pudding for a tropical twist
Bonus Ideas
- Add a topping: Whipped cream, chocolate shavings, crushed cookies, or toasted coconut flakes give the cake a beautiful finish.
- Mix-ins: Fold a handful of mini chocolate chips or chopped nuts into the top pudding layer for added texture.
- Holiday variations: Use pistachio pudding with red sprinkles for Christmas, or banana pudding with vanilla wafers for a fun summer twist.
Serving & Pairing Suggestions
Once your Pudding Poke Cake has chilled and the pudding has fully set, you’ll have a creamy, dreamy dessert ready to serve. Here are a few ways to elevate each slice and pair it with complementary flavors for an unforgettable dessert experience.
How to Serve This Cake
- Serve it chilled for the best texture. The cold pudding layer adds a refreshing contrast to the soft cake.
- Cut clean slices using a warm knife. Run the blade under hot water, wipe it dry, and slice—this helps keep the pudding layer smooth.
- Add a finishing touch like whipped cream, a dusting of cocoa powder, or a sprinkle of chocolate shavings to make each piece look effortlessly elegant.
Drinks That Pair Beautifully
- Hot coffee or espresso: The bitterness of coffee complements the sweetness of the pudding and cake perfectly.
- Cold brew or iced coffee: Ideal for warmer days when you want a refreshing pairing.
- Milk: A classic, comforting match—especially if you go with a double-chocolate pudding version.
- Herbal or black tea: Light, soothing flavors that balance the richness of the dessert.
Add-On Toppings to Elevate Flavor
- Fresh berries (strawberries, raspberries, or blueberries)
- Caramel or chocolate drizzle
- Crushed cookies (Oreo, graham crackers, vanilla wafers)
- Chopped nuts for a little crunch
- Toasted coconut flakes for a tropical touch
Perfect Occasions for This Dessert
This make-ahead, crowd-pleasing cake fits beautifully into many events:
- Potlucks and family gatherings
- Holiday parties
- Birthdays
- Summer barbecues
- Weeknight desserts when you want something easy yet indulgent
Tools and Equipment Guide
One of the best things about this Pudding Poke Cake Recipe is that it doesn’t require any special or expensive equipment. With just a few basic kitchen tools, you’ll be able to mix, bake, poke, and chill your cake to pudding-soaked perfection. Here’s everything you’ll need to make the process smooth and stress-free.
Essential Tools
- 9×13-inch baking dish
This classic size helps the cake bake evenly and gives plenty of room for the pudding to seep into the holes. - Mixing bowls
You’ll need one for the cake batter and another for preparing the pudding mixture. - Electric mixer (hand or stand)
Helps you achieve a smooth cake batter and lump-free pudding without extra effort. - Measuring cups and spoons
Accurate measurements ensure the perfect texture for both the cake and pudding layers. - Wooden spoon (for poking holes)
The rounded handle is ideal for creating deep, evenly spaced holes for the pudding to fill. - Rubber spatula
Great for spreading the second layer of pudding smoothly across the top. - Toothpick
A simple but reliable tool for checking if the cake is fully baked.
For Chilling and Storing
- Refrigerator
Since poke cakes rely on chilled pudding to set properly, cooling is essential. A full hour (or more) in the fridge ensures the cake becomes extra moist and sliceable. - Airtight container or plastic wrap
Keeps the cake fresh if you’re making it ahead or storing leftovers.
Optional Tools
- Offset spatula for ultra-smooth pudding layers
- Fine mesh sieve if you want to dust the top with cocoa powder or confectioners’ sugar
- Decorating tools for adding whipped cream piping or fancy toppings
Troubleshooting Common Issues
Even with a simple dessert like a Pudding Poke Cake, a few small things can affect the final texture. Here’s how to avoid common hiccups and make sure your cake turns out creamy, moist, and picture-perfect every time.
The Pudding Didn’t Sink Into the Holes
Possible Cause:
The holes weren’t deep enough or the pudding was too thick.
Fix:
- Make sure you poke the holes while the cake is still warm.
- Use the handle of a wooden spoon and push all the way down to the bottom.
- If the pudding starts to thicken too quickly, add 1–2 tablespoons of milk to loosen it.
The Cake Turned Out Too Dense
Possible Cause:
Overmixing the batter or using cold ingredients.
Fix:
- Mix only as directed—30 seconds on low, 2 minutes on medium.
- Let eggs come to room temperature before mixing for a lighter, fluffier cake.
The Pudding Layer Became Lumpy
Possible Cause:
Pudding was overwhipped or milk was added too quickly.
Fix:
- Add the milk gradually while stirring.
- Beat on low speed for no longer than a minute to avoid thickening too fast.
The Cake Didn’t Set Properly
Possible Cause:
Not enough chilling time.
Fix:
- Chill for at least 1 hour, but 2–4 hours gives the best texture.
- If you’re serving for a party, prepare the cake the day before for perfect slices.
The Top Layer Looks Watery
Possible Cause:
Condensation from the refrigerator or under-mixed pudding.
Fix:
- Gently blot with a paper towel before serving.
- Next time, ensure the pudding is fully combined but not overbeaten.
The Cake Dried Out Overnight
Possible Cause:
Improper storage.
Fix:
- Always cover the cake tightly with plastic wrap or store it in an airtight container.
- Keep it refrigerated to preserve the creamy pudding texture.
FAQs
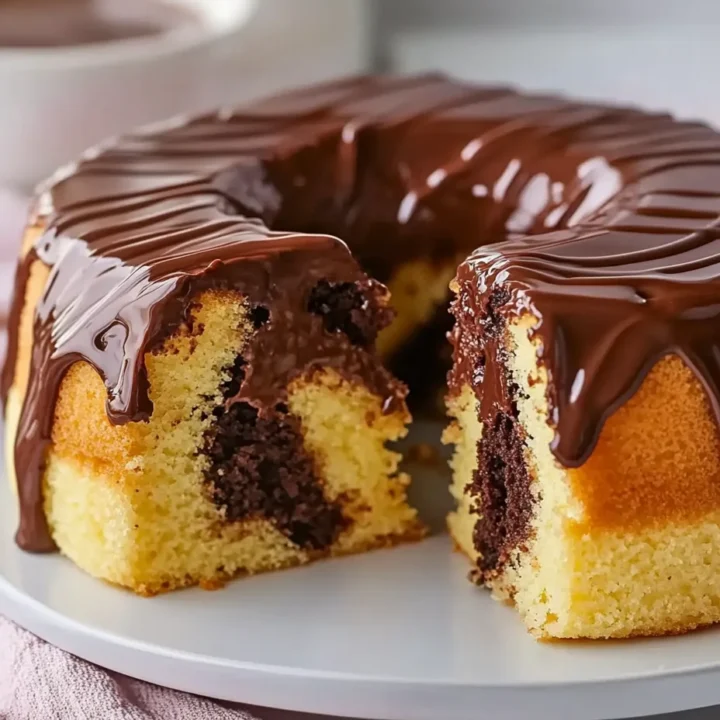
Pudding Poke Cake
If you’re searching for a dessert that’s effortlessly delicious and guaranteed to impress, this Pudding Poke Cake Recipe checks every box.
Ingredients
Cake Base:
- 1 (15.25 oz) box yellow cake mix
- 1 cup water
- 3 large eggs
- ⅓ cup vegetable oil
- Cooking spray (for greasing the pan)
Pudding Layer:
- 2 (3.9 oz) boxes instant chocolate pudding mix
- 1 cup confectioners’ sugar
- 4 cups milk
Optional Flavor Variations:
- Yellow/white cake with: butterscotch, pistachio, banana, coconut, or vanilla pudding
- Chocolate cake with: chocolate, vanilla, or coconut pudding
Instructions
1. Prepare the Pan & Oven
- Preheat oven to 350°F (175°C).
- Grease a 9×13-inch baking dish with cooking spray.
2. Make the Cake Batter
- Combine cake mix, water, eggs, and oil in a large bowl.
- Mix on low for 30 seconds, then on medium for 2 minutes.
- Pour batter into the prepared dish.
3. Bake the Cake
- Bake for 21–25 minutes, or until a toothpick comes out clean.
- Remove from the oven and leave the cake warm.
4. Poke the Holes
- Using the rounded handle of a wooden spoon, poke holes across the cake about 1 inch apart, pushing all the way to the bottom.
5. Prepare the Pudding
- Whisk pudding mix with confectioners’ sugar.
- Slowly add milk and beat on low for 1 minute until smooth (don’t overmix).
6. Assemble
- Pour half of the pudding mixture over warm cake, letting it seep into the holes.
- Allow the remaining pudding to thicken slightly, then spread it evenly over the top.
7. Chill & Serve
- Refrigerate the cake for at least 1 hour.
- Slice, serve chilled, and store leftovers in the refrigerator.
Notes
- Poke the holes while the cake is warm—this allows maximum pudding absorption.
- Don’t overbeat the pudding, or it will thicken too fast to pour.
- Full-fat milk creates a richer, creamier pudding layer.
- Want cleaner slices? Warm your knife under hot water before cutting.
- This dessert tastes even better the next day after the flavors meld.
Nutrition Information:
Yield: 12 Serving Size: 1Amount Per Serving: Calories: 310Total Fat: 11gSaturated Fat: 2gSodium: 350mgCarbohydrates: 49gFiber: 1gSugar: 34gProtein: 4g