




There’s something irresistible about the classic combination of chocolate and peanut butter, and this Decadent Peanut Butter Cup Chocolate Roll brings that beloved pairing to life in the most indulgent way. If you’ve ever dreamed of creating a bakery-style dessert at home that looks impressive yet feels surprisingly approachable, this chocolate peanut butter cake roll is about to become your new favorite treat.
Imagine a soft, rich chocolate sponge rolled around a creamy peanut butter filling, finished with a silky chocolate ganache and generous bites of peanut butter cups in every slice. Whether you’re planning a holiday dessert centerpiece, a celebration cake, or simply craving a homemade chocolate peanut butter dessert that feels extra special, this recipe delivers both flavor and visual wow-factor.
Have you ever wondered how to make a flawless chocolate swiss roll without cracks or fuss? You’re in the right place. I’ll guide you through each step so you can confidently create a smooth, beautiful chocolate roll that tastes as indulgent as it looks — perfect for sharing, gifting, or savoring with a cozy cup of coffee.
Key Benefits & Why You’ll Love This Recipe
If you’re a fan of rich chocolate desserts and that timeless chocolate-and-peanut-butter pairing, this Decadent Peanut Butter Cup Chocolate Roll is about to earn a permanent spot in your dessert rotation. It’s the kind of homemade treat that looks impressive on the table yet feels totally achievable in your own kitchen.
A bakery-style dessert made simple
You don’t need professional training to create a stunning chocolate peanut butter cake roll. With clear steps and a few smart techniques, you’ll be able to roll, fill, and finish this dessert like a pro — even if it’s your first time making a chocolate swiss roll at home.
Rich flavor in every bite
This dessert delivers everything chocolate lovers crave:
- A soft, cocoa-rich sponge cake
- A smooth, creamy peanut butter filling
- Chunks of peanut butter cups for extra indulgence
- A glossy chocolate ganache topping
Each slice offers the perfect balance of deep chocolate flavor and sweet, nutty creaminess, making it a standout chocolate peanut butter dessert for any occasion.
Perfect for celebrations or everyday indulgence
Whether you’re preparing a holiday centerpiece or simply want an impressive weekend bake, this peanut butter cup dessert roll adapts beautifully:
- Elegant enough for birthdays and gatherings
- Fun for family baking projects
- Make-ahead friendly for stress-free entertaining
- Easy to slice and serve for parties
It’s a crowd-pleasing dessert that always sparks conversation the moment it hits the table.
Make-ahead convenience
One of the best parts about this homemade chocolate roll cake is how well it fits into your schedule. You can prepare it ahead of time, chill it, and serve when ready. In fact, letting it rest enhances the flavor and makes slicing cleaner and easier.
A confidence-boosting baking experience
If cake rolls have ever intimidated you, this recipe will change that. You’ll learn simple techniques for rolling the cake smoothly, creating a fluffy peanut butter filling, and achieving that glossy ganache finish. By the end, you’ll have a dessert that looks bakery-worthy and tastes even better — all made by you.
Ingredients
Before we begin, let’s take a closer look at what makes this Decadent Peanut Butter Cup Chocolate Roll so irresistibly rich and balanced. Each ingredient plays an important role in creating that soft chocolate sponge, creamy peanut butter filling, and silky chocolate ganache topping.
I always recommend reading through the list once before starting — it makes the baking process smoother and stress-free.
For the Chocolate Sponge Cake
This light yet flavorful base is what allows the cake to roll beautifully without feeling heavy.
- 3 large eggs – These create structure and help the sponge stay flexible for rolling.
- ¾ cup granulated sugar – Adds sweetness while helping achieve that airy texture.
- 2 teaspoons brewed coffee or water – Coffee deepens the chocolate flavor without making the cake taste like coffee.
- 1 teaspoon vanilla extract – Enhances overall flavor and warmth.
- ¼ cup unsweetened cocoa powder – The foundation of that rich chocolate sponge cake flavor.
- ¼ teaspoon salt – Balances sweetness and intensifies the cocoa.
- 1 teaspoon baking powder – Provides gentle lift.
- ¾ cup all-purpose flour – Gives the cake structure while keeping it tender.
- Powdered sugar (for rolling) – Prevents sticking and helps avoid cracks when forming the chocolate swiss roll.
💡 Tip: Use high-quality cocoa powder for a deeper, more luxurious chocolate flavor.
For the Peanut Butter Filling
This creamy center is what transforms the roll into a true chocolate peanut butter dessert.
- 2 ounces cream cheese, softened – Adds subtle tang and stabilizes the filling.
- ⅓ cup peanut butter – Use creamy peanut butter for the smoothest texture.
- 1 cup powdered sugar – Sweetens and thickens the filling.
- 1 teaspoon vanilla extract – Adds depth and warmth.
- 4 tablespoons heavy whipping cream (plus more as needed) – Creates a fluffy, spreadable consistency.
- ½ cup chopped peanut butter cups – Adds texture and bursts of chocolate-peanut flavor.
💡 Tip: Make sure your cream cheese is fully softened to prevent lumps in your peanut butter cream filling.
For the Chocolate Ganache Topping
The final layer that gives this dessert its glossy, bakery-style finish.
- 1 cup semi-sweet chocolate chips – Provides a balanced chocolate flavor.
- ⅔ cup heavy whipping cream – Melts the chocolate into a smooth, pourable ganache.
- Remaining chopped peanut butter cups – For garnish and extra indulgence.
💡 Tip: Let the ganache cool slightly before pouring. It should be thick enough to coat the roll without running off completely.
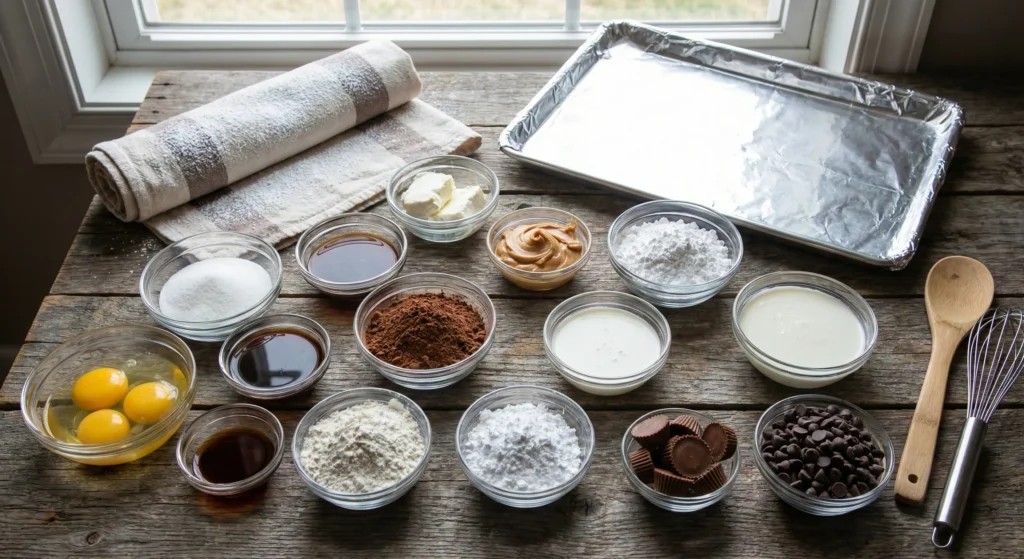
Instructions
Let’s walk through this step by step, just like we’re baking together in the same kitchen. This Decadent Peanut Butter Cup Chocolate Roll comes together beautifully when you take your time and follow each stage. Read through once before starting so everything flows smoothly.
Step 1: Prepare the Chocolate Sponge Cake
- Preheat your oven to 350°F (175°C).
Line a 10×15-inch jelly roll pan with foil and lightly spray with cooking spray (preferably baking spray with flour). - Whip the eggs in a large bowl using a hand or stand mixer on high speed for about 3 minutes.
- The mixture should look frothy and turn a pale, thick yellow.
- This step creates the airy structure needed for a flexible chocolate sponge.
- Add sugar, coffee (or water), and vanilla extract.
Beat until smooth and slightly thickened. - Mix in dry ingredients:
- Cocoa powder
- Salt
- Baking powder
- Blend gently, then add flour and stir just until combined.
Avoid overmixing — this keeps your chocolate swiss roll soft and easy to roll. - Spread the batter evenly into the prepared pan.
The layer will be thin, so use a spatula to reach all corners. - Bake for 10–15 minutes.
The cake is ready when lightly pressed and it springs back.
Step 2: Roll the Cake While Warm
Rolling while warm prevents cracking later — don’t skip this step.
- Lay a clean kitchen towel on your counter and sprinkle generously with powdered sugar.
- Immediately turn the hot cake onto the towel.
- Carefully peel away the foil or lining.
- Starting at the short end, gently roll the cake with the towel inside.
- Place seam-side down and let cool completely for at least 1 hour (or chill overnight).
This technique helps create that signature homemade chocolate roll cake shape without breaking.
Step 3: Make the Peanut Butter Filling
- In a mixing bowl, beat softened cream cheese and peanut butter until smooth.
- Add powdered sugar and mix until crumbly.
- Pour in vanilla and 2 tablespoons heavy whipping cream.
- Beat until creamy and spreadable.
- Add extra cream, 1 tablespoon at a time, if needed.
- Fold in ½ cup chopped peanut butter cups.
You’re looking for a fluffy, smooth peanut butter cream filling that spreads easily without being runny.
Step 4: Assemble the Chocolate Roll
- Carefully unroll the cooled cake.
- Spread the peanut butter filling evenly across the surface.
- Leave about 1 inch uncovered at both ends.
- Gently roll the cake back up (without the towel).
- Wrap in plastic wrap and chill for at least 1 hour to set.
Chilling helps the chocolate peanut butter cake roll hold its shape for clean slicing.
Step 5: Prepare the Chocolate Ganache Topping
- Place chocolate chips and heavy whipping cream in a microwave-safe bowl.
- Microwave for 30–60 seconds.
- Whisk until smooth and glossy.
- Let cool 15–20 minutes until thick but pourable.
The ganache should coat the back of a spoon without being watery.
Step 6: Finish and Decorate
- Place the chilled roll on a wire rack over a baking sheet.
- Pour ganache evenly over the cake.
- Sprinkle remaining chopped peanut butter cups on top.
- Chill until the topping sets.
Once set, slice gently with a sharp knife and admire your stunning chocolate peanut butter dessert roll before serving.
Pro Tips and Variations
Now that you’ve mastered the basics, let’s elevate your Decadent Peanut Butter Cup Chocolate Roll even further. These practical tips will help you avoid common mistakes and customize your chocolate peanut butter dessert to suit your taste and occasion.
Pro Tips for a Perfect Chocolate Swiss Roll
- Roll while warm — always.
The secret to preventing cracks in a chocolate sponge roll is rolling it immediately after baking. The warmth keeps it flexible and “trains” the cake to hold its shape. - Don’t overbake the sponge.
Even an extra 1–2 minutes can dry out the cake. A properly baked sponge should spring back lightly when touched. - Use room temperature ingredients for the filling.
Softened cream cheese blends more smoothly with peanut butter, giving you that creamy, lump-free peanut butter filling. - Chill before glazing.
A well-chilled roll holds its structure when you pour the chocolate ganache, resulting in a cleaner, bakery-style finish. - Slice with a warm knife.
Dip your knife in hot water, wipe dry, then slice. This keeps your chocolate cake roll with peanut butter filling looking neat and professional.
Flavor Variations to Try
Want to put your own twist on this classic chocolate peanut butter cake roll? Here are some easy ideas:
- Extra Chocolate Lover’s Version
Add mini chocolate chips to the filling or drizzle melted dark chocolate inside before rolling. - Crunchy Texture Upgrade
Use crunchy peanut butter instead of creamy, or add chopped roasted peanuts for contrast. - Salted Caramel Boost
Drizzle a thin layer of salted caramel sauce over the filling before rolling for a sweet-salty depth. - Lighter Option
Swap part of the cream cheese with whipped topping for a fluffier, less dense center. - Holiday-Inspired Variation
Crush peppermint candies into the ganache during winter months, or add festive sprinkles for special occasions.
Make It Your Signature Dessert
One of the best things about a homemade chocolate roll cake is how adaptable it is. You can adjust sweetness, texture, or toppings to match your preferences while keeping that irresistible chocolate-and-peanut-butter combination front and center.
With just a few thoughtful tweaks, this dessert can go from weeknight indulgence to celebration centerpiece — all while maintaining that rich, indulgent flavor that makes it unforgettable.
Serving & Pairing Suggestions
Once your Decadent Peanut Butter Cup Chocolate Roll is beautifully set and ready to slice, it’s time for the most rewarding part — serving and sharing. This rich chocolate peanut butter dessert is naturally eye-catching, so a little thoughtful presentation goes a long way.
How to Serve for the Best Experience
For clean, bakery-style slices and the best texture:
- Remove the roll from the refrigerator about 10–15 minutes before serving.
This softens the filling slightly and enhances the chocolate flavor. - Use a sharp knife warmed in hot water, wiping it clean between cuts.
This keeps each slice neat and picture-perfect. - Slice into even rounds and arrange on a serving platter so the beautiful spiral of chocolate sponge and peanut butter filling is visible.
This simple approach makes your chocolate cake roll with peanut butter filling look elegant and irresistible on any dessert table.
Delicious Pairing Ideas
Because this dessert is rich and creamy, pairing it with complementary flavors creates a perfectly balanced treat.
Perfect drink pairings:
- Freshly brewed coffee or espresso
- Cold milk (a classic with chocolate)
- Cappuccino or latte
- Light vanilla or hazelnut tea
Extra dessert pairings:
- A scoop of vanilla or chocolate ice cream
- Fresh berries for a refreshing contrast
- Lightly sweetened whipped cream
- Warm chocolate or caramel drizzle
These pairings enhance the deep cocoa and nutty notes of the chocolate peanut butter cake roll without overwhelming its flavor.
Presentation Ideas for Special Occasions
If you’re serving this dessert for guests or celebrations, a few finishing touches can make it unforgettable:
- Sprinkle extra chopped peanut butter cups over the platter
- Dust lightly with powdered sugar for contrast
- Add chocolate curls or shavings on top
- Serve on a cake stand for a bakery-style display
For holidays and parties, you can even pre-slice and arrange on a decorative tray for easy grab-and-enjoy servings.
Make-Ahead & Storage Tips
This homemade chocolate roll cake is ideal for preparing in advance:
- Store covered in the refrigerator for up to 24 hours before serving
- Keep wrapped tightly to maintain moisture
- Slice just before serving for the freshest look
In fact, letting the roll rest overnight deepens the flavors and makes slicing even easier — a win for both taste and convenience.
Tools and Equipment Guide
You don’t need a professional bakery setup to create this stunning Decadent Peanut Butter Cup Chocolate Roll. With a few essential kitchen tools and a little preparation, you’ll be ready to craft a smooth, bakery-style chocolate peanut butter cake roll right at home.
Let’s go through the must-haves and helpful extras that make the process easier and more enjoyable.
Essential Baking Tools
These core tools ensure your chocolate sponge roll bakes evenly and rolls smoothly.
- Jelly roll pan (10×15-inch)
This is the most important piece of equipment. A proper jelly roll pan creates the thin, flexible sponge needed for rolling without cracking. - Mixing bowls
Use at least two medium-to-large bowls — one for the cake batter and another for the peanut butter filling. - Hand mixer or stand mixer
Beating the eggs properly is key to achieving a light sponge. A mixer makes this step quick and reliable. - Rubber spatula or offset spatula
Perfect for spreading the thin batter evenly and later smoothing the peanut butter filling across the cake. - Measuring cups and spoons
Accurate measurements help maintain the right texture for your homemade chocolate roll cake.
Helpful Tools for Rolling & Assembly
These tools make shaping and assembling your roll stress-free.
- Clean kitchen towel
Used to roll the warm cake and prevent sticking. Choose a lint-free towel for best results. - Powdered sugar shaker or sieve
Dusting powdered sugar over the towel prevents the cake from sticking and tearing. - Plastic wrap
Keeps the roll tight and secure while chilling so it holds its shape. - Wire cooling rack
Essential for pouring ganache smoothly over the roll without creating a mess underneath. - Baking sheet or tray
Place under the wire rack to catch excess chocolate ganache for easy cleanup.
Optional but Useful Extras
These aren’t required, but they can elevate your baking experience:
- Offset icing spatula for ultra-smooth filling and ganache
- Serrated knife for cleaner slicing
- Parchment paper for easy lifting
- Cake stand for elegant presentation
Quick Prep Tips for Success
Before you begin assembling your chocolate cake roll with peanut butter filling, take a moment to:
- Measure all ingredients ahead of time
- Prepare and line your baking pan
- Set tools within reach
- Clear enough counter space for rolling
Having everything ready turns this recipe into a smooth, enjoyable baking session rather than a rushed process. With the right tools and a little organization, creating this impressive dessert becomes both simple and fun.
Troubleshooting Common Issues
Even a well-written recipe can come with a few challenges, especially when making a chocolate peanut butter cake roll for the first time. Don’t worry — most issues are easy to fix once you know what to look for. Think of this as your quick confidence guide to achieving a flawless homemade chocolate roll cake every time.
Cake Cracks When Rolling
Why it happens:
- Cake was overbaked and became dry
- It cooled completely before the first roll
- Not enough powdered sugar on the towel
How to fix it:
- Roll the cake immediately while it’s still warm
- Bake just until the cake springs back lightly
- Dust the towel generously with powdered sugar
Small cracks can often be hidden under ganache, so don’t panic — your chocolate swiss roll will still taste amazing.
Filling Is Too Runny
Why it happens:
- Too much heavy cream added
- Cream cheese too soft or warm
- Kitchen temperature very warm
How to fix it:
- Add a bit more powdered sugar to thicken
- Chill the filling for 10–15 minutes before spreading
- Use cream cheese that is softened but not melted
A properly balanced peanut butter filling should be creamy and spreadable, not dripping.
Filling Squeezes Out While Rolling
Why it happens:
- Overfilling the cake
- Spreading filling all the way to edges
- Rolling too tightly or too quickly
How to fix it:
- Leave a 1-inch border around edges
- Use an even, moderate layer of filling
- Roll slowly and gently
If some filling spills out, simply scoop it away and continue rolling — your chocolate cake roll with peanut butter filling will still look beautiful once chilled and glazed.
Ganache Too Thick or Too Thin
Too thick?
- Add 1–2 teaspoons warm cream and whisk until smooth.
Too thin?
- Let it cool longer in the fridge until slightly thickened.
Perfect ganache for a chocolate peanut butter dessert roll should be pourable but not watery. It should coat the cake and slowly drip down the sides.
Cake Loses Shape or Flattens
Why it happens:
- Not chilled long enough before glazing
- Filling too soft
- Roll not wrapped tightly
How to fix it:
- Chill the filled roll at least 1 hour
- Wrap firmly in plastic wrap
- Place seam-side down while chilling
A well-chilled roll holds its spiral shape and slices cleanly for a professional finish.
Remember: Imperfect Can Still Be Beautiful
Every baker has a learning curve with cake rolls. Even if your first attempt isn’t perfectly smooth, the rich flavor of this chocolate peanut butter dessert will still shine. Once covered in glossy ganache and topped with peanut butter cups, minor flaws disappear — leaving you with a dessert that looks impressive and tastes unforgettable.
FAQs
If this is your first time making a Decadent Peanut Butter Cup Chocolate Roll, you might have a few questions before getting started. Here are the most common ones to help you bake with confidence and enjoy a smooth, stress-free experience.
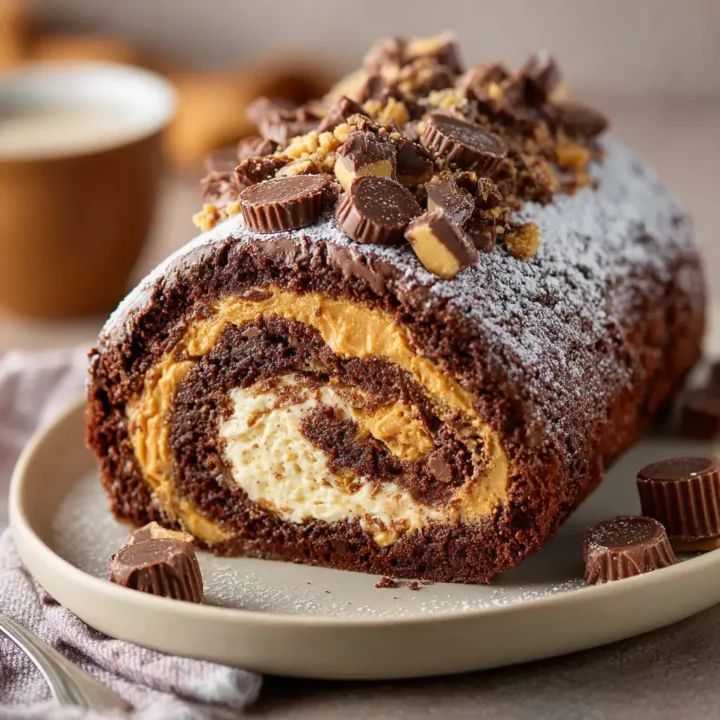
Peanut Butter Cup Chocolate Roll
If you’re a fan of rich chocolate desserts and that timeless chocolate-and-peanut-butter pairing, this Decadent Peanut Butter Cup Chocolate Roll is about to earn a permanent spot in your dessert rotation.
Ingredients
For the Chocolate Cake:
- 3 large eggs
- ¾ cup (150g) granulated sugar
- 2 teaspoons brewed coffee or water
- 1 teaspoon vanilla extract
- ¼ cup (20g) unsweetened cocoa powder
- ¼ teaspoon salt
- 1 teaspoon baking powder
- ¾ cup (93g) all-purpose flour
- Powdered sugar (for rolling)
For the Peanut Butter Filling:
- 2 ounces cream cheese, softened
- ⅓ cup peanut butter
- 1 cup powdered sugar
- 1 teaspoon vanilla extract
- 4 tablespoons heavy whipping cream (plus more if needed)
- ½ cup chopped peanut butter cups
For the Chocolate Ganache Topping:
- 1 cup semi-sweet chocolate chips
- ⅔ cup heavy whipping cream
- Remaining chopped peanut butter cups for topping
Instructions
1. Make the Chocolate Sponge
- Preheat oven to 350°F (175°C). Line a 10×15-inch jelly roll pan with foil and spray lightly.
- Beat eggs on high speed for about 3 minutes until frothy and pale.
- Add sugar, coffee (or water), and vanilla; mix until smooth.
- Blend in cocoa powder, salt, and baking powder.
- Add flour and mix just until combined.
- Spread batter evenly into prepared pan.
- Bake 10–15 minutes until the cake springs back lightly when touched.
2. Roll and Cool
- Lay a clean kitchen towel on a flat surface and sprinkle generously with powdered sugar.
- Turn hot cake onto the towel and carefully remove foil.
- Roll cake gently with the towel from the short end.
- Let cool completely for at least 1 hour.
3. Prepare the Filling
- Beat cream cheese and peanut butter until smooth.
- Add powdered sugar and mix until crumbly.
- Add vanilla and heavy cream; beat until creamy and spreadable.
- Fold in chopped peanut butter cups.
4. Assemble the Roll
- Carefully unroll cooled cake.
- Spread filling evenly, leaving a 1-inch border.
- Re-roll cake gently without the towel.
- Wrap in plastic wrap and chill for at least 1 hour.
5. Make the Ganache
- Combine chocolate chips and heavy cream in a microwave-safe bowl.
- Heat 30–60 seconds and whisk until smooth.
- Let cool until thick but pourable.
6. Decorate and Serve
- Place cake on a wire rack over a tray.
- Pour ganache evenly over roll.
- Sprinkle remaining peanut butter cups on top.
- Chill until set, slice, and serve.
Notes
- Roll the cake while warm to prevent cracking.
- Don’t overbake — a soft sponge rolls best.
- Chill before slicing for clean, neat pieces.
- Use a warm knife for perfect bakery-style slices.
- Make ahead: store in the refrigerator up to 24 hours before serving.
Nutrition Information:
Yield: 10 Serving Size: 1Amount Per Serving: Calories: 420Total Fat: 22gSaturated Fat: 12gSodium: 180mgCarbohydrates: 52gFiber: 2gSugar: 38gProtein: 6g