




Have you ever wished you could enjoy all the cheesy, saucy goodness of your favorite pepperoni pizza—without the mess or the wait? That’s exactly why I love making pizza bombs. These irresistible little bites are everything you adore about a classic slice, wrapped inside warm, golden biscuit dough for the ultimate easy, bite-sized appetizer.
They’re quick to prepare, endlessly customizable, and a guaranteed crowd-pleaser whether you’re hosting game night, feeding hungry kids, or craving a simple, no-fuss snack. With their ooey-gooey mozzarella center, savory pepperoni, and buttery Parmesan topping, pizza bombs deliver that perfect “wow” moment the second you pull them apart.
If you’re looking for a 15-minute, beginner-friendly recipe that feels fun, comforting, and wildly delicious, you’re in the right place. Let’s dive into the magic behind these cheesy pizza bites—and why they’re about to become your new favorite go-to snack.
Why You’ll Love These Pizza Bombs
If you’re anything like me, you love a recipe that delivers big flavor with minimal effort—and that’s exactly what makes these easy pizza bombs such a winner. They combine everything irresistible about a classic pepperoni pizza but in a fun, bite-sized form that’s perfect for snacking, sharing, or serving at gatherings.
Here are a few reasons these cheesy, stuffed pizza bites always steal the spotlight:
- Quick & beginner-friendly: With refrigerated biscuit dough, there’s no kneading or rolling required. You can have warm, golden pizza bombs on the table in about 15 minutes.
- Crowd-pleasing flavor: Each bite is filled with gooey mozzarella, savory pepperoni, and rich pizza sauce—like a mini pepperoni pizza wrapped in soft, buttery dough.
- Perfect for any occasion: Whether it’s game day, a movie night, or a casual get-together, these bite-sized pizza bombs make an ideal appetizer or snack.
- Easy to customize: Swap in your favorite fillings—think sausage, veggies, extra cheese, or even a spicy twist—to make them your own.
- Kid-approved and freezer-friendly: They reheat beautifully, making them great for quick after-school snacks or lunchbox additions.
These cheesy pizza bombs aren’t just delicious—they’re practical, fun to make, and guaranteed to become a recipe you’ll come back to again and again.
Ingredients You’ll Need
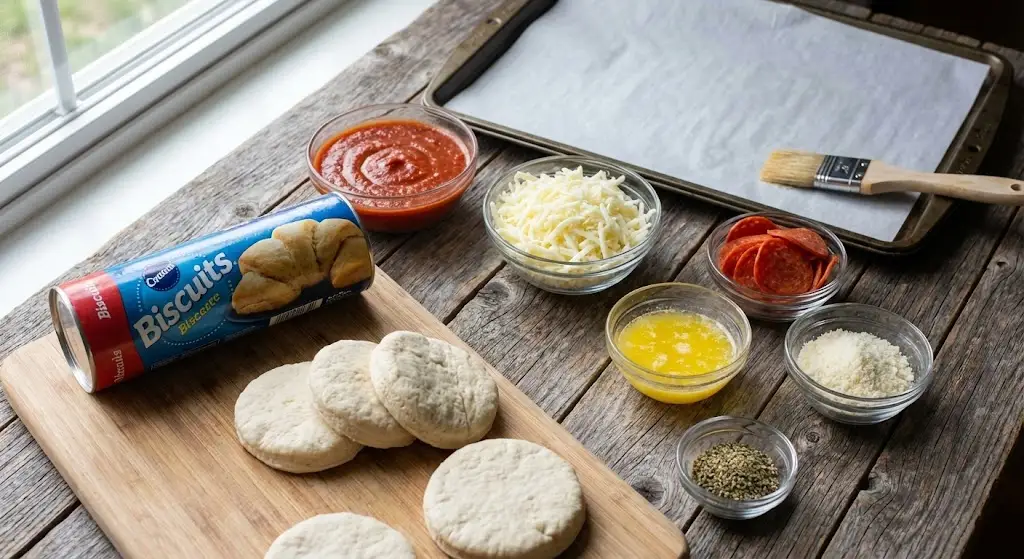
Before we dive into assembling your cheesy, stuffed pizza bombs, let’s take a quick look at the simple ingredients that make this recipe so convenient and flavorful. One of the best parts? Everything is easy to find, budget-friendly, and perfect for creating that classic pepperoni pizza taste in bite-sized form.
Here’s what you’ll need:
- Refrigerated biscuit dough (16 oz can): This is your shortcut to soft, fluffy pizza bombs without any kneading or rising time.
- Pizza sauce: A tablespoon per bomb adds just the right amount of tangy, savory flavor.
- Shredded mozzarella cheese: For that irresistible, melty center.
- Pepperoni slices: Adds a bold, classic pizza taste in every bite.
- Melted butter: Helps the bombs bake to a beautiful golden brown.
- Grated Parmesan cheese: Enhances the flavor and creates a delicious, lightly crusted top.
- Italian seasoning: A blend of herbs that gives each bite a warm, authentic pizza aroma.
How to Make Pizza Bombs (Step-by-Step Instructions)
Making these easy pizza bombs is a fun, hands-on process that comes together quickly—perfect for beginners, busy cooks, or anyone craving a cheesy, bite-sized treat. Follow these simple steps, and you’ll have golden, gooey pizza bites ready in no time.
1. Preheat & Prepare
Start by preheating your oven to 375°F (190°C). Line a baking sheet with parchment paper to prevent sticking and make cleanup effortless.
2. Flatten the Biscuit Dough
Open the can of refrigerated biscuits and separate them into 8 individual pieces.
Using your thumbs, gently press each biscuit into a flat circle, about ⅛ inch thick. This helps create enough space for the fillings without tearing the dough.
3. Add the Sauce, Cheese & Pepperoni
Spoon about 1 tablespoon of pizza sauce into the center of each dough circle, making sure to leave a ¼-inch border around the edges.
Top with 1 tablespoon mozzarella cheese and 1 tablespoon pepperoni, keeping everything centered so the dough seals properly.
4. Seal & Shape the Bombs
Carefully pull the edges of the dough upward, bringing them together to form a ball.
Pinch the seams tightly, then roll each ball gently between your hands to ensure it’s fully sealed—this prevents cheese from melting out during baking.
5. Brush & Season
Place each sealed pizza bomb seam-side down on the prepared baking sheet.
Brush the tops with melted butter, then sprinkle with Parmesan cheese and Italian seasoning for extra flavor and beautiful browning.
6. Bake Until Golden
Bake for about 15 minutes, or until the pizza bombs are puffed, golden, and lightly crisp on top.
7. Serve Warm
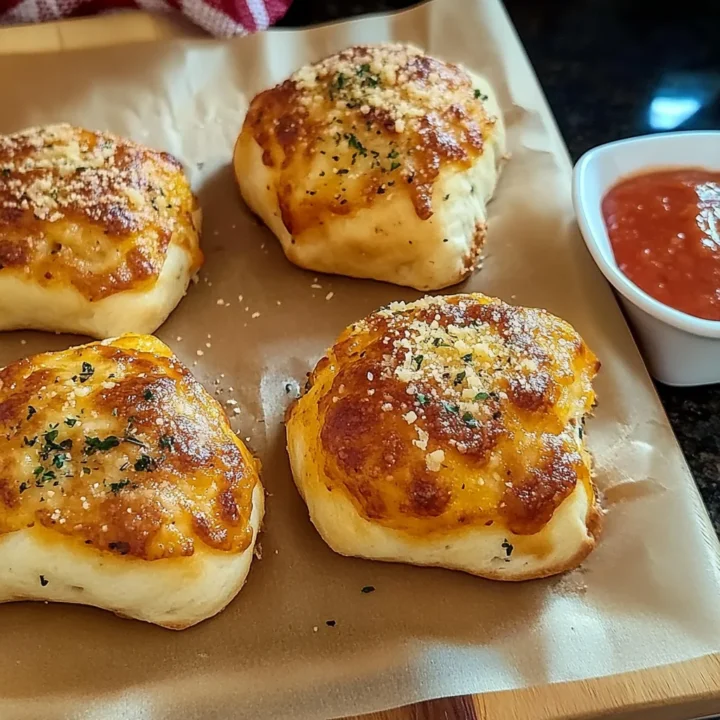
Enjoy your freshly baked cheesy pizza bombs with extra warmed pizza sauce on the side for dipping. They’re best when served hot and melty—perfect for parties, snacking, or a fun family treat.
Pro Tips & Delicious Variations
Making pizza bombs is already simple, but a few smart tricks can take them from good to unforgettable. Here’s how to elevate flavor, prevent common mistakes, and customize these cheesy bites to fit your taste.
Pro Tips for Perfect Pizza Bombs
- Seal the dough tightly:
Make sure there are no gaps or thin spots where sauce or cheese can leak out. A well-sealed seam keeps the bombs perfectly round and gooey inside. - Avoid overfilling:
It’s tempting to add extra cheese (trust me, I get it!), but too much filling can cause the dough to burst while baking. - Keep fillings centered:
Place the sauce, cheese, and pepperoni in the middle of the dough circle. This helps the dough wrap evenly around the filling. - Use parchment paper:
It prevents sticking and ensures an even bake—plus makes cleanup so much easier. - Brush with butter generously:
The melted butter helps achieve that glossy, golden crust and allows the Parmesan and herbs to cling beautifully. - Serve immediately:
Pizza bombs taste best fresh out of the oven while the mozzarella is still warm and stretchy.
Delicious Variations to Try
- Meat Lovers’ Bombs:
Add cooked sausage, ham, or bacon bits for a hearty, flavor-packed bite. - Veggie Pizza Bombs:
Swap in diced mushrooms, bell peppers, spinach, or olives for a tasty vegetarian option. - Extra-Cheesy Bombs:
Mix mozzarella with a bit of provolone or cheddar for deeper, richer flavor. - Spicy Kick:
Add sliced jalapeños or a sprinkle of crushed red pepper flakes to the filling. - Garlic Butter Topping:
Stir minced garlic into the melted butter before brushing for an aromatic boost. - Marinara Dip Pairing:
Serve with warm marinara, garlic dip, or ranch to switch up the flavor experience.
Serving & Pairing Suggestions
Pizza bombs are wonderfully versatile, making them one of those snacks you can serve in countless ways depending on the occasion. Whether you’re planning a family movie night, hosting friends, or looking for a kid-approved appetizer, these cheesy bites fit right in.
Here are some delicious ideas to help you serve and enjoy your pizza bombs:
Best Dipping Sauces
Enhance every bite with a flavorful dip:
- Warm pizza sauce or marinara
- Creamy ranch dressing
- Garlic butter dip for an extra indulgent touch
- Spicy marinara or sriracha mayo for a kick
These sauces add contrast and make the experience even more fun and interactive—especially for kids.
Perfect Side Dishes
If you’re turning your pizza bombs into a full meal, pair them with:
- A crisp Caesar salad
- Italian chopped salad
- Garlic parmesan fries
- A simple pasta salad
- Roasted vegetables
Light, fresh sides balance the richness of these cheesy, stuffed bites.
Great for Any Occasion
Pizza bombs shine as:
- Game-day appetizers
- Party finger food
- Movie-night snacks
- Lunchbox or after-school treats
- A fast, fun twist on pizza night
Their bite-size shape and gooey center make them easy to serve, easy to eat, and impossible to resist.
Tools & Equipment Guide
One of the best things about making these pizza bombs is that you don’t need any special gadgets or complicated tools. Everything is simple, kitchen-friendly, and perfect for beginners. Here’s what you’ll want to have on hand before you get started:
Essential Tools
- Baking sheet:
A standard, flat baking sheet works perfectly for even heat distribution. - Parchment paper:
Helps prevent sticking and makes cleanup quick and effortless. - Small mixing bowl:
Ideal for melting butter and mixing in Parmesan or herbs if you’re customizing toppings. - Pastry brush or silicone brush:
Useful for brushing the melted butter over the tops of the pizza bombs to achieve that golden, flavorful crust. - Measuring spoons:
To portion the sauce, cheese, and seasonings accurately without overfilling. - Your hands:
Truly the most important tool here—shaping and sealing the dough is easy and gives you full control over each little pizza bomb.
Optional but Helpful
- Cheese grater:
If you prefer freshly grated mozzarella or Parmesan for richer flavor. - Cooling rack:
Keeps the bottoms of the pizza bombs from getting too soft by allowing airflow underneath after baking. - Small serving bowls:
Perfect for dips like pizza sauce, ranch, garlic butter, or marinara.
Troubleshooting Common Issues
Even though pizza bombs are beginner-friendly, a few small hiccups can happen along the way. Don’t worry—these quick fixes will help you get perfect, golden, cheesy bites every single time.
Issue: Cheese Leaking Out While Baking
What’s happening:
The dough isn’t sealed tightly enough, or the filling shifted toward the edge.
How to fix it:
- Pinch the seams firmly and roll the dough ball gently in your hands to reinforce the seal.
- Keep sauce, cheese, and pepperoni centered to avoid weak spots in the dough.
- Avoid overfilling—less is more here.
Issue: Dough Tears When Flattening
Why it happens:
The dough might be too cold or stretched too thin.
How to fix it:
- Let the biscuits sit at room temperature for 5 minutes; they’ll soften naturally.
- Press gently and evenly—no need to force the dough thinner than ⅛ inch.
Issue: Pizza Bombs Aren’t Golden Brown
Why it happens:
Not enough butter on top, or the oven heat isn’t fully even.
How to fix it:
- Brush generously with melted butter before baking.
- Rotate the baking sheet halfway through for even browning.
- Ensure your oven is fully preheated to 375°F (190°C).
Issue: Undercooked Center
Why it happens:
The bombs may be crowded or the dough too thick in the middle.
How to fix it:
- Space them out so hot air can circulate.
- Make sure the dough is flattened evenly before filling.
- Add 2–3 extra minutes of baking time if needed.
Issue: Pizza Bombs Turn Soft During Storage
Why it happens:
Steam gets trapped when stored while still warm.
How to fix it:
- Let them cool completely before placing in containers.
- Reheat in the oven or air fryer instead of the microwave for a crispier texture.
Frequently Asked Questions
Curious about customizing, storing, or switching up your pizza bombs? Here are the questions home cooks ask most—along with clear, helpful answers to guide you every step of the way.
Pizza Bombs
If you’re anything like me, you love a recipe that delivers big flavor with minimal effort—and that’s exactly what makes these easy pizza bombs such a winner.
Ingredients
- 1 (16 oz) can refrigerated biscuits (such as Pillsbury™ Grands!)
- ½ cup pizza sauce
- ½ cup shredded mozzarella cheese
- ½ cup pepperoni slices
- ¼ cup melted butter
- 2 ½ tbsp grated Parmesan cheese
- 1 tsp Italian seasoning
Instructions
- Preheat the oven to 375°F (190°C) and line a baking sheet with parchment paper.
- Separate the biscuits into 8 pieces and flatten each one into a ⅛-inch thick circle.
- Add the fillings: Spoon 1 tbsp pizza sauce in the center of each circle. Top with 1 tbsp mozzarella and 1 tbsp pepperoni.
- Seal the bombs: Pull the edges up over the filling and pinch tightly to form a ball. Roll gently between your hands to ensure the seams are sealed.
- Season: Place seam-side down on the baking sheet. Brush each ball with melted butter, then sprinkle with Parmesan and Italian seasoning.
- Bake for 15 minutes or until golden brown.
- Serve warm with extra pizza sauce for dipping.
Notes
- Don’t overfill the bombs—too much sauce or cheese can cause leakage during baking.
- Keep fillings centered so the dough seals evenly and holds its shape.
- Add a flavor boost by mixing garlic powder or crushed red pepper into the melted butter.
- Make ahead: Prepare and refrigerate unbaked bombs for up to 24 hours, then bake when ready.
- Reheat best in the oven or air fryer to keep the exterior crisp.
Nutrition Information:
Yield: 8 Serving Size: 1Amount Per Serving: Calories: 210Total Fat: 11gSaturated Fat: 5gCholesterol: 25mgSodium: 520mgCarbohydrates: 20gFiber: 1gSugar: 2gProtein: 6g