




There’s something magical about a tray of Perfect Thumbprint Cookies coming out of the oven — the buttery aroma, the jewel-bright jam centers, the way each cookie looks slightly unique, almost like it has its own personality. If you grew up enjoying classic jam-filled cookies during the holidays, this recipe will feel like a warm memory you can recreate anytime. And if you’re new to making thumbprint cookies, don’t worry — this is one of the most beginner-friendly, melt-in-your-mouth treats you can bake.
What I love most about these cookies is their versatility. Whether you’re preparing a festive dessert table, packing homemade gifts, or simply craving a small, sweet bite with your afternoon coffee, these soft, buttery thumbprints fit every occasion. Plus, you get complete creative freedom: raspberry, apricot, berry medley, or even a drizzle of icing — each variation turns the cookie into something uniquely yours.
If you’ve ever wondered how bakers achieve that perfect balance of tender shortbread texture and glossy jam center, you’re about to learn exactly how. Let’s dive into a simple, foolproof recipe that delivers bakery-style results with everyday ingredients and just a few easy steps.
Key Benefits & Why You Will Love This Recipe
If you’ve been searching for truly Perfect Thumbprint Cookies, the kind that feel soft and buttery with a glossy jam center that doesn’t sink or crack, you’re in the right place. This recipe is designed with simplicity in mind, giving you bakery-style results without complicated steps or specialty tools. Think of it as your go-to cookie whenever you want something quick, comforting, and irresistibly pretty.
What makes these cookies so special?
- Beginner-friendly and foolproof: Whether it’s your first time making jam-filled cookies or you’re a seasoned baker, this dough behaves beautifully — no chilling, no stress, no guesswork.
- Melts-in-your-mouth texture: The tender, shortbread-style base gives each cookie a soft bite, perfectly contrasted by the bright, fruity center.
- Customizable flavors: Raspberry, apricot, strawberry, or a mix — each jam brings its own personality, allowing you to tailor the cookies to any occasion.
- Festive and timeless: These classic thumbprint cookies look charming on holiday dessert tables, but they’re just as welcome on a cozy weekend afternoon with tea or coffee.
- Great for gifting: Their vibrant centers and delicate icing drizzle make them feel handcrafted and heartfelt — ideal for boxed treats or cookie swaps.
You’ll love how quickly these come together and how consistently delicious they turn out. With just a handful of everyday ingredients and a few helpful tips, you’ll be able to create picture-perfect thumbprint cookies that never spread too much, never crumble apart, and always deliver that nostalgic, jam-filled sweetness we all adore.
Ingredients
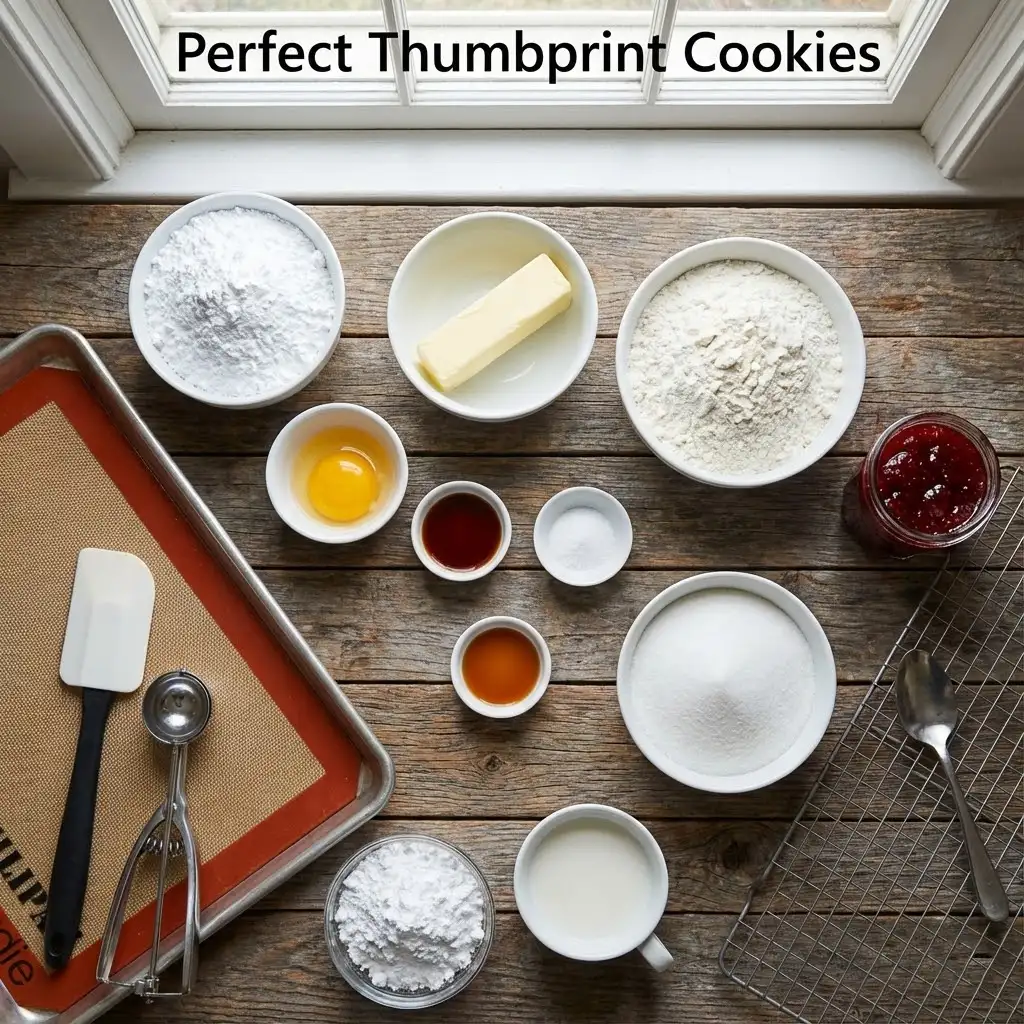
Before you start mixing, let’s take a quick look at what you’ll need to create these Perfect Thumbprint Cookies. The ingredient list is simple and intentionally approachable — nothing fancy, just classic baking staples that come together to form soft, buttery, jam-filled cookies.
For the Cookies
- Powdered sugar – Adds a delicate sweetness and helps create that smooth, melt-in-your-mouth texture.
- Unsalted butter, softened – The heart of any great thumbprint cookie. Soft butter blends easily and gives the cookies their tender crumb.
- One egg yolk – Enriches the dough and helps keep the cookies soft.
- Pure vanilla extract – Brings warmth and depth to the flavor.
- A hint of almond extract – Totally optional, but it enhances the “bakery-style” flavor profile beautifully.
- Fine salt – Just enough to balance the sweetness.
- All-purpose flour – Provides structure without making the dough dense.
- Granulated sugar – Used for rolling the dough to give the cookies a subtle sparkle and crisp edge.
- Fruit jam of your choice – Raspberry, apricot, blueberry, or even a mix. Use a smooth jam for the cleanest indent and glossy finish.
For the Icing Drizzle
- Powdered sugar – Forms the base of the icing.
- A splash of milk – Just enough to create a pipeable consistency for that delicate zigzag finish.
Instructions
Baking Perfect Thumbprint Cookies is wonderfully simple, and these steps will guide you through the process with ease. Think of this as baking alongside a friend who’s sharing their best tips along the way.
Step 1: Prepare Your Workspace
Start by preheating your oven to 325°F (165°C). Line a baking sheet with a silicone mat or parchment paper — this helps the cookies bake evenly and prevents sticking.
Step 2: Cream the Butter and Sugar
In a mixing bowl, blend the softened butter with the powdered sugar until the mixture looks light and creamy. This step sets the foundation for a smooth, tender cookie texture.
Step 3: Add the Flavor
Mix in the egg yolk, vanilla extract, a small splash of almond extract, and a pinch of salt. Stir until everything is fully combined, and the dough smells rich and fragrant.
Step 4: Bring in the Flour
Add the flour gradually, folding it in just until the dough comes together. You’re aiming for a soft, pliable dough — not sticky, not crumbly.
Step 5: Roll and Shape
Scoop out small portions of dough (about 1 tablespoon each) and roll them into smooth balls. Coat each ball lightly in granulated sugar for a subtle crunch and sparkle.
Place the dough balls on your prepared baking sheet, leaving a bit of space between each one.
Step 6: Create the Thumbprint
Gently press your thumb, the back of a spoon, or a small rounded tool into the center of each ball to form a well. Make the indentation deep enough to hold the jam, but not so deep that the cookie cracks.
Step 7: Add the Jam
Fill each indentation with your chosen fruit jam. A small spoon or piping bag works great here. Don’t overfill — the jam will spread slightly as the cookies bake.
Step 8: Bake to Perfection
Bake the cookies for about 14–16 minutes, or until the bottoms turn lightly golden. They should remain pale on top with a soft, tender finish.
Let the cookies rest on the baking sheet for a few minutes, then move them to a cooling rack to finish setting.
Step 9: Optional Icing Drizzle
If you’d like a decorative touch, mix powdered sugar with a few drops of milk until thick but pourable. Drizzle over the cooled cookies for a pretty, bakery-style finish.
Pro Tips & Variations
Want to take your Perfect Thumbprint Cookies from great to unforgettable? These tips and creative variations will help you master the recipe and customize every batch to suit your mood, season, or flavor preferences.
Pro Tips for Perfect Results
- Use softened butter, not melted: Soft butter creams smoothly and gives the cookies their signature tender bite. Melted butter will make the dough spread too much.
- Don’t overmix the flour: Once the flour is incorporated, stop. Overmixing can lead to tough cookies instead of that soft, shortbread-style texture.
- Shape with care: If your dough cracks when making the indentation, simply pinch and smooth the crack back together — it takes seconds and keeps the cookies looking beautiful.
- Avoid overfilling with jam: A small spoonful is enough. Too much jam can spill over the edges during baking.
- Rotate your tray halfway through: This ensures even coloring and prevents the bottom from browning too quickly.
- Let the cookies cool before icing: Warm cookies will melt the drizzle, so give them time to set on a wire rack first.
Flavor Variations to Try
- Berry Swirl Thumbprints: Use two complementary jams (like raspberry + blueberry) and twist them together in the center for a marbled look.
- Citrus Glow: Fill the cookies with orange marmalade or lemon curd for a bright, zesty twist.
- Nutty Delight: Add finely chopped pecans or almonds to the dough for a subtle crunch and deeper flavor.
- Chocolate Kiss: Replace the jam with a small spoonful of chocolate spread or ganache for a rich holiday variation.
- Spiced Dough: Add a pinch of cinnamon or cardamom to the flour for a warm, aromatic cookie perfect for winter baking.
- Frosted Thumbprints: Instead of a drizzle, pipe a thicker icing into the center after baking to create a creamy, sweet contrast.
Make-Ahead Options
- Refrigerate the dough: Chill up to 48 hours if you prefer to bake ahead of time. Let it soften slightly before shaping.
- Freeze the unbaked dough balls: Shape, indent, and freeze on a tray, then store in freezer bags. Add jam just before baking.
- Freeze baked cookies: They freeze beautifully — just skip the icing until you’re ready to serve.
Serving & Pairing Suggestions
One of the best things about Perfect Thumbprint Cookies is how effortlessly they fit into any moment — from cozy evenings at home to festive holiday gatherings. Their soft, buttery centers and vibrant jam filling make them a beautiful addition to dessert tables, party platters, or simple afternoon treats.
Here are some delightful ways to enjoy and serve them:
Perfect Moments to Serve
- Holiday celebrations: Their jewel-toned centers make them a natural fit for Christmas cookie boxes and seasonal dessert spreads.
- Tea and coffee breaks: These cookies pair wonderfully with a warm cup of tea, a latte, or even a cozy mug of hot chocolate.
- Brunch boards: Add them to a sweet grazing board alongside fresh fruit, pastries, and mini muffins.
- Gifting: Package them in clear treat bags or small tins — the combination of jam and icing gives them a handcrafted, heartfelt charm.
- Family gatherings: Serve them slightly warm for an ultra-soft bite everyone will love.
Pairing Ideas
- Tea pairings: Earl Grey, chamomile, jasmine, or even a citrus herbal blend really bring out the fruity notes in the jam.
- Coffee pairings: A mild roast or creamy cappuccino complements the buttery shortbread flavor perfectly.
- Ice cream pairing: Enjoy the cookies alongside a scoop of vanilla or raspberry swirl ice cream for a simple but elegant dessert.
- Fruit-forward plates: Serve with fresh berries or sliced stone fruit for a refreshing contrast to the sweetness.
Presentation Tips
- Dust the tops lightly with powdered sugar for a snowy, festive touch.
- Arrange a mix of jam flavors on a serving platter to create a beautiful color display.
- If you added icing drizzle, let it fully set before stacking to keep the cookies neat and picture-perfect.
Tools and Equipment Guide
You don’t need a kitchen full of gadgets to make Perfect Thumbprint Cookies, but having the right tools can make the process smoother, quicker, and even more enjoyable. Here’s a simple guide to help you set up your baking station like a pro.
Essential Tools
- Mixing bowls: A medium bowl for creaming the butter and sugar, plus a smaller one for dry ingredients or icing.
- Sturdy spatula or wooden spoon: Perfect for blending the dough together without overmixing.
- Baking sheet: A flat, rimmed sheet helps the cookies bake evenly and hold their shape.
- Silicone baking mat or parchment paper: Prevents sticking and promotes even browning on the bottoms.
- Measuring cups and spoons: For accurate ingredient portions — precision matters in baking.
Helpful (But Optional) Tools
- Cookie scoop or tablespoon measure: Ensures uniform cookie sizes, which helps them bake evenly and look professional.
- Small spoon or pastry bag: Useful for adding jam neatly into the indentations.
- Wooden spoon handle or rounded tool: Great for creating perfect wells in the dough if you prefer not to use your thumb.
- Cooling rack: Allows air to circulate underneath the cookies, preventing sogginess as they cool.
- Piping bag for icing: If you want clean, delicate drizzle lines on top.
Why the Right Tools Matter
Using the proper equipment ensures:
- consistent cookie size
- even baking
- smooth dough texture
- clean jam indentations
- beautiful presentation
Troubleshooting Common Issues
Even the most Perfect Thumbprint Cookies can run into small hiccups, especially if you’re new to baking. The good news? Most problems have simple fixes. Here’s a helpful guide to keep your cookies soft, shapely, and beautifully filled every time.
Why Did My Cookies Crack When I Made the Indentation?
Small cracks are normal, but large ones usually mean the dough was a bit dry.
Try this:
- Warm the dough slightly with your hands before shaping.
- Press the indentation gently and gradually rather than all at once.
- Smooth any cracks with your fingers — it takes just seconds.
Why Did My Cookies Spread Too Much?
Overspreading can happen for a few reasons.
Common causes:
- Butter was too soft or partially melted.
- Not enough flour in the dough.
- Baking sheet was warm from a previous batch.
Solutions: - Chill the shaped dough balls for 5–10 minutes before baking.
- Add a teaspoon or two of flour if the dough feels sticky.
- Always start with a cool baking sheet.
Why Did the Jam Sink or Bubble Over?
Thumbprint cookies can lose their tidy centers if overfilled or baked too hot.
Fix it by:
- Using just enough jam to fill the well — a small spoonful is perfect.
- Stirring thicker jams to loosen them slightly before spooning.
- Tapping the tray lightly so the jam settles evenly.
Why Are My Cookies Dry or Crumbly?
This usually means too much flour or overbaking.
Quick adjustments:
- Spoon and level the flour instead of packing it.
- Bake just until the bottoms turn pale golden — not more.
Why Is My Icing Too Runny or Too Thick?
Icing consistency is easy to fix.
- If it’s too thin, add a pinch more powdered sugar.
- If it’s too thick, add a drop of milk at a time — a little goes a long way.
Why Don’t My Cookies Look as Smooth as Bakery Thumbprints?
A few tricks can help your cookies stay picture-perfect:
- Roll each dough ball until completely smooth before shaping.
- Coat lightly in sugar for a crisp, even surface.
- Press the indentation with a rounded tool for consistent wells.
FAQs
Thumbprint Cookies
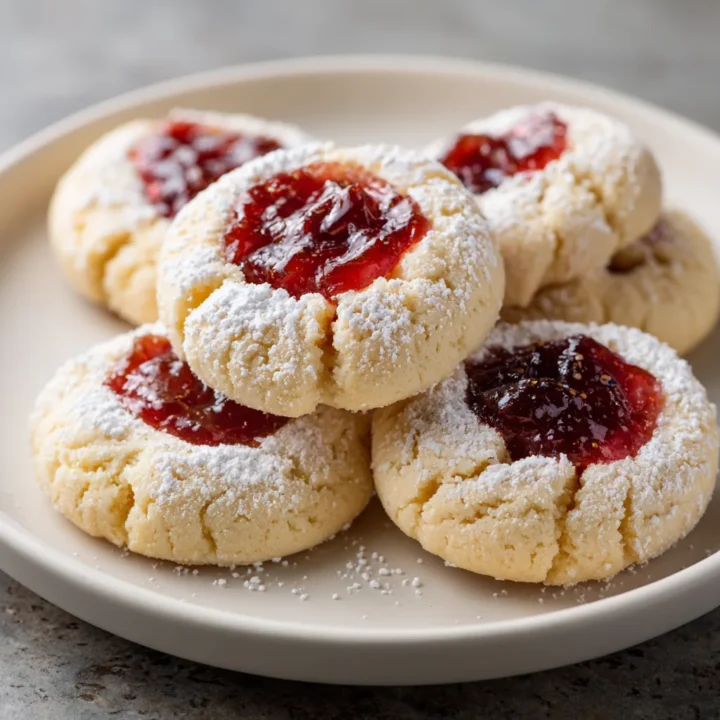
If you’ve been searching for truly Perfect Thumbprint Cookies, the kind that feel soft and buttery with a glossy jam center that doesn’t sink or crack, you’re in the right place.
Ingredients
For the Cookies:
- ½ cup unsalted butter, softened
- ⅓ cup powdered sugar
- 1 egg yolk
- 1 teaspoon vanilla extract
- A small splash of almond extract (optional)
- ¼ teaspoon fine salt
- 1¼ cups all-purpose flour
- ⅓ cup granulated sugar (for rolling)
- ½ cup smooth fruit jam (raspberry, apricot, strawberry, or your choice)
For the Icing (Optional):
- 1 cup powdered sugar
- 1–2 tablespoons milk (adjust for consistency)
Instructions
1. Prepare the Oven
Preheat your oven to 325°F (165°C). Line a baking sheet with parchment paper or a silicone baking mat.
2. Cream the Butter and Sugar
In a medium bowl, blend the softened butter and powdered sugar until smooth and creamy.
3. Add the Wet Ingredients
Mix in the egg yolk, vanilla extract, almond extract (if using), and salt. Stir until fully combined.
4. Add the Flour
Fold in the flour gradually until a soft, pliable dough forms. Avoid overmixing.
5. Shape the Cookies
Roll 1-tablespoon portions of dough into smooth balls. Coat each ball lightly in granulated sugar and place them on the baking sheet.
6. Make the Indentation
Press your thumb or the end of a spoon into the center of each dough ball to create a small well. Fill each indentation with a small spoonful of jam.
7. Bake
Bake for 14–16 minutes, or until the bottoms turn lightly golden. Allow the cookies to cool on the baking sheet for a few minutes before transferring to a wire rack.
8. Optional Icing
Whisk powdered sugar with a splash of milk until thick but drizzle-friendly. Drizzle over cooled cookies for a pretty finish.
Notes
- Avoid cracked edges: Press slowly when forming the well to keep the dough smooth.
- Use smooth jam: Thick or seedless jams create the cleanest, glossy centers.
- Don’t overfill: A small amount of jam goes a long way — it will spread as the cookies bake.
- Want extra flavor? Add a pinch of cinnamon or cardamom to the dough for a warm twist.
- Storing: Keep in an airtight container for up to 4 days, or freeze (without icing) for longer storage.
Nutrition Information:
Yield: 20 Serving Size: 1Amount Per Serving: Calories: 115Total Fat: 5.4gSaturated Fat: 3.3gCholesterol: 23mgSodium: 37mgCarbohydrates: 15.6gFiber: 0.3gSugar: 7.9gProtein: 1.2g