




There is something utterly enchanting about biting into a warm, flaky cheese danish with butter layers giving way to a creamy, decadent cream cheese filling that melts in the mouth. Be it morning coffee or a brunch gathering, homemade cheese danishes are the perfect treat to brighten any moment.
But the best part is, you don’t need to be a pastry chef to make an easy cheese danish out of puff pastry, cream cheese, and a dash of vanilla extract! Take a moment to imagine the smell of freshly baked golden-brown pastries scrumptious in your kitchen.
So, who is ready to treat the family (or just themselves) to a treaty cheese danish? Let’s start the process so you too can enjoy these super simple flakies and creamy delights everyone is sure to love. Trust me, once that recipe finds itself into your list, store-bought danishes will never hold their same status upon you!
Key Benefits of Cheese Danishes
If you’ve ever wondered why cheese danishes are a universally loved treat, then allow me to indulge your curiosity-these are simplicity combined with indulgence. Put it on your to-bake list:
- Delicious Flavor: Simple? Flaky puff pastry filled with cream cheese mixed with some sugar and vanilla. It makes this rich and feel-good treat an absolute mouth-watering item.
- Easy to Make: Don’t let the fancy appearance fool you! Store-bought puff pastry dough makes this suitable for even beginner bakers as it involves very little work!
- Versatile treat: Cheese Danishes are always a hit for breakfast, dessert, or even an afternoon treat! Perfect for brunches or to enjoy on a slow weekend.
- Freshly Baked Bakery-Quality Danish at Home: No need to run to the bakery; you have warm freshly-baked golden brown Danish straight from your oven. The smell itself is worth it!
- Customizable: Drizzle a little lemon juice in the filling or top it with a powdered sugar glaze. The options are limitless!
By making these cheese danishes at home, you’re not just baking, you’re creating memories. Plus, there’s something incredibly satisfying about pulling a tray of flaky, golden-brown pastries out of the oven and sharing them with loved ones. Ready to get started? Let’s gather your ingredients and dive into the fun part, baking!
Ingredients for Making Cheese Danishes
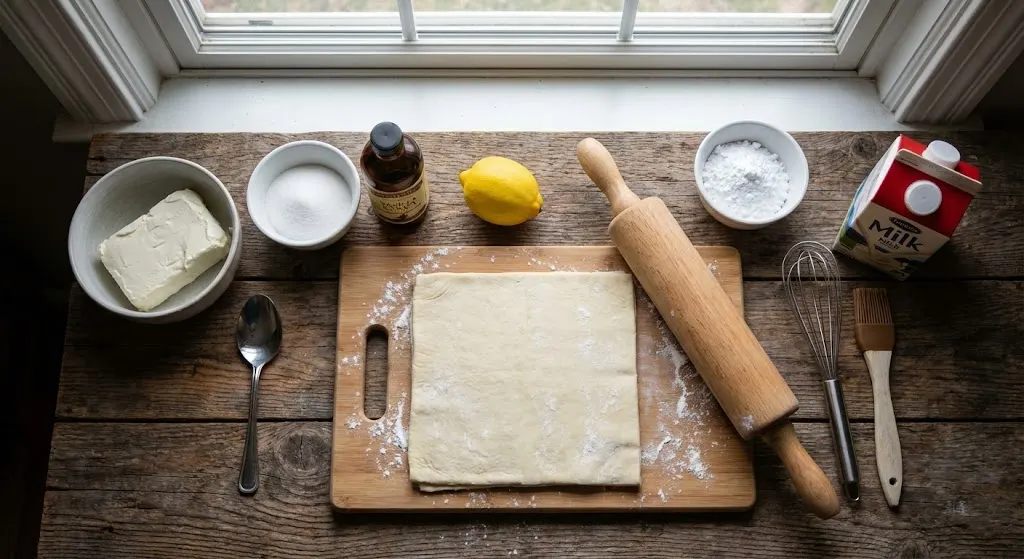
Before we jump into the steps, let’s make sure you have everything you need to create these irresistible cheese danishes. The beauty of this recipe lies in its simplicity, so you’ll likely have most of these ingredients on hand already. Here’s your shopping list:
For the Cream Cheese Filling:
- 8 oz (225g) cream cheese, softened
- 1/4 cup (50g) granulated sugar
- 1 teaspoon vanilla extract
- 1 tablespoon lemon juice (optional, for a tangy twist)
For the Pastry:
- 1 sheet puff pastry dough, thawed (store-bought or homemade)
- 1 tablespoon flour, for dusting
For the Glaze (Optional):
- 1/2 cup (60g) powdered sugar
- 1-2 tablespoons milk (or cream for a richer glaze)
- 1/4 teaspoon vanilla extract
For Topping (Optional):
- Fresh berries (like strawberries or blueberries)
- Powdered sugar for dusting
Equipment You’ll Need:
- Baking sheet
- Parchment paper
- Mixing bowls
- Whisk
- Rolling pin (if needed)
- Pastry brush (optional)
Why These Ingredients Work
- Cream Cheese: The star of the filling, providing a rich, creamy texture.
- Puff Pastry: Creates those flaky, golden-brown layers we all love.
- Lemon Juice: Adds a subtle tang that balances the sweetness.
- Powdered Sugar Glaze: Gives the danishes a beautiful finish and extra sweetness.
Pro Tip:
If you’re short on time, store-bought puff pastry dough is a lifesaver. Just make sure to thaw it according to the package instructions for the best results.
Instructions for Making Cheese Danishes
Ready to transform those simple ingredients into flaky, golden-brown cheese danishes? Follow these easy steps, and you’ll have a tray of delicious pastries in no time. Let’s get started!
Step 1: Prepare the Cream Cheese Filling
- In a mixing bowl, combine 8 oz softened cream cheese, 1/4 cup granulated sugar, 1 teaspoon vanilla extract, and 1 tablespoon lemon juice (if using).
- Use a whisk or hand mixer to blend until the mixture is smooth and creamy. Set aside.
Step 2: Prep the Puff Pastry
- Preheat your oven to 400°F (200°C) and line a baking sheet with parchment paper.
- Lightly dust your work surface with flour and unfold the thawed puff pastry sheet. If needed, gently roll it out to smooth any creases.
- Cut the pastry into 4 equal squares (or 6 smaller squares for mini danishes).
Step 3: Assemble the Danishes
- Place the pastry squares on the prepared baking sheet, leaving space between them to allow for expansion.
- Spoon 2-3 tablespoons of the cream cheese filling into the center of each square.
- Fold the corners of each square toward the center, slightly overlapping them to create a pinwheel shape. Press gently to secure.
Step 4: Bake to Perfection
- Bake in the preheated oven for 15-18 minutes, or until the pastries are puffed and golden brown.
- Remove from the oven and let them cool on the baking sheet for 5 minutes before transferring to a wire rack.
Step 5: Add the Finishing Touches
- While the danishes cool, prepare the glaze by whisking together 1/2 cup powdered sugar, 1-2 tablespoons milk, and 1/4 teaspoon vanilla extract until smooth.
- Drizzle the glaze over the warm danishes using a spoon or piping bag.
- For an extra touch, dust with powdered sugar or top with fresh berries.
Pro Tip:
For an even flakier pastry, brush the assembled danishes with a beaten egg before baking. This will give them a beautiful, glossy finish.
Pro Tips and Variations
Now that you’ve nailed the basics of making cheese danishes, let’s explore some expert tips and creative variations to make this recipe truly your own. Whether you’re looking to simplify the process or add a unique twist, these ideas will help you elevate your baking game.
Pro Tips for Perfect Cheese Danishes
- Keep Ingredients Cold: If your kitchen is warm, chill the cream cheese filling for 10-15 minutes before assembling. This prevents it from spreading too much during baking.
- Thaw Puff Pastry Properly: Let the puff pastry dough thaw in the fridge overnight or on the counter for about 30-40 minutes. Avoid over-thawing, as it can become sticky and difficult to work with.
- Egg Wash for Shine: Brush the assembled danishes with a beaten egg before baking for a glossy, golden-brown finish.
- Don’t Overfill: Stick to 2-3 tablespoons of filling per danish to prevent it from leaking out during baking.
- Cool Before Glazing: Let the danishes cool slightly before adding the glaze. This ensures it sets beautifully without melting off.
Creative Variations
- Fruit-Filled Danishes: Add a spoonful of fruit preserves (like raspberry or apricot) on top of the cream cheese filling before folding the pastry.
- Chocolate Twist: Mix 1-2 tablespoons of cocoa powder into the cream cheese filling for a chocolatey version.
- Savory Option: Skip the sugar and vanilla, and add herbs, garlic powder, and shredded cheddar to the cream cheese for a savory danish.
- Mini Danishes: Cut the puff pastry into smaller squares for bite-sized treats, perfect for parties!
- Seasonal Flavors: Add a pinch of pumpkin spice in the fall or a dash of lemon zest in the spring for a seasonal twist.
Storing and Reheating
- Storage: Keep leftover danishes in an airtight container at room temperature for up to 2 days or in the fridge for up to 5 days.
- Reheating: Warm them in the oven at 300°F (150°C) for 5-10 minutes to restore their flaky texture.
Why These Tips Work
These tips and variations ensure your cheese danishes turn out perfectly every time, whether you’re sticking to the classic recipe or experimenting with new flavors. Plus, they make the process even more fun and customizable!
Serving Suggestions
Now that your cheese danishes are fresh out of the oven and beautifully glazed, it’s time to think about how to serve them. Whether you’re enjoying them solo or sharing with friends, here are some delightful ways to make the most of your homemade pastries.
Perfect Pairings
- Coffee or Tea: A warm cup of coffee or tea is the classic companion to a cheese danish. The slight bitterness of coffee or the subtle flavors of tea balance the sweetness of the pastry.
- Fresh Fruit: Serve your danishes with a side of fresh berries, sliced bananas, or a fruit salad for a refreshing contrast.
- Whipped Cream: Add a dollop of whipped cream on the side for an extra indulgent treat.
- Yogurt Parfait: Pair your danish with a small bowl of yogurt and granola for a balanced breakfast or snack.
Occasion Ideas
- Brunch Spread: Include these danishes as part of a brunch buffet alongside quiches, muffins, and fresh juices.
- Afternoon Tea: Serve mini danishes with a selection of teas and finger sandwiches for an elegant afternoon treat.
- Holiday Breakfast: Make these danishes a special part of your holiday mornings, they’re perfect for Christmas, Easter, or Mother’s Day.
- Dessert Platter: Add them to a dessert platter with cookies, brownies, and other pastries for a sweet ending to any meal.
Presentation Tips
- Dust with Powdered Sugar: A light dusting of powdered sugar adds a touch of elegance.
- Drizzle with Glaze: Use a piping bag or spoon to create a beautiful glaze pattern on top.
- Garnish with Berries: Place a few fresh berries on the plate for a pop of color and freshness.
- Serve Warm: Danishes are best enjoyed warm, so time your baking to align with when you plan to serve them.
Tools and Equipment Guide
Having the right tools on hand can make all the difference when baking cheese danishes. Here’s a list of essential equipment to ensure your recipe turns out perfectly every time. Don’t worry, most of these items are likely already in your kitchen!
Essential Tools
- Baking Sheet: A sturdy baking sheet lined with parchment paper ensures even baking and easy cleanup.
- Parchment Paper: Prevents sticking and makes transferring the danishes a breeze.
- Mixing Bowls: Use medium-sized bowls for preparing the cream cheese filling and glaze.
- Whisk or Hand Mixer: Helps blend the filling until smooth and creamy.
- Rolling Pin: Useful for gently rolling out the puff pastry dough if needed.
- Measuring Cups and Spoons: Ensures accurate measurements for the filling and glaze.
- Pastry Brush: Optional, but great for applying an egg wash to the danishes for a golden finish.
- Knife or Pizza Cutter: For cutting the puff pastry into squares.
- Wire Rack: Allows the danishes to cool evenly after baking.
- Spatula: Helps transfer the danishes from the baking sheet to the wire rack.
Optional but Helpful Tools
- Piping Bag: For drizzling the glaze neatly over the danishes.
- Silicone Baking Mat: An alternative to parchment paper for non-stick baking.
- Stand Mixer: If you prefer using one for mixing the filling.
- Cooling Rack with Tray: Catches any drips from the glaze.
Why These Tools Matter
Using the right equipment ensures precision and ease throughout the baking process. For example:
- A baking sheet and parchment paper prevent sticking and promote even browning.
- A whisk or hand mixer ensures a smooth, lump-free filling.
- A wire rack helps the danishes cool without becoming soggy.
Pro Tip:
If you don’t have a pastry brush, you can use a folded paper towel to apply the egg wash. Improvising with what you have is part of the fun of baking!
Seasonal Variations
One of the best things about cheese danishes is how versatile they are. With a few simple tweaks, you can adapt this recipe to suit any season or occasion. Here are some creative ideas to keep your danishes fresh and exciting throughout the year!
Spring
- Lemon Blueberry Danishes: Add 1 tablespoon of lemon zest to the cream cheese filling and top with fresh blueberries before baking.
- Strawberry Rhubarb: Swirl a spoonful of strawberry-rhubarb compote into the filling for a tangy, fruity twist.
Summer
- Berry Bliss: Top the baked danishes with a mix of fresh summer berries like raspberries, blackberries, and strawberries.
- Tropical Twist: Add 1/4 cup of crushed pineapple to the cream cheese filling and sprinkle with shredded coconut before baking.
Fall
- Pumpkin Spice: Mix 2 tablespoons of pumpkin puree and 1/2 teaspoon of pumpkin spice into the cream cheese filling for a cozy autumn treat.
- Apple Cinnamon: Add 1/4 cup of finely diced apples and a sprinkle of cinnamon to the filling for a warm, spiced flavor.
Winter
- Peppermint Chocolate: Stir 1-2 tablespoons of cocoa powder into the filling and drizzle with a peppermint glaze (made with powdered sugar, milk, and a drop of peppermint extract).
- Cranberry Orange: Add 1 tablespoon of orange zest and a handful of dried cranberries to the filling for a festive holiday twist.
Why Seasonal Variations Work
These variations not only keep your cheese danishes exciting but also allow you to use fresh, seasonal ingredients. They’re perfect for holidays, special occasions, or simply adding a touch of creativity to your baking routine.
Pro Tip:
When experimenting with seasonal flavors, start with small additions and adjust to taste. This ensures the filling stays balanced and doesn’t overpower the delicate puff pastry.
History of this Recipe
The cheese danish is more than just a delicious pastry, it’s a treat with a rich history that spans cultures and centuries. Let’s take a moment to appreciate the origins of this beloved baked good and how it became a staple in bakeries and kitchens worldwide.
Origins of Danish Pastry
- Danish Roots: Despite its name, the Danish pastry (or wienerbrød in Danish) actually has its roots in Austria. It was brought to Denmark in the 19th century by Austrian bakers during a labor strike. Danish bakers quickly adopted and adapted the technique, creating their own versions of flaky, layered pastries.
- Global Popularity: Danish pastries gained international fame in the early 20th century, particularly in the United States, where they became a breakfast and brunch favorite.
The Rise of the Cheese Danish
- Cream Cheese Innovation: The addition of cream cheese filling to Danish pastries is believed to have originated in the United States, where cream cheese became widely popular in the early 1900s. The creamy, tangy filling paired perfectly with the buttery, flaky pastry, creating a match made in heaven.
- Bakery Staple: Today, cheese danishes are a staple in bakeries and coffee shops around the world, loved for their simplicity and irresistible flavor.
Cultural Significance
- Comfort Food: For many, cheese danishes evoke a sense of nostalgia and comfort, often associated with leisurely weekend breakfasts or special occasions.
- Versatility: Their adaptability to different flavors and fillings has made them a canvas for creativity in both home kitchens and professional bakeries.
Why the History Matters
Understanding the history of cheese danishes adds depth to your baking experience. It’s a reminder that food is more than just sustenance, it’s a way to connect with cultures, traditions, and shared memories.
Fun Fact:
In Denmark, Danish pastries are often enjoyed with a cup of coffee as part of hygge, the Danish concept of coziness and contentment. So, when you bake these danishes, you’re not just making a pastry, you’re creating a moment of joy.
Pairing Suggestions
A cheese danish is delicious on its own, but pairing it with the right beverage or side can take your experience to the next level. Here are some tried-and-true combinations that complement the flavors and textures of your homemade danishes.
Beverage Pairings
- Coffee: A classic choice! The bitterness of coffee balances the sweetness of the danish. Try a latte, cappuccino, or black coffee.
- Tea: A cup of Earl Grey, chamomile, or green tea pairs beautifully with the creamy filling and flaky pastry.
- Hot Chocolate: For a decadent treat, enjoy your danish with a rich, velvety hot chocolate.
- Fresh Juice: Orange juice or apple cider adds a refreshing contrast to the richness of the danish.
- Sparkling Wine: For a brunch celebration, pair your danish with a glass of prosecco or champagne.
Food Pairings
- Fresh Fruit: A side of berries, sliced melon, or a fruit salad adds a light, refreshing element.
- Yogurt Parfait: Layer yogurt with granola and fruit for a balanced breakfast or snack.
- Savory Dishes: Balance the sweetness of the danish with savory options like scrambled eggs, bacon, or a quiche.
- Cheese Board: Add your danish to a cheese board with nuts, dried fruit, and crackers for a delightful spread.
Occasion-Specific Pairings
- Brunch: Serve danishes alongside quiches, muffins, and mimosas for a crowd-pleasing spread.
- Afternoon Tea: Pair mini danishes with finger sandwiches and a selection of teas for an elegant treat.
- Dessert Platter: Include danishes on a dessert platter with cookies, brownies, and other pastries for a sweet finale to any meal.
Why These Pairings Work
These combinations enhance the flavors of your cheese danish while adding variety to your meal. Whether you’re enjoying a quiet morning or hosting a gathering, these pairings ensure your danishes shine.
Pro Tip:
When serving danishes at a party, offer a variety of beverages and sides to cater to different tastes. This makes your spread more inclusive and enjoyable for everyone.
Conclusion
There is something undeniably special about making cheese danish: the sweet smell of flaky puff pastry fills the home and the satisfaction of making something truly stunning that can be shared with others. Whether you are an experienced pastry maker or trying pastries for the first time, this cheese danish recipe is sure to impress.
Heaven on a plate from the creamy filling to the golden-brown buttery layers. And with the tips, variations, and pairing suggestions we shared, you can make this recipe personalized – almost any time of the year or season or any occasion.
So tell me, what is the hold-up? Heat up that oven, roll out that puff pastry, and let the magic begin. If you are cooking for a brunch, a quiet breakfast when at home, or just because, these homemade cheese danishes are going to knock anyone’s socks off.
Final Pro Tip:
Don’t forget to snap a photo of your beautiful danishes before they disappear, they’re almost too pretty to eat (but trust me, you’ll want to dig in!). Share your creations with friends and family, and don’t be surprised if they start asking for the recipe.
FAQs
Even the most straightforward recipes can come with questions, so let’s address some common queries about making cheese danishes. Whether you’re a first-time baker or just looking for clarification, these FAQs will help you troubleshoot and perfect your pastry game.
1. Can I make cheese danishes ahead of time?
Yes! You can assemble the danishes the night before, cover them tightly with plastic wrap, and refrigerate. Bake them fresh in the morning for a warm, flaky treat.
2. Can I freeze cheese danishes?
Absolutely. After baking, let the danishes cool completely, then store them in an airtight container or freezer bag for up to 2 months. Reheat in the oven at 300°F (150°C) for 10-15 minutes to restore their texture.
3. Can I use homemade puff pastry?
Of course! While store-bought puff pastry is convenient, homemade puff pastry can take your danishes to the next level. Just be prepared for the extra time and effort it requires.
4. Why did my cream cheese filling leak out?
This can happen if the filling is overfilled or the pastry isn’t folded securely. Stick to 2-3 tablespoons of filling per danish and press the edges gently to seal.
5. Can I use a different type of cheese?
While cream cheese is traditional, you can experiment with ricotta, mascarpone, or even a mix of cheeses for a unique twist. Just ensure the filling is smooth and not too runny.
6. How do I prevent soggy bottoms?
To avoid soggy pastry, make sure your oven is fully preheated and bake the danishes on the middle rack. Using parchment paper also helps by allowing air to circulate underneath.
7. Can I make mini danishes?
Yes! Simply cut the puff pastry into smaller squares and reduce the baking time by a few minutes. Mini danishes are perfect for parties or bite-sized treats.
8. What’s the best way to store leftovers?
Store leftover danishes in an airtight container at room temperature for up to 2 days or in the fridge for up to 5 days. Reheat in the oven for the best texture.
9. Can I make these danishes gluten-free?
Yes, use a gluten-free puff pastry and ensure all other ingredients are gluten-free. The texture may vary slightly, but they’ll still be delicious.
10. How do I get a shiny, golden finish?
Brush the assembled danishes with a beaten egg or egg wash before baking. This creates a beautiful, glossy finish.
Why These FAQs Matter
These answers address common concerns and help you troubleshoot potential issues, ensuring your cheese danishes turn out perfectly every time.

Cheese Danishes
Indulge in our easy homemade cheese danish recipe featuring flaky puff pastry and creamy filling. Whisk together simple ingredients for buttery, delicious danishes!
Ingredients
For the Cream Cheese Filling:
- 8 oz (225g) cream cheese, softened
- 1/4 cup (50g) granulated sugar
- 1 teaspoon vanilla extract
- 1 tablespoon lemon juice (optional)
For the Pastry:
- 1 sheet puff pastry dough, thawed
- 1 tablespoon flour (for dusting)
For the Glaze (Optional):
- 1/2 cup (60g) powdered sugar
- 1-2 tablespoons milk (or cream)
- 1/4 teaspoon vanilla extract
Instructions
- Prepare Filling: Mix cream cheese, sugar, vanilla, and lemon juice until smooth.
- Prep Pastry: Roll out puff pastry, cut into squares, and spoon filling into the center. Fold corners to create a pinwheel shape.
- Bake: Bake at 400°F (200°C) for 15-18 minutes until golden brown.
- Glaze: Whisk powdered sugar, milk, and vanilla, then drizzle over cooled danishes.
Notes
Pro Tips:
- Chill the filling if it’s too soft.
- Use an egg wash for a shiny finish.
- Store leftovers in an airtight container and reheat in the oven.
Serving Suggestions:
- Pair with coffee, tea, or fresh fruit.
- Serve warm for the best flavor and texture.
Nutritional values are approximate and may vary based on specific ingredients used.
Nutrition Information:
Yield: 6 Serving Size: 1Amount Per Serving: Calories: 250Total Fat: 16gSaturated Fat: 8gCholesterol: 35mgSodium: 150mgCarbohydrates: 22gFiber: 1gSugar: 10gProtein: 4g