




If you’ve ever craved warm, buttery garlic bread but didn’t want to fuss with yeast or long rising times, this crescent dough garlic bread might be exactly what you’re looking for. I still remember the first time I reached for refrigerated crescent roll dough instead of a traditional loaf—it felt like a shortcut, but the result was surprisingly irresistible. Soft on the inside, lightly crisp on the outside, and packed with garlicky, cheesy flavor, this recipe proves that great garlic bread doesn’t have to be complicated.
What makes this crescent roll garlic bread so special is its versatility. It works as a quick side dish for pasta night, a crowd-pleasing appetizer, or even a cozy snack when you want something comforting and homemade. With a simple garlic butter topping, a sprinkle of Parmesan, and just minutes in the oven, you’ll have an easy garlic bread recipe that tastes indulgent without the extra effort—perfect for busy days, last-minute meals, or whenever the craving hits.
Key Benefits & Why You’ll Love This Crescent Dough Garlic Bread
This crescent dough garlic bread is one of those recipes that feels like a little kitchen win every time you make it. It’s simple, fast, and incredibly satisfying—perfect for nights when you want something homemade without committing to a full baking project. If you’ve ever stood in the kitchen wondering how to pull together a warm, comforting side dish at the last minute, this recipe has your back.
Here’s what makes it truly worth keeping on repeat:
- Quick and stress-free: Using refrigerated crescent roll dough eliminates kneading, rising, and guesswork. You’re only minutes away from an easy garlic bread recipe that tastes far more indulgent than the effort involved.
- Rich, buttery garlic flavor: Melted butter, minced garlic, and Parmesan come together to create a bold, savory bite that soaks beautifully into each piece of dough.
- Perfect texture every time: These garlic bread bites bake up soft and fluffy inside, with lightly crisp edges that make them irresistible straight from the oven.
- Versatile for any occasion: Serve this crescent roll garlic bread alongside pasta, soups, salads, or as a quick appetizer when guests drop by unexpectedly.
- Beginner-friendly: Even if you don’t bake often, this recipe is forgiving and straightforward—no special skills required, just simple steps and reliable results.
What I love most is how adaptable this garlic bread is. You can keep it classic or easily customize it with herbs, extra cheese, or spices based on what you have on hand. It’s the kind of recipe that feels helpful rather than demanding, guiding you toward something delicious without overcomplicating the process.
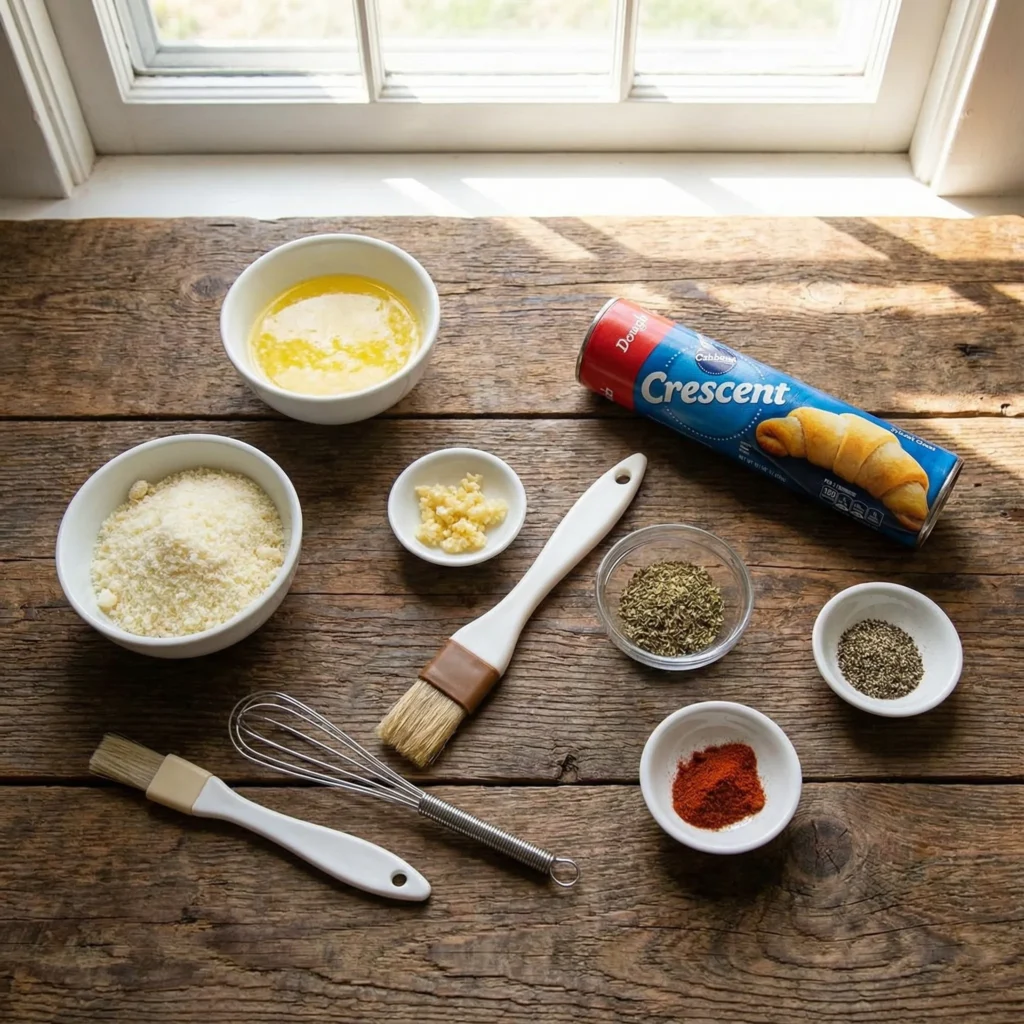
Ingredients for Crescent Dough Garlic Bread
One of the best things about this crescent dough garlic bread is how short and approachable the ingredient list is. Everything works together to create bold flavor without overwhelming the dough, making this recipe easy to pull off anytime—even on a busy day.
Here’s what you’ll need and why each ingredient matters:
- ¼ cup unsalted butter, melted
This forms the rich base of the garlic butter topping. Using unsalted butter lets you control the seasoning and keeps the flavors balanced. - 1 tablespoon minced garlic
Fresh garlic delivers that unmistakable aroma and depth that defines great garlic bread. Finely minced garlic spreads evenly, ensuring every bite is flavorful. - 2 tablespoons grated Parmesan cheese
Parmesan adds a subtle nutty, savory note that complements the butter and garlic without overpowering the dough. - 1 (8-ounce) package refrigerated crescent roll dough
The star of this recipe. Crescent dough bakes up soft and tender, making it a perfect shortcut for easy garlic bread with minimal effort. - ½ teaspoon Italian seasoning
A blend of herbs like oregano and basil adds classic garlic bread flavor and a hint of warmth. - ¼ teaspoon ground black pepper (or to taste)
Black pepper brings gentle heat and balances the richness of the butter. - ⅛ teaspoon paprika
Just a touch enhances color and adds a mild, smoky undertone without dominating the flavor.
Tip: If possible, let the butter cool slightly before mixing in the garlic and cheese. This helps preserve the garlic’s flavor and prevents it from cooking too quickly before baking.
How to Make Crescent Dough Garlic Bread
This crescent dough garlic bread comes together quickly, and once you’ve made it once, you’ll likely remember the steps by heart. Think of this process as assembling flavor rather than baking from scratch—simple actions that lead to a warm, bakery-style result.
Step-by-Step Instructions
- Preheat and prepare your pan
Set your oven to 375°F (190°C) and line a baking sheet with parchment paper. This prevents sticking and helps the bottoms bake evenly without over-browning. - Mix the garlic butter
In a small bowl, combine the melted butter, minced garlic, and grated Parmesan. Stir until everything is well blended. This mixture is the flavor foundation, so make sure the garlic is evenly distributed. - Slice the crescent dough
Open the can of refrigerated crescent roll dough, but do not unroll it. Using a serrated knife, carefully cut the dough into 12 equal slices. This keeps the pieces uniform so they bake at the same rate. - Arrange and season
Place the dough slices cut-side up on the prepared baking sheet, leaving a little space between each one. Brush the tops generously with the garlic butter mixture, then sprinkle with Italian seasoning, black pepper, and paprika. - Bake until golden
Transfer the baking sheet to the oven and bake for 16 to 20 minutes, or until the pieces are puffed, lightly crisp on the edges, and golden on top. - Cool slightly and serve
Let the garlic bread rest for a few minutes before serving. This allows the butter to settle and keeps the pieces tender instead of greasy.
Helpful tip: For extra flavor, reserve a small amount of garlic butter and brush it on immediately after baking. The heat helps it melt right into the dough, giving you a richer, more aromatic finish.
Pro Tips and Variations
Once you’ve mastered the basics of this crescent dough garlic bread, it’s easy to tweak and customize it to suit your taste or the meal you’re serving. These simple tips and variations help you get consistent results while adding flexibility to the recipe.
Pro Tips for Best Results
- Use a light hand with the butter: Generously brushing is good, but avoid pooling butter on the pan, which can cause soggy bottoms instead of lightly crisp edges.
- Even slices matter: Cutting the crescent dough into uniform pieces ensures everything bakes evenly and finishes at the same time.
- Watch the last few minutes: Oven temperatures vary, so check early. You’re looking for puffed dough with a golden top, not deep browning.
- Add butter after baking: Brushing a small amount of garlic butter on hot bread boosts flavor without overcooking the garlic.
Flavor Variations to Try
- Cheesy garlic bread: Sprinkle shredded mozzarella or extra Parmesan over the dough before baking for gooey, melty tops.
- Herb-forward version: Add dried oregano, basil, or parsley to the garlic butter for a more traditional Italian-style garlic bread.
- Spicy twist: Mix a pinch of red pepper flakes into the butter for gentle heat that balances the richness.
- Garlic butter deluxe: Stir a teaspoon of olive oil into the butter to deepen the flavor and keep the bread tender.
Make-It-Your-Own Ideas
- Swap Parmesan for Asiago or Romano cheese.
- Finish with fresh herbs right after baking for color and aroma.
- Serve as bite-sized crescent roll garlic bread pieces for parties or casual gatherings.
These small adjustments make this easy garlic bread recipe endlessly adaptable, so you can tailor it to your mood, menu, or pantry without complicating the process.
Serving & Pairing Suggestions
This crescent dough garlic bread is incredibly versatile, which makes it easy to serve in both casual and more polished settings. Whether it’s fresh from the oven on a busy weeknight or part of a shared table with guests, it fits right in without extra effort.
Best Ways to Serve It
- Straight from the oven: Serve warm for the softest texture and boldest garlic flavor.
- As pull-apart bites: Arrange the pieces on a platter for easy grabbing—perfect for gatherings or family-style meals.
- With a dipping option: Pair with warm marinara, creamy Alfredo, or even a garlic-infused olive oil for an extra layer of flavor.
Perfect Pairings
This crescent roll garlic bread works beautifully alongside a variety of dishes:
- Pasta dishes: Spaghetti, baked ziti, lasagna, or creamy pasta benefit from a buttery side that soaks up sauce.
- Soups and stews: Tomato soup, minestrone, or creamy vegetable soups pair especially well.
- Salads: Serve with crisp Caesar or mixed green salads for a balanced meal.
- Comfort meals: It’s a natural match for casseroles, roasted chicken, or hearty skillet dishes.
Hosting Tip
If you’re serving a crowd, double the batch and keep the garlic bread warm in a low oven. This easy garlic bread recipe disappears quickly, so having extras ensures everyone gets a piece.
No matter how you serve it, this garlic bread adds warmth, flavor, and a homemade touch that instantly elevates the meal.
Tools and Equipment Guide
You don’t need any specialized tools to make this crescent dough garlic bread, which is part of what makes it such an approachable recipe. A few basic kitchen essentials are all it takes to turn simple ingredients into a golden, garlicky side dish.
Essential Tools
- Baking sheet: A standard rimmed baking sheet provides even heat and prevents butter from dripping into the oven.
- Parchment paper: Helps prevent sticking and makes cleanup quick and effortless.
- Small mixing bowl: Perfect for combining the melted butter, garlic, and Parmesan evenly.
- Pastry brush or spoon: A brush gives you the most control, but a spoon works just fine for spreading the garlic butter.
- Serrated knife: Ideal for slicing the crescent roll dough cleanly without squishing it.
Optional but Helpful
- Measuring spoons: Useful for keeping seasoning balanced, especially if you’re new to garlic bread recipes.
- Cooling rack: Allows excess heat and steam to escape if you’re not serving immediately.
- Tongs or spatula: Makes transferring the baked pieces easier without tearing the dough.
Practical tip: If you don’t have parchment paper, lightly greasing the baking sheet works as an alternative—just keep an eye on the bottoms to avoid over-browning.
With these simple tools on hand, making crescent roll garlic bread feels effortless, letting you focus more on flavor and timing than on equipment.
Troubleshooting Common Issues
Even with an easy crescent dough garlic bread recipe like this one, small details can affect the final result. If something doesn’t turn out exactly as expected, these quick fixes will help you adjust and succeed the next time.
Garlic Bread Is Too Soft or Doughy
- This usually means it needs a few more minutes in the oven.
- Make sure the pieces are spaced slightly apart so heat can circulate evenly.
- Check that your oven is fully preheated before baking.
Bottoms Are Too Brown
- Your baking sheet may be getting too hot. Try placing the pan on the middle rack instead of the lower one.
- Using parchment paper helps create a barrier between the dough and direct heat.
- If needed, switch to a lighter-colored baking sheet.
Garlic Flavor Is Too Strong or Too Mild
- For milder flavor, reduce the minced garlic slightly or mix it into cooled butter.
- For bolder garlic bread, brush on a little extra garlic butter right after baking while the bread is still hot.
Bread Feels Greasy
- Avoid overloading the dough with butter before baking.
- Let the garlic bread rest for a couple of minutes after coming out of the oven so the butter can absorb properly.
Uneven Baking
- Uneven slices can bake at different speeds. Cutting the crescent dough into equal pieces makes a big difference.
- Rotate the pan halfway through baking if your oven has hot spots.
These small adjustments make a big impact and help ensure your crescent roll garlic bread turns out golden, flavorful, and perfectly baked every time—no guesswork required.
FAQs
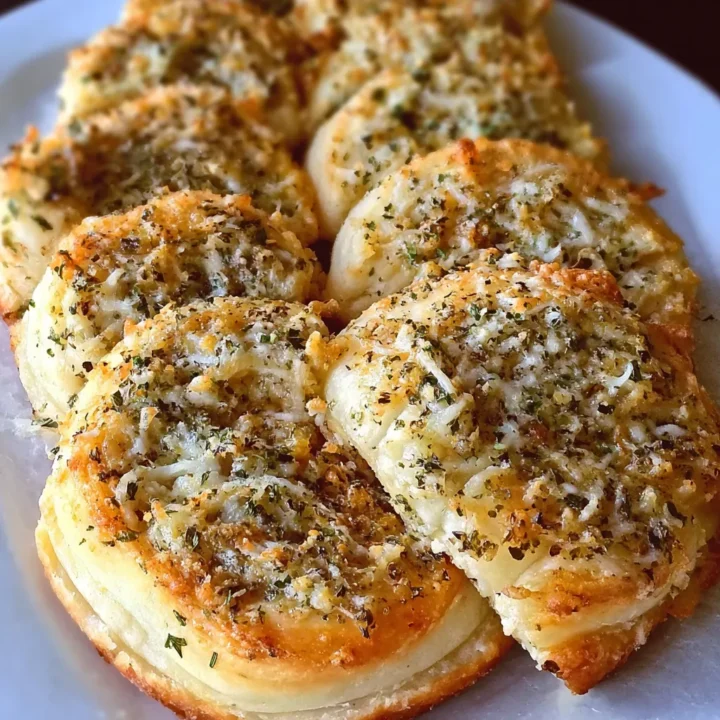
Crescent Dough Garlic Bread
This crescent dough garlic bread is one of those recipes that feels like a little kitchen win every time you make it.
Ingredients
- ¼ cup unsalted butter, melted
- 2 tablespoons grated Parmesan cheese
- 1 tablespoon minced garlic
- 1 (8-ounce) package refrigerated crescent roll dough
- ½ teaspoon Italian seasoning
- ¼ teaspoon ground black pepper (or to taste)
- ⅛ teaspoon paprika
Instructions
- Preheat the oven to 375°F (190°C). Line a baking sheet with parchment paper.
- Prepare the garlic butter: In a small bowl, mix the melted butter, minced garlic, and Parmesan cheese until well combined.
- Slice the dough: Open the crescent dough can without unrolling it. Using a serrated knife, cut the dough into 12 equal slices.
- Arrange and season: Place slices cut-side up on the baking sheet. Brush generously with garlic butter, then sprinkle with Italian seasoning, black pepper, and paprika.
- Bake: Cook for 16–20 minutes, or until puffed and golden brown.
- Serve warm: Allow to cool slightly before serving for best texture and flavor.
Notes
- Even slicing matters: Uniform pieces ensure consistent baking and golden results.
- Boost flavor after baking: Brush a small amount of leftover garlic butter on the hot bread for extra aroma and richness.
- Avoid sogginess: Don’t overload the dough with butter—generous, not dripping, is the goal.
- Customize easily: Add shredded mozzarella, red pepper flakes, or fresh herbs to tailor the flavor to your meal.
Nutrition Information:
Yield: 12 Serving Size: 1Amount Per Serving: Calories: 165Total Fat: 11gSaturated Fat: 6gCholesterol: 25mgSodium: 260mgCarbohydrates: 13gFiber: 0.5gSugar: 2gProtein: 3g