




Have you ever bitten into a cookie that’s crisp on the outside, irresistibly soft inside, and dusted with just the right amount of powdered-sugar magic? That’s exactly what Chocolate Crinkle Cookies deliver — the kind of classic, fudgy treat that feels like a cross between a brownie and a holiday cookie tray favorite.
I love making these because they’re simple, nostalgic, and endlessly reliable. Whether you’re baking for a holiday party, prepping a weekend treat, or just craving something chocolatey and comforting, these crackle-topped cookies never disappoint. Their signature crinkled coating isn’t just pretty — it promises that perfect contrast of textures: a delicate, sugary shell with a rich, chewy center bursting with cocoa flavor.
If you enjoy easy, crowd-pleasing recipes that fill your kitchen with warmth and your cookie jar with something irresistible, you’re in for a treat. Let’s dive into what makes these Chocolate Crinkle Cookies so special.
Why You’ll Love These Chocolate Crinkle Cookies
There’s something magical about a cookie that looks bakery-fancy but comes together with simple pantry staples. These Chocolate Crinkle Cookies check all the boxes — rich chocolate flavor, that iconic crackled surface, and a soft, brownie-like center that keeps everyone reaching for “just one more.”
Here’s what makes this recipe a keeper:
- A perfect balance of texture: The crisp, powdered-sugar coating contrasts beautifully with the fudgy center, giving each bite a satisfying mix of soft and delicate crunch.
- Reliable and beginner-friendly: Even if you’re new to baking, this recipe is straightforward and forgiving. A chilled dough and a quick roll in confectioners’ sugar are all it takes to achieve that classic crinkle effect.
- Holiday-ready and crowd-pleasing: These cookies shine on Christmas cookie trays, gift boxes, or potluck dessert tables. Their festive, snow-dusted look feels instantly celebratory.
- Made with real, bold cocoa flavor: Using unsweetened cocoa powder brings out a deep chocolate taste without being overly sweet, keeping the flavor rich and satisfying.
- Great make-ahead option: Since the dough needs to chill, you can prepare it the night before and bake fresh cookies whenever you’re ready — perfect for busy schedules or party prep.
Whether you’re baking for family, gifting treats, or simply indulging in something chocolatey and comforting, these cookies never fail to impress. They’re the kind of recipe you’ll want to save, share, and come back to whenever you need a dependable, delicious cookie moment.
Ingredients
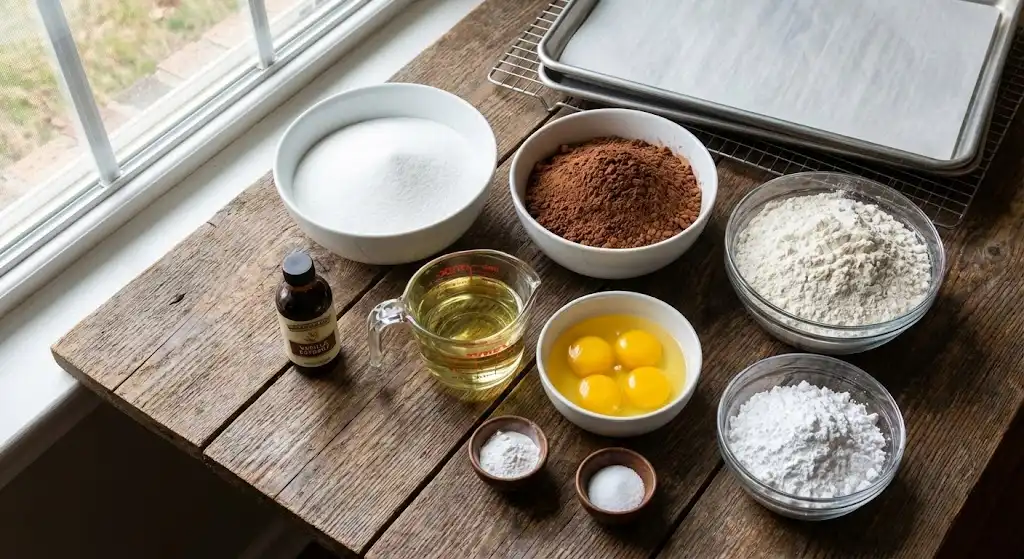
Here’s everything you’ll need to bring these fudgy, crackle-topped cookies to life. I like to keep the list simple and straightforward — just classic pantry staples that deliver big flavor.
Dry Ingredients:
- 2 cups all-purpose flour – Provides structure and helps the cookies hold their shape.
- 2 teaspoons baking powder – Gives the cookies their lift and helps create that signature crinkle top.
- ½ teaspoon salt – Balances the sweetness and enhances the chocolate flavor.
Wet Ingredients & Sweeteners:
- 2 cups white sugar – Sweetens the dough and contributes to the soft, chewy texture.
- 1 cup unsweetened cocoa powder – The key to a deep, rich, chocolatey flavor.
- ½ cup vegetable oil – Keeps the cookies moist and tender without adding heaviness.
- 4 large eggs – Bind the ingredients and add richness; they also help achieve that brownie-like center.
- 2 teaspoons vanilla extract – Adds warmth and enhances the overall chocolate aroma.
For Coating:
- ½ cup confectioners’ sugar – Creates the snowy, crackled finish and adds a subtle crispness to the exterior.
With these simple, accessible ingredients, you’re on your way to baking a batch of cookies that look impressive and taste even better.
Instructions
Let’s walk through the process step-by-step so you can bake these cookies with confidence. The method is simple, but a few small details—like chilling the dough and coating each ball generously—make all the difference in achieving that perfect crinkle.
- Start by combining your base ingredients.
In a medium bowl, mix together the sugar, cocoa powder, and vegetable oil. The mixture will look thick and glossy. Add the eggs one at a time, mixing well after each addition, then stir in the vanilla extract. - Whisk your dry ingredients separately.
In another bowl, whisk the flour, baking powder, and salt. This ensures the leavening is evenly distributed for consistent cracking and lift. - Bring the dough together.
Gradually add the dry mixture to the cocoa mixture. Stir just until combined—no need to overmix. The dough will be sticky, and that’s exactly what you want. - Chill the dough thoroughly.
Cover the bowl and refrigerate for at least 4 hours or overnight. Chilling firms up the dough, prevents the cookies from spreading too much, and helps create the signature crackled exterior. - Preheat and prep.
Heat your oven to 350°F (175°C). Line two cookie sheets with parchment paper to prevent sticking and ensure even baking. - Shape and coat.
Scoop or roll the chilled dough into 1-inch balls. Coat each one generously in confectioners’ sugar. Don’t skimp—this thick coating is what forms the snowy crinkles. - Bake to perfection.
Arrange the dough balls about 1 inch apart on your prepared sheets and bake for 10–12 minutes, or until the tops are crackled and the edges are just set. The centers should still look slightly soft. - Cool and enjoy.
Let the cookies rest on the baking sheet for a few minutes to firm up, then transfer them to a wire rack to cool completely.
Pro Tips & Variations
Baking Chocolate Crinkle Cookies is simple, but a few smart tweaks can make your cookies even richer, fudgier, and more impressive. Here are some tried-and-true tips and fun variations to elevate every batch.
Pro Tips
- Chill the dough fully:
This step isn’t optional. A well-chilled dough helps the cookies stay thick, develop deeper cracks, and maintain that brownie-like center. Overnight chilling gives the best results. - Coat generously in confectioners’ sugar:
A light dusting won’t create bold crinkles. Roll each dough ball heavily so the sugar forms a thick, snowy shell as it bakes. - Use a cookie scoop for even sizing:
Uniform dough balls = even baking and prettier cookies. A 1-tablespoon scoop works perfectly for this recipe. - Avoid overbaking:
The cookies should look slightly underdone in the center when you take them out. They continue to firm up on the baking sheet, keeping that soft, fudgy texture. - Work quickly with chilled dough:
If the dough starts to warm up while you’re rolling it, pop it back into the fridge for 10–15 minutes to keep your cookies from spreading too much.
Tasty Variations
- Peppermint Crinkles:
Add ½ teaspoon peppermint extract to the dough or sprinkle crushed candy canes on top after baking for a festive twist. - Mocha Crinkles:
Mix 1–2 teaspoons of instant espresso powder into the cocoa mixture to deepen the chocolate flavor. - Spiced Crinkles:
Try adding a pinch of cinnamon or a hint of chili powder for a warm, cozy flavor. - Double Chocolate Crinkles:
Fold in ½ cup mini chocolate chips for extra richness and texture. - Orange Chocolate Crinkles:
Add 1 teaspoon of fresh orange zest to brighten the chocolate with a citrusy note.
Serving & Pairing Suggestions
These Chocolate Crinkle Cookies are delicious on their own, but pairing them thoughtfully can turn a simple treat into a memorable moment. Here are some fun and practical ways to enjoy them:
Perfect Ways to Serve
- Fresh from the cooling rack:
These cookies are at their absolute best once they’ve cooled slightly but still have that soft, brownie-like center. - Holiday cookie platters:
Their snowy, crackled tops make them a festive standout alongside sugar cookies, gingerbread, or shortbread. - Gift boxes & party favors:
Package them in cute tins, clear bags, or small boxes with ribbon — they hold their shape well and look gorgeous when stacked. - With a cozy drink:
Serve them warm with a glass of milk, hot cocoa, or your favorite coffee for the ultimate winter treat.
Simple but Delicious Pairings
- Coffee or espresso – The bold flavors complement the rich cocoa beautifully.
- Hot chocolate – The perfect indulgent duo, especially on cold evenings.
- Vanilla ice cream – Sandwich a cookie scoop between two crinkles for an easy dessert.
- Warm milk or chai latte – Mild flavors that highlight the cookie’s sweetness and texture.
Occasions They’re Perfect For
- Holiday gatherings
- Cookie exchanges
- School parties
- Weekend baking with kids
- After-dinner treats
Tools & Equipment Guide
You don’t need fancy gear to make Chocolate Crinkle Cookies, but having the right tools on hand makes the process smoother and ensures consistent, beautiful results. Here’s a quick guide to what you’ll need — and why each item matters.
Essential Tools
- Mixing bowls (2–3 sizes):
One for your wet ingredients and another for your dry mixture. A third bowl can be helpful for rolling the dough in confectioners’ sugar. - Whisk & mixing spoon or silicone spatula:
A whisk helps evenly distribute the baking powder and salt, while a sturdy spoon or spatula makes mixing the thick dough easier. - Measuring cups and spoons:
Accuracy is key in baking, especially with ingredients like flour and cocoa powder. - Cookie scoop or tablespoon measure:
Ensures uniform cookie sizes so they bake evenly and develop consistent crinkles. - Baking sheets:
Light-colored sheets prevent the bottoms from over-browning. You’ll want at least two so you can rotate batches. - Parchment paper or silicone baking mats:
Prevent sticking and promote even baking. Plus, cleanup becomes a breeze. - Cooling rack:
Allows air to circulate around the cookies, helping them firm up without becoming soggy.
Helpful Extras
- Stand mixer or hand mixer:
Not required, but they make combining the ingredients faster and more efficient — especially when mixing the thicker dough. - Fine-mesh sieve:
Great for breaking up clumps in cocoa powder or adding an extra-light dusting of confectioners’ sugar after baking.
Troubleshooting Common Issues
Even though Chocolate Crinkle Cookies are straightforward, a few small hiccups can affect the final result. Here’s a friendly guide to help you fix — or even better, prevent — the most common issues bakers run into.
1. Cookies Didn’t Crack on Top
- The dough wasn’t chilled long enough.
Warm dough won’t form those bold cracks. Chill for at least 4 hours or overnight. - Your oven may not be hot enough.
A properly preheated oven creates the quick rise needed for cracking. - Too much flour in the dough.
Scoop lightly and level the flour to avoid drying out the dough.
2. Cookies Spread Too Much
- Dough wasn’t firm.
If it feels soft or sticky when shaping, chill longer. - Baking sheets were warm.
Always use completely cooled pans between batches. - Oil measurement was off.
Too much oil can thin the dough—measure carefully.
3. Powdered Sugar Disappeared After Baking
- Coating was too thin.
Roll each dough ball generously and evenly in confectioners’ sugar. - Dough absorbed the sugar due to warmth.
If the dough warms up during shaping, pop it back into the fridge for 10–15 minutes.
4. Cookies Turned Out Dry
- Overbaking is the number one cause.
Remove them when the edges are just set and the centers still look slightly soft. - Too much flour was used.
Spoon flour into the measuring cup rather than packing it.
5. Cookies Stuck to the Pan
- No parchment or baking mat.
Always line your baking sheets to prevent sticking and reduce browning.
With these fixes in your back pocket, you’ll be able to tackle any cookie curveballs and still end up with perfect, fudgy Chocolate Crinkle Cookies every time. Ready for the next section?
FAQs
Here are some of the most common questions bakers ask when making Chocolate Crinkle Cookies. These quick, helpful answers will guide you toward perfect results every time.
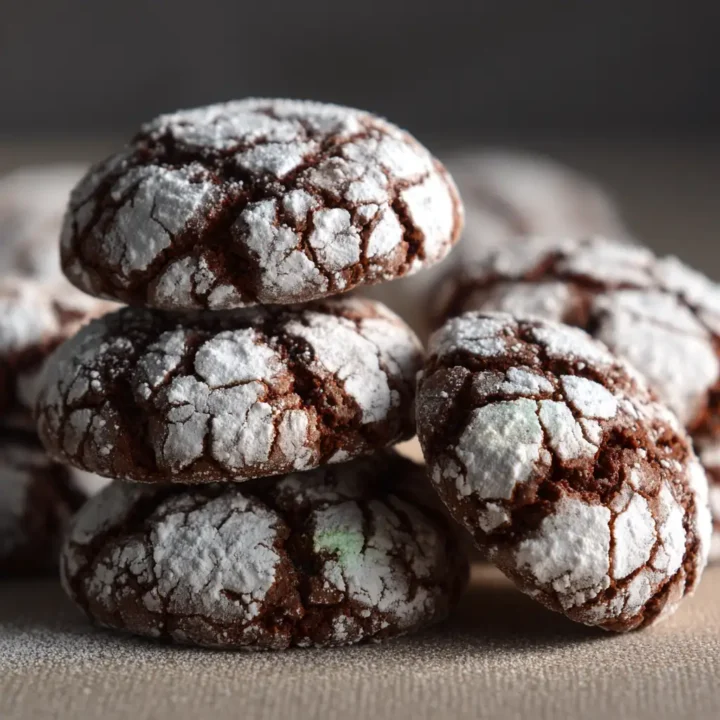
Chocolate Crinkle Cookies
There’s something magical about a cookie that looks bakery-fancy but comes together with simple pantry staples. These Chocolate Crinkle Cookies check all the boxes — rich chocolate flavor, that iconic crackled surface, and a soft, brownie-like center that keeps everyone reaching for “just one more.”
Ingredients
Dry Ingredients:
- 2 cups all-purpose flour
- 2 teaspoons baking powder
- ½ teaspoon salt
Wet Ingredients & Sweeteners:
- 2 cups white sugar
- 1 cup unsweetened cocoa powder
- ½ cup vegetable oil
- 4 large eggs
- 2 teaspoons vanilla extract
Coating:
- ½ cup confectioners’ sugar
Instructions
Mix Wet Ingredients:
- In a medium bowl, combine sugar, cocoa powder, and oil. Mix until glossy. Add eggs one at a time, blending well after each. Stir in vanilla.
Combine Dry Ingredients:
- In a separate bowl, whisk flour, baking powder, and salt until evenly mixed.
Bring the Dough Together:
- Gradually add the dry mixture to the chocolate mixture. Stir gently until combined. Dough will be sticky.
Chill the Dough:
- Cover and refrigerate for at least 4 hours or overnight until firm.
Prepare to Bake:
- Preheat the oven to 350°F (175°C). Line cookie sheets with parchment paper.
Shape and Coat:
- Scoop or roll chilled dough into 1-inch balls. Coat each generously in confectioners’ sugar.
Bake:
- Arrange on prepared sheets (1 inch apart) and bake for 10–12 minutes, until the tops crack and edges are set.
Cool:
- Let cookies rest on the sheet for a few minutes, then transfer to a wire rack to cool completely.
Notes
- Chill thoroughly: The long chill time is crucial for preventing spreading and creating bold crinkles.
- Generous sugar coating = perfect crackle: A heavy layer of powdered sugar helps create those photogenic, snowy tops.
- Don’t overbake: Remove when centers are slightly soft — they firm up as they cool, staying fudgy inside.
- Make-Ahead Friendly: Chill the dough overnight or freeze uncoated dough balls for up to 2 months.
Nutrition Information:
Yield: 24 Serving Size: 1Amount Per Serving: Calories: 105Total Fat: 3.5gSaturated Fat: 0.5gCholesterol: 20mgSodium: 65mgCarbohydrates: 19gFiber: 1gSugar: 14gProtein: 2g