




There’s something magical about a fresh strawberry tart—that glossy fruit glaze, the burst of sweet berries, and the delicate crunch of a buttery shell. If you love simple summer desserts that feel bakery-quality without the fuss, these easy strawberry tarts might become your new favorite treat.
Have you ever taken a bite of a dessert that instantly reminded you of sunny afternoons, ripe berries, and warm kitchen memories? That’s the feeling these mini tarts bring to the table. They’re light, bright, and beautifully customizable—perfect for gatherings, quick weeknight sweets, or those moments when you simply want something fresh and homemade.
What I love most about this recipe is how effortless it is. With just a handful of ingredients and a silky, fruit-forward glaze, you can create a crowd-pleasing dessert that looks like it came straight from a patisserie. Whether you’re a seasoned baker or just getting comfortable with fruit tarts, this is one recipe that invites creativity and guarantees delicious results.
So, ready to turn a basket of juicy strawberries into a stunning treat? Let’s begin.
Key Benefits & Why You’ll Love This Strawberry Tart Recipe
If you’re craving a dessert that feels light, fresh, and effortlessly elegant, these mini strawberry tarts will win you over instantly. They bring together everything we love about simple summer desserts—bright flavors, beautiful presentation, and a no-fuss process that anyone can master. Think of this recipe as your shortcut to creating a bakery-style tart at home without spending hours in the kitchen.
Here’s why this recipe is such a keeper:
- Fresh, vibrant flavor: Each bite combines juicy strawberries with a glossy fruit glaze, creating a natural sweetness that never feels heavy.
- Beginner-friendly method: No complicated pastry skills required. Using ready-made tart shells makes this dessert accessible even if you’re new to fruit tarts.
- Perfect for any occasion: Whether you’re hosting a brunch, bringing a treat to a gathering, or simply wanting a pretty dessert after dinner, these tarts always impress.
- Customizable and versatile: Swap berries, add citrus zest, or flavor the glaze—this recipe invites creativity while still delivering consistent results.
- Beautiful presentation with minimal effort: The vibrant color of the berries against the crisp shell looks like something from a patisserie display case, yet the process remains quick and approachable.
What truly sets this recipe apart is how forgiving it is. The glaze comes together in minutes, the ingredients are simple, and the assembly is wonderfully intuitive. If you’ve ever wanted to make a fresh strawberry tart that tastes as good as it looks, this is the perfect place to start.
These tarts aren’t just desserts—they’re little moments of joy you can share, savor, and proudly serve. Ready to see how easy they are? Let’s keep going.
Ingredients
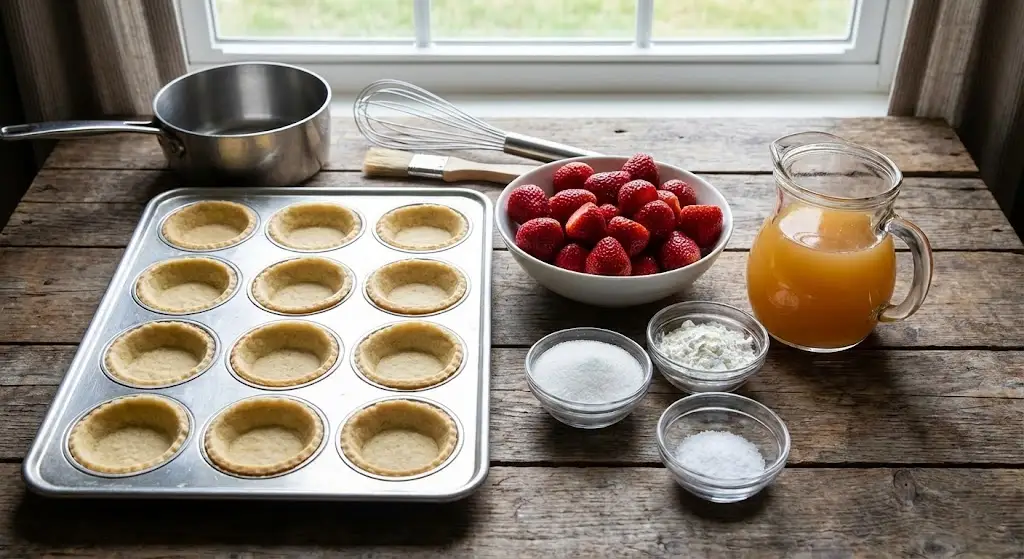
Before we dive into assembling these gorgeous fresh strawberry tarts, let’s take a look at what you’ll need. The ingredient list is simple, accessible, and designed to highlight the natural sweetness of the berries while giving the glaze a smooth, vibrant finish.
For the Tart Shells & Filling
- 12 pre-baked mini tart shells (about 4 inches each; buttery shortcrust or sweet pastry shells work beautifully)
- 3 cups fresh strawberries, hulled and kept whole or halved depending on size
For the Glaze
- ⅔ cup granulated sugar
- 2 ½ tablespoons cornstarch
- A small pinch of fine sea salt
- 1 cup apple juice
- Optional flavor boosters:
- A splash of lemon juice for brightness
- ½ teaspoon vanilla extract or a hint of orange zest for added depth
Instructions
Making these mini strawberry tarts is surprisingly simple, and once you see how beautifully they come together, you’ll want to make them for every occasion. Just follow the steps below, and you’ll have glossy, vibrant tarts ready to chill in no time.
Step 1: Prep Your Ingredients
Give your strawberries a gentle rinse, remove the stems, and set them aside to dry. If some berries are larger, slice them in half so they fit neatly into the tart shells.
Step 2: Create the Glaze
- In a small saucepan, whisk together the sugar, cornstarch, and salt.
- Slowly pour in the apple juice while stirring to prevent lumps.
- Set the saucepan over medium heat and cook, stirring continuously.
- Once the mixture thickens into a smooth, glossy glaze, remove it from the heat and let it cool for about 10 minutes.
- Tip: If you’re adding lemon juice, vanilla, or citrus zest, mix it in while the glaze is still warm.
Step 3: Prepare the Tart Shells
Brush a thin layer of the warm glaze over the base of each pre-baked tart shell. This creates a delicious barrier that keeps the pastry crisp while adding extra flavor.
Step 4: Arrange the Strawberries
Nestle the strawberries into the shells, arranging them snugly so each tart looks full and vibrant. Whole berries work beautifully, but sliced berries make for an elegant, layered look.
Step 5: Add the Remaining Glaze
Carefully spoon the remaining glaze over the strawberries, making sure each berry gets a glossy coating. Work slowly so the glaze settles without overflowing.
Step 6: Chill and Set
Place the assembled tarts in the refrigerator for 2 to 4 hours. This step allows the glaze to firm up and the flavors to meld, giving you that picture-perfect, bakery-style finish.
Once chilled, your fresh strawberry tarts are ready to serve—bright, beautiful, and irresistibly refreshing. Let’s move on to pro tips and variations to help you elevate them even further!
Pro Tips & Variations
One of the best things about these mini strawberry tarts is how adaptable they are. With just a few small tweaks, you can elevate the flavor, adjust the texture, or even transform the dessert entirely. Here are some helpful tips and creative variations to make your tarts truly your own.
Pro Tips for Perfect Strawberry Tarts
- Keep the tart shells crisp:
Brushing the base with a thin layer of glaze before adding the berries acts as a moisture barrier and prevents sogginess. - Aim for even berry sizes:
If your strawberries vary in size, halve the larger ones so each tart looks uniform and beautifully arranged. - Let the glaze cool slightly:
Pouring very hot glaze can soften the berries too much. A brief cooling period helps it cling smoothly and gives tarts that classic glossy finish. - Chill long enough:
The full 2–4 hour chill time helps the glaze set properly and keeps the tart shells crisp while enhancing flavor. - Use a gentle hand when glazing:
Spoon the glaze slowly so it settles around each berry without spilling over the edges.
Flavor Variations to Try
- Citrus Twist:
Add orange zest or lemon zest to the glaze for a bright, aromatic finish. - Mixed Berry Tarts:
Swap some strawberries for blueberries, raspberries, or blackberries for a colorful fruit-tart assortment. - Vanilla Cream Layer:
Spread a thin layer of vanilla pastry cream or mascarpone under the berries before glazing for a richer, more decadent tart. - Chocolate Drizzle:
Once the glaze sets, drizzle melted dark or white chocolate over the top for an elegant touch. - Almond Tart Shells:
Use almond-based tart shells for a nutty flavor that pairs beautifully with fresh berries.
Serving & Pairing Suggestions
Once your fresh strawberry tarts have chilled to perfection, the fun part begins—serving them! These vibrant little desserts shine in almost any setting, and with the right pairings, you can turn a simple treat into a memorable experience.
Best Ways to Serve These Tarts
- Straight from the fridge:
The cool glaze and crisp shell make these tarts incredibly refreshing, especially during warm weather. - With a touch of creaminess:
Add a dollop of lightly sweetened whipped cream, vanilla bean mascarpone, or plain Greek yogurt for a lovely contrast to the bright berries. - Dusted for elegance:
A light sprinkle of powdered sugar or a tiny mint leaf makes each tart photo-ready and perfect for entertaining.
Perfect Pairings
- Tea & Coffee:
Pair with iced tea, Earl Grey, or a mild coffee for a delicate balance of sweetness and acidity. - Sparkling Drinks:
Sparkling water with lemon, rosé, or a berry-infused mocktail complements the tart’s fresh, fruity notes beautifully. - Light Meals:
Serve after brunch dishes like quiche, mixed greens, or savory pastries for a refreshing finish.
Occasions These Tarts Shine
- Spring and summer gatherings
- Mother’s Day brunch
- Afternoon tea parties
- Potlucks and picnics
- Elegant dessert tables
Tools and Equipment Guide
One of the best parts about making mini strawberry tarts is that you don’t need any specialty tools or advanced baking equipment. A few simple kitchen essentials are all it takes to create a dessert that looks beautifully polished and tastes wonderfully fresh. Here’s everything you’ll want to have on hand before you begin.
Essential Tools
- Small saucepan:
Perfect for preparing the fruit glaze and ensuring it heats evenly without scorching. - Whisk or heatproof spatula:
Helps blend the sugar, cornstarch, and apple juice into a smooth, lump-free mixture. - Pastry brush:
Useful for brushing the bottom of each tart shell with a thin layer of glaze to keep them crisp. - Cooling rack:
Ideal for letting the glaze cool slightly before assembly. - Mixing bowls:
A couple of small bowls will help you organize ingredients and optional flavor add-ins like citrus zest or vanilla.
Helpful Extras (Optional but Wonderful)
- Paring knife:
Great for trimming or halving strawberries to make them fit neatly in the pastry shells. - Offset spatula or spoon:
Makes spreading glaze and arranging berries easier and more precise. - Chilling tray or flat baking sheet:
Helps move the assembled tarts into the refrigerator without disturbing their shape.
Tart Shell Options
- Pre-baked shortcrust shells
- Sweet pastry tartlets
- Almond tart shells for a nutty upgrade
Troubleshooting Common Issues
Even though these mini strawberry tarts are wonderfully simple to make, a few small hiccups can happen along the way—especially if it’s your first time working with fruit glazes or delicate tart shells. Here’s a helpful guide to keep everything running smoothly and ensure your tarts come out beautifully every single time.
Issue 1: The Glaze Turns Lumpy
What happened:
The cornstarch may not have been whisked in evenly, or the mixture heated too quickly.
How to fix it:
- Whisk the dry ingredients thoroughly before adding the apple juice.
- Stir constantly over medium heat.
- If lumps appear, strain the glaze through a fine mesh sieve while it’s still warm.
Issue 2: The Tart Shells Become Soft or Soggy
What happened:
The filling may have been added while the glaze was too hot, or not enough glaze was brushed on the base.
How to fix it:
- Always brush a thin layer of glaze inside each shell before adding berries.
- Allow the glaze to cool slightly so it doesn’t steam the pastry.
- Chill the tarts promptly once assembled.
Issue 3: The Glaze Doesn’t Set Properly
What happened:
The cornstarch may not have cooked long enough, or the liquid-to-starch ratio was off.
How to fix it:
- Cook the glaze until it becomes noticeably thick and glossy.
- Keep it over medium heat—too low and it won’t activate properly.
- Double-check measurements for accuracy.
Issue 4: Strawberries Slide Around
What happened:
The glaze may have been too warm during assembly or not spooned in slowly enough.
How to fix it:
- Let the glaze cool for 8–10 minutes before using.
- Arrange berries snugly in the tart shell before glazing.
- Spoon the glaze gently so it nestles around the fruit instead of pushing it.
Issue 5: Uneven or Dull Finish
What happened:
Strawberries may have released moisture or the glaze was applied too thinly.
How to fix it:
- Pat strawberries dry before arranging them.
- Apply a generous but controlled layer of glaze for that classic shiny finish.
FAQs
Strawberry Tarts
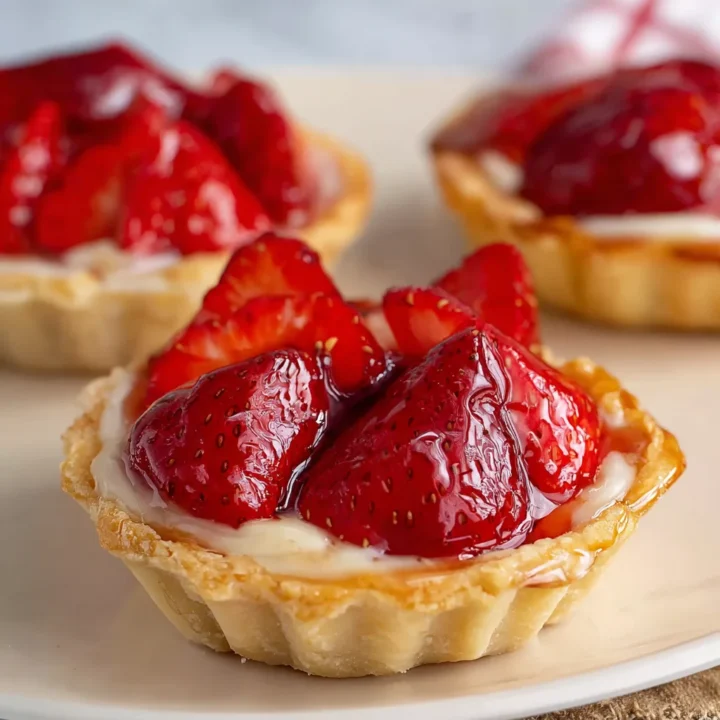
If you’re craving a dessert that feels light, fresh, and effortlessly elegant, these mini strawberry tarts will win you over instantly.
Ingredients
For the Tart Shells & Filling:
- 12 pre-baked mini tart shells (about 4 inches each)
- 3 cups fresh strawberries, hulled (whole or halved depending on size)
For the Glaze:
- ⅔ cup granulated sugar
- 2 ½ tablespoons cornstarch
- 1 pinch fine sea salt
- 1 cup apple juice
- Optional: ½ teaspoon vanilla extract, splash of lemon juice, or pinch of orange zest
Instructions
1. Prepare the Strawberries
Rinse, hull, and pat dry the strawberries. Slice larger ones in half so they sit neatly inside the tart shells.
2. Make the Glaze
- In a saucepan, whisk sugar, cornstarch, and salt.
- Slowly pour in the apple juice while stirring to avoid lumps.
- Cook over medium heat, stirring continuously, until the mixture thickens and becomes glossy.
- Remove from heat and let it cool for about 10 minutes.
- Add optional vanilla, citrus zest, or lemon juice for extra flavor.
3. Coat the Tart Shells
Brush a thin layer of the warm glaze onto the base of each tart shell. This helps keep the pastry crisp.
4. Add the Strawberries
Arrange strawberries tightly in each shell, creating a full, vibrant look.
5. Finish With Glaze
Spoon the remaining glaze gently over the strawberries, coating them evenly without overfilling.
6. Chill
Refrigerate for 2 to 4 hours to allow the glaze to set and flavors to meld.
Your fresh strawberry tarts are now ready to enjoy!
Notes
- Keep shells crisp: Always brush a light glaze layer before adding berries.
- Choose firm berries: Firm, bright strawberries hold their shape and give best results.
- Avoid soggy tarts: Let the glaze cool slightly before assembly.
- Make ahead: These tarts are best eaten the same day but can be prepared up to 24 hours in advance.
- Flavor boosters: Almond extract, orange zest, or a mint garnish can elevate the flavor beautifully.
Nutrition Information:
Yield: 12 Serving Size: 1Amount Per Serving: Calories: 165Total Fat: 4gSaturated Fat: 1gSodium: 65mgCarbohydrates: 32gFiber: 2gSugar: 22gProtein: 1g