




There’s something wonderfully nostalgic about making your own fruit leather at home—the sweet aroma of slow-baked fruit puree, the anticipation as it transforms into a soft, flexible sheet you can roll, slice, and snack on. If you’ve ever wondered how to recreate those classic homemade fruit roll-ups using simple, wholesome ingredients, you’re in the right place.
This recipe is one of my favorite ways to turn everyday apples and pears into a healthy, kid-friendly snack without preservatives or store-bought additives. It’s surprisingly easy, incredibly budget-friendly, and perfect for anyone who loves creative homemade treats. Whether you’re filling lunchboxes, stocking up on natural fruit snacks, or just craving a fun kitchen project, this fruit leather recipe delivers every time.
As you walk through this process with me, you’ll see how simple ingredients, a blender, and a low oven come together to make a snack that’s flavorful, flexible, and—best of all—completely customizable. Ready to make your kitchen smell amazing? Let’s dive in.
Key Benefits & Why You’ll Love This Recipe
If you’ve been looking for a simple, wholesome way to enjoy natural fruit snacks at home, this fruit leather recipe is going to become a favorite. It’s one of those snacks that feels both nostalgic and rewarding—sweet, flexible, and made with just a few real ingredients. Here’s why you’ll love making it:
✔️ Completely Homemade & Preservative-Free
You’re in full control of what goes into your snack. No artificial flavors, no dyes—just pure fruit puree made from apples and pears.
✔️ Kid-Friendly & Lunchbox Approved
These soft, rollable strips make the perfect healthy treat for kids (and adults). They’re fun to eat, easy to pack, and feel like a better version of classic fruit roll-ups.
✔️ Surprisingly Easy to Make
You don’t need a dehydrator or special equipment. A blender, a baking sheet, and a low oven are all it takes to turn blended fruit into smooth, flexible homemade fruit leather.
✔️ Budget-Friendly & Perfect for Using Extra Fruit
Got apples or pears that are a little too soft? This recipe transforms them into a long-lasting, flavorful snack that reduces food waste.
✔️ Customizable Flavors
Once you master the base recipe, you can experiment with endless combinations—strawberry, mango, berry mixes, or even spice it with cinnamon for a cozy twist.
✔️ Long-Lasting & Great for Meal Prep
Stored properly, fruit leather keeps well for weeks, giving you a ready-to-go treat whenever you need something sweet and healthy.
Whether you’re making snacks for your family or just want a fun kitchen project that fills your home with the aroma of slow-baked fruit, this recipe checks every box. It’s simple, satisfying, and endlessly versatile—exactly the kind of homemade treat you’ll want to make again and again.
Ingredients
Before we jump into the fun part—turning fresh fruit into a smooth, flexible sheet of delicious homemade fruit leather—let’s take a quick look at what you’ll need. One of the best things about this recipe is how simple and accessible the ingredients are. Each one plays a role in creating the perfect texture and balanced flavor.
Here’s what you’ll need:
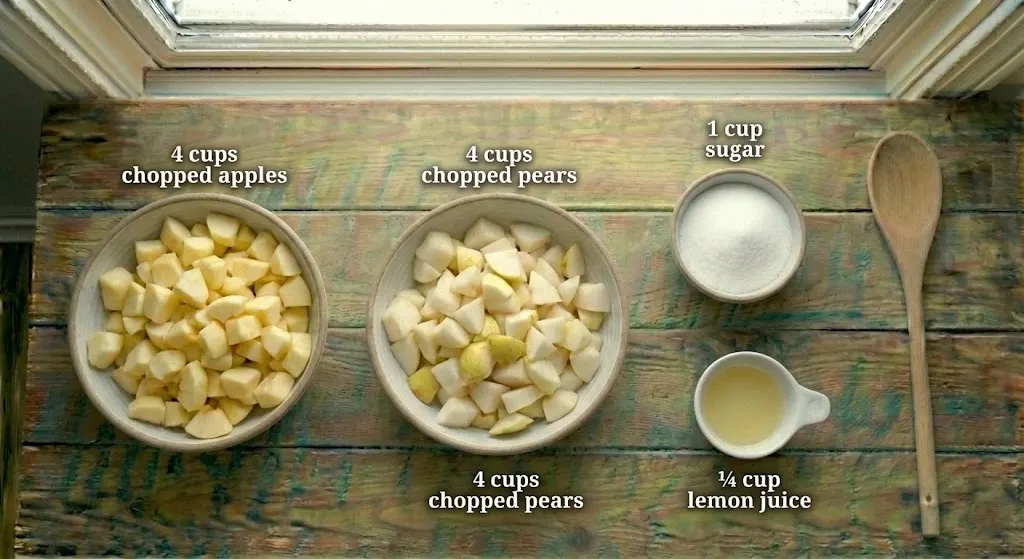
- 4 cups peeled, cored, and chopped apples
These form the base of the fruit puree, adding natural sweetness and a sturdy texture that dries beautifully. - 4 cups peeled, cored, and chopped pears
Pears bring moisture and a naturally soft, silky quality to the leather. - 1 cup sugar
This sweetens the fruit and helps the final leather stay flexible rather than brittle. You can adjust the amount to taste. - ¼ cup lemon juice
Essential for brightness and flavor balance, and it helps preserve the color during drying.
Every ingredient is easy to find, budget-friendly, and works together to give you a smooth, flavorful fruit puree that dries evenly in the oven. You’re now ready for the next step—blending everything into a silky base for your fruit leather.
Instructions
Making homemade fruit leather is much easier than it looks. Think of it as transforming fresh fruit into a smooth, flexible sheet of goodness—one slow, gentle bake at a time. Follow these steps, and you’ll get perfectly dried, flavorful results every time.
Step-by-Step Guide
- Preheat and Prepare Your Pan
Start by heating your oven to 150°F (65°C). This low temperature is key for dehydrating the fruit without cooking it.
Line a baking sheet with parchment paper or plastic wrap—this prevents sticking and makes rolling the finished leather effortless. - Blend the Fruit Puree
Add the chopped apples, pears, sugar, and lemon juice to your blender.
Blend until the mixture becomes completely smooth. A silky puree ensures even drying and the best fruit leather texture. - Spread the Puree Evenly
Pour the puree onto your lined baking sheet and use a spatula to spread it into a thin, even layer.
Aim for uniform thickness—slightly thicker edges can help prevent over-drying. - Slow-Bake the Fruit Leather
Place the baking sheet on the top rack of your oven.
Bake for 5 to 6 hours, keeping the oven door slightly open. This allows moisture to escape and helps the fruit dry properly.
You’ll know it’s ready when it’s no longer tacky to the touch and you can tear it cleanly—just like classic fruit roll-ups. - Cool, Roll, and Store
Let the fruit leather cool completely.
Roll it up with the parchment or plastic wrap, then cut it into strips.
Store your rolls in an airtight container to keep them soft and fresh.
Pro Tips and Variations
Making fruit leather at home is simple, but these expert tips will help you get the best texture, flavor, and drying results every time. Think of this as your insider guide to avoiding common mistakes and elevating your homemade snack to the next level.
Pro Tips for Perfect Fruit Leather
- Keep the puree smooth for even drying
Any chunks or uneven spots will dry at different rates. Blend until the mixture is completely silky for a uniform sheet. - Aim for consistent thickness
Spread the puree as evenly as possible—about ⅛ inch is ideal. Too thick, and it takes much longer to dry; too thin, and it becomes brittle. - Don’t skip the lemon juice
It brightens the flavor and helps maintain the color during the long drying process. - Let the oven breathe
Keep the oven door slightly open to encourage moisture to escape. This small detail makes a big difference in the final texture. - Test for doneness
Gently touch the surface—if it’s dry, smooth, and no longer sticky, it’s ready. It should tear cleanly without cracking. - Roll before cutting
Rolling the entire sheet first makes it easier to slice into neat, even strips that look just like homemade fruit roll-ups.
Fun Variations to Try
Once you’ve mastered the base apple pear fruit leather, try experimenting with these delicious combinations:
- Strawberry Apple – Sweet and vibrant, great for kids.
• Mango Pear – Smooth, tropical, and naturally bright.
• Mixed Berry – Slightly tart and full of antioxidants.
• Peach Apple – Soft, fragrant, and perfect for summer.
• Cinnamon Spice – Add a pinch of cinnamon for a cozy, fall-inspired flavor.
You can mix and match fruits or adjust sweetness depending on the natural sugars in your ingredients. This recipe is incredibly flexible—let your creativity lead the way!
Serving & Pairing Suggestions
One of the best things about homemade fruit leather is just how versatile it is. Whether you’re packing snacks for the week or looking for creative ways to enjoy your batch, these ideas will help you make the most of every strip.
Everyday Snacking
- Lunchbox favorite: Roll it up and tuck it into lunch bags for a sweet, wholesome treat kids love.
- On-the-go snack: Lightweight, mess-free, and perfect for work, commuting, or travel.
- Afternoon pick-me-up: Pair a strip with nuts or cheese for a balanced mini-snack.
Breakfast Boosters
- Yogurt topper: Slice the fruit leather into tiny ribbons and sprinkle over yogurt bowls.
- Oatmeal upgrade: Add thin strips to warm oats—they soften slightly and taste amazing.
- Smoothie garnish: Twist or curl a thin strip on top of smoothies for a fun finishing touch.
Dessert Pairings
- Ice cream companion: Serve alongside vanilla ice cream for a chewy-sweet contrast.
- Charcuterie boards: Add sliced fruit leather for pops of color and sweetness.
- Baked goods: Chop into small bits and fold into muffin or granola bar batter for fruity bursts.
Fun Ways to Serve
- Fruit leather rolls: Keep them rolled for a classic “fruit roll-up” style snack.
- Ribbon twists: Cut into long, thin strips and twist into spirals for a playful presentation.
- Gift-ready bundles: Roll and tie with kitchen twine—perfect for homemade gift baskets.
Tools and Equipment Guide
You don’t need any fancy gadgets to make homemade fruit leather, but having the right tools will make the process smoother, more efficient, and more enjoyable. Here’s a simple guide to the essentials that will help you achieve that perfect smooth, flexible texture every time.
Basic Tools You’ll Need
- Blender or Food Processor
This is the heart of the recipe. A strong blender ensures your apples and pears break down into a silky, lump-free fruit puree that dries evenly in the oven. - Baking Sheet
A standard rimmed baking sheet works best. The shallow edges help contain the puree while allowing it to spread evenly. - Parchment Paper or Plastic Wrap
This keeps the puree from sticking and makes rolling the finished leather a breeze. Parchment is especially reliable for even drying. - Spatula or Offset Spreader
Perfect for smoothing the puree into a uniform layer. Even thickness is key to preventing brittle or under-dried areas.
Oven Setup Essentials
- Low-Temperature Oven
Since fruit leather is dried—not baked—you’ll need an oven that can hold steady around 150°F (65°C). This slow, gentle heat helps remove moisture while preserving flavor. - Wooden Spoon or Heat-Safe Object
You’ll need something to keep the oven door slightly open. This allows moisture to escape and is crucial for achieving that classic fruit leather texture.
Storage Tools
- Airtight Jars or Containers
Once your fruit leather is rolled and cut, airtight storage keeps it soft, fresh, and flexible for days—or even weeks. - Kitchen Scissors or Sharp Knife
These help you cut the cooled leather into clean strips or fun shapes.
Troubleshooting Common Issues
Even though making fruit leather at home is a simple process, a few small hiccups can happen along the way—especially the first time you try it. Don’t worry! Here’s a clear, friendly guide to help you troubleshoot the most common issues so you always end up with smooth, chewy, perfectly dried fruit leather.
Issue: The Fruit Leather Is Too Sticky
What happened:
It likely didn’t dry long enough or the puree layer was spread too thick.
How to fix it:
- Return it to the oven for an additional 30–60 minutes.
- Keep the oven door slightly open to let excess moisture escape.
- Make sure your puree is spread in an even, thin layer next time.
Issue: The Edges Are Dry, but the Center Is Soft
What happened:
The puree may have been uneven, or the center was spread too thick.
How to fix it:
- Rotate the baking sheet halfway through drying.
- Spread the puree as evenly as possible—an offset spatula helps.
- Add a little extra puree around the edges next time to balance drying.
Issue: The Fruit Leather Cracks or Becomes Brittle
What happened:
It was dried too long or the layer was too thin.
How to fix it:
- Reduce drying time slightly.
- Aim for a thickness of about ⅛ inch when spreading the puree.
- If using a dehydrator or convection oven, check more frequently.
Issue: Uneven Texture or Small Bumps
What happened:
The puree wasn’t fully blended.
How to fix it:
- Blend the fruit mixture longer until completely smooth.
- Scrape the sides of the blender to eliminate small chunks.
- Strain the puree if needed for ultra-smooth texture.
Issue: The Leather Tastes Too Tart or Too Sweet
What happened:
Natural fruit sweetness varies, especially with apples and pears.
How to fix it:
- Adjust sugar based on taste before drying.
- Add a bit more lemon juice if the fruit mixture feels too sweet.
- Taste the puree before spreading—this is your best guide.
FAQs
Here are answers to some of the most common questions about making homemade fruit leather, so you can feel confident every step of the way.
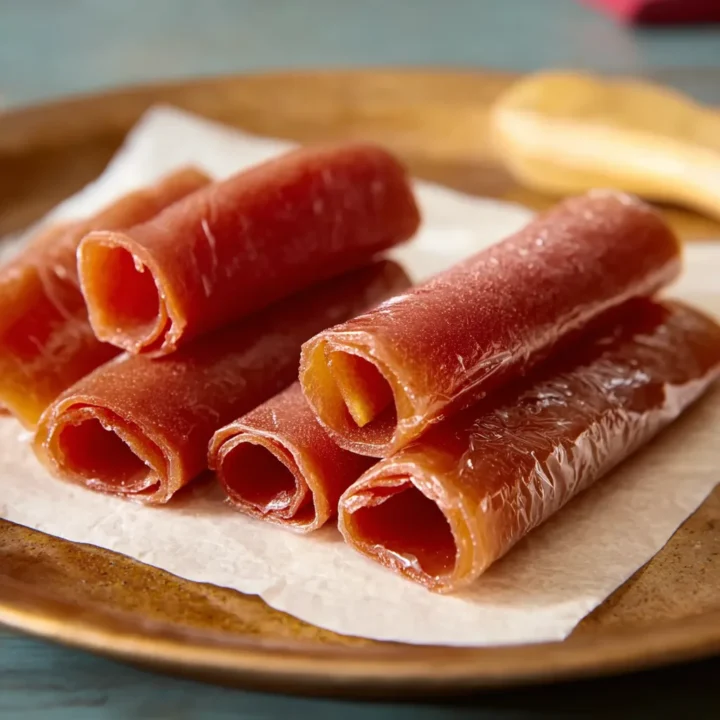
Fruit Leather Recipe
If you’ve been looking for a simple, wholesome way to enjoy natural fruit snacks at home, this fruit leather recipe is going to become a favorite.
Ingredients
- 4 cups peeled, cored, and chopped apples
- 4 cups peeled, cored, and chopped pears
- 1 cup sugar
- ¼ cup lemon juice
Instructions
Preheat the Oven:
- Set your oven to 150°F (65°C). Line a baking sheet with parchment paper or plastic wrap.
Blend the Puree:
- Add apples, pears, sugar, and lemon juice to a blender. Puree until completely smooth.
Spread the Mixture:
- Pour the fruit puree onto the prepared baking sheet. Spread evenly into a thin layer (about ⅛ inch).
Bake / Dry the Leather:
- Place the baking sheet on the top rack. Keep the oven door slightly open. Dry for 5–6 hours, or until the surface is dry, smooth, and no longer tacky.
Cool and Roll:
- Let the fruit leather cool fully. Roll it up with the parchment, then slice into strips.
Store:
- Transfer strips to an airtight container to keep them soft and fresh.
Notes
- Blend very smooth: A silky puree ensures even drying and prevents thin, brittle spots.
- Check edges early: The edges may dry faster; rotate the tray halfway for even results.
- Adjust sweetness: Reduce sugar if your fruit is very ripe; keep in mind sugar adds flexibility.
- No dehydrator needed: This recipe works perfectly in a standard oven at low heat.
- Storage tip: Keep rolled strips in a sealed jar at room temp for up to 1 month—or freeze for longer storage.
Nutrition Information:
Yield: 16 Serving Size: 1Amount Per Serving: Calories: 70Total Fat: 0gSodium: 1mgCarbohydrates: 18gFiber: 2gSugar: 15gProtein: 0.2g