




If you’ve ever bitten into a piece of fried chicken so crispy, golden, and perfectly seasoned that it practically sings when you crunch into it, then you know exactly why this Triple-Dipped Fried Chicken is about to become your new favorite. There’s something magical about layering seasoned flour, silky batter, and a final dredge to build that extra-thick, shatter-crispy crust—the kind you usually only get from a beloved hometown diner.
Have you ever wondered how restaurants achieve that irresistible, long-lasting crunch that stays crisp even after the chicken cools? Or why some fried chicken turns out juicy while others fall flat? This recipe answers both questions with a method that’s simple, reliable, and incredibly rewarding. With just a few pantry staples, a bit of patience, and the right dipping technique, you’ll create fried chicken that’s beautifully golden, deeply flavorful, and tender all the way through.
Whether you’re planning a cozy family dinner or prepping a crowd-pleasing platter for game night, this recipe delivers a flavor punch that satisfies every time. Let’s dive into the technique behind this irresistible, three-layer masterpiece.
Key Benefits & Why You’ll Love This Triple-Dipped Fried Chicken
If you’ve ever wished your homemade fried chicken could match that extra-crispy, restaurant-style crunch, this recipe is going to feel like a small victory. The secret lies in the triple-dipping method—a simple but game-changing technique that builds layers of flavor and texture with every coat. Here’s why this version stands out and why you’ll keep coming back to it:
Unbeatable Crunch That Lasts
Because the chicken is coated three times—seasoned flour, batter, then a final dredge—you get a thick, craggly crust that stays crispy long after frying. No soggy spots, no slipping coating—just pure crunch from the first bite to the last.
Juicy, Tender Meat Every Time
The triple-dipping technique doesn’t just improve the outside; it protects the chicken as it cooks. The outer layers seal in moisture, giving you irresistibly juicy meat with every bite, whether you’re frying legs, wings, or breasts.
Bold, Well-Balanced Flavor
With paprika, garlic salt, black pepper, and just a touch of cayenne, the chicken gets a deep, savory flavor that’s delicious on its own—no dipping sauce required (though it pairs wonderfully with many).
Beginner-Friendly, Foolproof Method
Even if frying intimidates you, this method walks you through each step with results that work every time. You don’t need special equipment—just hot oil, flour, and a little confidence.
Perfect for Any Occasion
This fried chicken shines anywhere:
- Weekend family dinners
- Game-day platters
- Potlucks and picnics
- Packed lunches—yes, it stays crispy even after cooling
Fully Customizable to Your Taste
Craving more heat? Add extra cayenne. Prefer a more savory finish? Increase the paprika or poultry seasoning. This recipe adapts beautifully to your flavor preferences.
With a crispy exterior, juicy interior, and bold seasoning in every bite, this triple-dipped fried chicken isn’t just a recipe—it’s a guaranteed crowd-pleaser you’ll proudly serve over and over again.
Ingredients
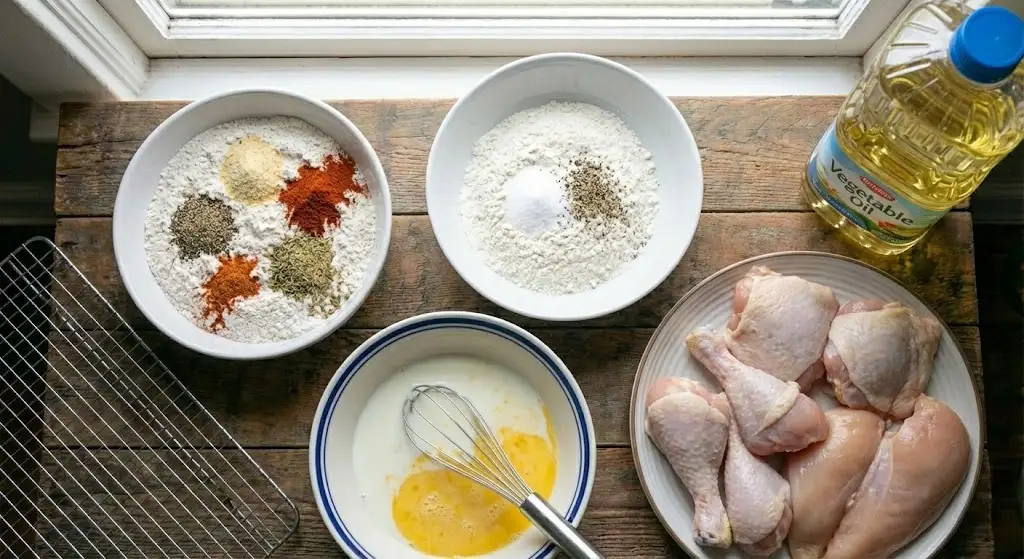
Before you start dipping and frying, it helps to have everything measured and ready to go. This not only makes the process smoother but also ensures your coating turns out perfectly crispy and evenly seasoned. Here’s what you’ll need for this triple-dipped masterpiece:
For the Seasoned Flour (First Coating):
- 1 1/2 cups all-purpose flour
- 1 tablespoon garlic salt
- 1 tablespoon paprika
- 1 teaspoon ground black pepper
- 1 teaspoon poultry seasoning
- 1/2 teaspoon cayenne pepper (optional, for extra heat)
For the Second Flour Coating:
- 1 1/3 cups all-purpose flour
- 1 teaspoon salt
- 1/4 teaspoon ground black pepper
For the Wet Batter:
- 1 cup milk
- 1 egg
For Frying:
- 1 quart vegetable oil
- 1 whole chicken, cut into pieces
Instructions
Ready to create that irresistible, ultra-crispy crust? Follow these steps as if I’m right in the kitchen with you, guiding you through each layer of the triple-dipping process. Take your time, stay organized, and you’ll end up with fried chicken that’s golden, crunchy, and juicy all the way through.
1. Prepare the Seasoned Flour
In a medium mixing bowl, combine:
- 1 1/2 cups all-purpose flour
- Garlic salt
- Paprika
- Poultry seasoning
- Black pepper
- Cayenne pepper (optional but great for extra kick)
Give everything a good stir so the spices are evenly distributed—this first layer sets the foundation for that bold, savory flavor.
2. Prepare the Second Coating
In another bowl, mix:
- 1 1/3 cups all-purpose flour
- Salt
- Ground black pepper
This layer adds texture and helps the crust develop those signature crispy ridges.
3. Make the Wet Batter
Whisk the milk and egg together in a third bowl until smooth.
This wet mixture helps the final flour layer cling beautifully to the chicken, creating a thick, crunchy exterior.
4. Heat the Oil
Pour the vegetable oil into a deep fryer or large heavy-bottomed skillet.
Heat it to 350°F (175°C)—keeping the oil at the right temperature is key to getting a golden crust without greasy spots.
5. Triple-Dip the Chicken
Working one piece at a time:
- First Dip: Coat the chicken thoroughly in the seasoned flour.
- Second Dip: Submerge it into the milk-and-egg batter.
- Third Dip: Press it into the second flour coating.
- Repeat: For an extra-thick crust, repeat the batter and final flour dip once more.
Make sure each piece is evenly coated; this is where the magic happens.
6. Fry to Golden Perfection
Carefully lower the coated chicken into the hot oil.
Fry in batches—overcrowding cools the oil and softens the crust.
Cook for 15–18 minutes, turning occasionally, until:
- The coating is deep golden brown
- The internal temperature reaches 165°F (74°C)
7. Drain & Serve
Transfer the fried chicken to a wire rack or a plate lined with paper towels to drain excess oil.
Let it rest for a few minutes so the crust sets beautifully.
Pro Tips and Variations
Creating the perfect triple-dipped fried chicken is all about technique, timing, and a few smart tricks that make a world of difference. Here’s how to take this recipe from delicious to absolutely unforgettable—along with some fun variations to match your flavor mood.
Pro Tips for the Crispiest, Juiciest Results
- Keep One Dry Hand and One Wet Hand
This small habit prevents clumping and helps you achieve a smooth, even coating. Your dry hand handles the flour; your wet hand handles the batter. - Pat the Chicken Dry Before Coating
Moisture is the enemy of crispiness. Removing excess water helps the seasoned flour stick better and keeps oil from splattering. - Don’t Skip Preheating the Oil
Oil that’s too cool makes the crust soggy; too hot burns it before the inside cooks. Use a kitchen thermometer to maintain 350°F (175°C) throughout. - Rest the Coated Chicken for 5–10 Minutes
Before frying, let the coated chicken sit on a rack. This helps the layers bond and prevents the crust from slipping off during frying. - Avoid Overcrowding the Pan
Adding too many pieces drops the oil temperature instantly. Fry in small batches for the best texture and even cooking. - Let the Fried Chicken Rest on a Wire Rack
A rack allows air to circulate, keeping the bottom crisp instead of steaming on paper towels.
Serving & Pairing Suggestions
Once your triple-dipped fried chicken is beautifully golden and irresistibly crispy, it’s time to enjoy it with sides and pairings that complement every crunchy bite. Whether you’re feeding a crowd or serving a cozy family dinner, these ideas will take your meal from tasty to unforgettable.
Classic Comfort Pairings
These timeless sides work perfectly with the rich, savory flavor of fried chicken:
- Creamy mashed potatoes with brown gravy
- Buttery cornbread or warm dinner rolls
- Mac and cheese with a golden baked top
- Coleslaw for a refreshing crunch that balances the fried coating
- Potato wedges or seasoned fries
Fresh & Light Options
If you want something crisp and refreshing to brighten the plate:
- Mixed green salad with a citrus vinaigrette
- Cucumber and tomato salad
- Steamed green beans or roasted veggies
- Fresh fruit bowls, especially watermelon or pineapple
These add contrast to the rich, crunchy crust and keep the meal feeling balanced.
Perfect for Picnics & Parties
Triple-dipped fried chicken holds its crunch exceptionally well, making it ideal for:
- Outdoor picnics
- Tailgate parties
- Potluck gatherings
- Packed lunches
Serve it warm or cold—either way, the flavor stays bold and the crust stays crisp.
Dipping Sauces to Elevate the Experience
While this chicken tastes incredible on its own, a good sauce adds personality:
- Honey mustard
- Spicy mayo
- Ranch dressing
- BBQ sauce
- Hot sauce drizzle
- Garlic aioli
Mix and match to suit your crowd.
Drink Pairings
To complete the experience, try pairing with:
- Iced tea (sweet or unsweetened)
- Fresh lemonade
- Sparkling water with citrus
- Light beer or crisp cider
Tools and Equipment Guide
Having the right tools on hand makes frying easier, safer, and far more enjoyable. You don’t need professional kitchen gear to achieve that ultra-crispy triple-dipped crust—but a few reliable items will help you get consistent, restaurant-quality results every time.
Essential Tools You’ll Need
- Deep Fryer or Heavy-Bottomed Skillet
Either works perfectly. A deep fryer helps maintain a steady temperature, while a cast-iron or stainless-steel skillet provides even heat distribution. - Kitchen Thermometer
This is one of the most important tools for frying chicken. Keeping your oil around 350°F (175°C) ensures a golden, crispy crust without burning or undercooking. - Mixing Bowls (At Least Three)
You’ll need a separate bowl for the seasoned flour, the wet batter, and the final flour coating. Wide, shallow bowls make dipping easier and more even. - Tongs or a Slotted Fry Spoon
Use these to lower chicken pieces into the oil and to flip them safely. They help prevent splashes and protect your hands from the hot oil. - Wire Rack
After frying, resting the chicken on a wire rack allows air to circulate around the crust, keeping it crisp instead of steaming on a flat surface. - Sheet Pan or Tray
Place the wire rack on top of a sheet pan to catch oil drips and keep your kitchen cleaner. - Paper Towels (Optional)
Useful for absorbing excess oil, though a wire rack is still the best option to maintain crispiness.
Helpful Extras (Not Required but Nice to Have)
- Oil Splatter Screen
Keeps your stovetop clean and protects you from oil popping during frying. - Meat Thermometer
Ensures your chicken reaches the safe internal temperature of 165°F (74°C) without overcooking. - Cooling Tray for Preparation
Great for letting the coated chicken rest before frying, which helps the crust adhere better.
Troubleshooting Common Issues
Even with a solid recipe, fried chicken can be a little tricky—especially when you’re building a thick, triple-dipped crust. If something doesn’t go as planned, don’t worry. Here are the most common problems home cooks encounter and exactly how to fix them so your chicken turns out crispy, juicy, and flawless every time.
1. The Coating Falls Off During Frying
This usually happens when the layers haven’t adhered properly. Try this:
- Pat the chicken dry before dredging to remove excess moisture.
- Press the flour firmly onto each piece rather than lightly dusting.
- Let the coated chicken rest for 5–10 minutes before frying to help the layers bond.
- Avoid moving the chicken too early—let it fry undisturbed for the first few minutes.
2. The Crust Looks Pale Instead of Golden
If the color is off, it’s typically an oil-temperature issue.
- Make sure the oil is 350°F (175°C) before adding the chicken.
- Increase the heat slightly if the temperature drops after adding a batch.
- Don’t overcrowd the pot—too many pieces at once cool the oil quickly.
3. The Chicken Is Crispy Outside but Undercooked Inside
This means the oil is too hot.
- Keep the temperature steady—use a thermometer and adjust the heat as needed.
- Fry medium-size pieces instead of overly large ones for more even cooking.
- Always check that the internal temperature reaches 165°F (74°C).
4. The Crust Turns Out Soggy
No one wants soggy chicken! Prevent it by:
- Draining on a wire rack, not paper towels.
- Ensuring the oil is hot enough before frying.
- Avoiding lids or covers while the chicken cools (steam will soften the crust).
5. The Chicken Tastes Too Salty or Bland
Finding your perfect flavor balance may require minor adjustments:
- If too salty: reduce garlic salt or use a salt-free seasoning blend.
- If bland: increase paprika, cayenne, or poultry seasoning for deeper flavor.
6. The Oil Is Smoking or Burning
This can affect both safety and flavor.
- Lower the heat immediately—the oil is too hot.
- Use vegetable, canola, or peanut oil, which all have higher smoke points.
- Remove burnt flour bits between batches to prevent a bitter taste.
7. The Coating Is Too Thick or Too Thin
Adjust your dipping process:
- For thicker crust: repeat the last two steps (batter and final flour coat).
- For lighter crust: stick to a single round of triple-dipping.
FAQs
Curious about substitutions, storage, or frying techniques? Here are the most common questions home cooks ask when making triple-dipped fried chicken—answered with clear, practical tips to help you get the best results every time.
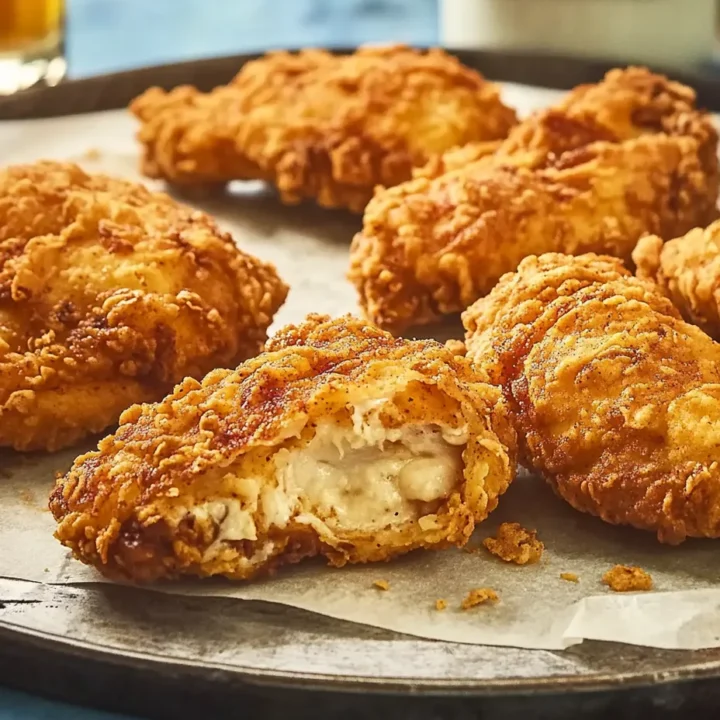
Triple-Dipped Fried Chicken
If you’ve ever wished your homemade fried chicken could match that extra-crispy, restaurant-style crunch, this recipe is going to feel like a small victory.
Ingredients
Seasoned Flour (First Coating):
- 1 1/2 cups all-purpose flour
- 1 tablespoon garlic salt
- 1 tablespoon paprika
- 1 teaspoon ground black pepper
- 1 teaspoon poultry seasoning
- 1/2 teaspoon cayenne pepper (optional)
Second Flour Coating:
- 1 1/3 cups all-purpose flour
- 1 teaspoon salt
- 1/4 teaspoon ground black pepper
Wet Batter:
- 1 cup milk
- 1 egg
For Frying:
- 1 quart vegetable oil
- 1 whole chicken, cut into pieces
Instructions
1. Prepare Seasoned Flour
Combine the flour, garlic salt, paprika, black pepper, poultry seasoning, and cayenne in a medium bowl.
2. Prepare Second Coating
Mix 1 1/3 cups of flour, salt, and black pepper in another bowl.
3. Make the Batter
Whisk the milk and egg together in a separate bowl until smooth.
4. Heat the Oil
Preheat the vegetable oil in a deep fryer or heavy skillet to 350°F (175°C).
5. Triple-Dip the Chicken
- Coat chicken in seasoned flour.
- Dip into the milk-and-egg mixture.
- Dredge in the second flour coating.
- Repeat the last two steps (batter + flour) for a thicker crust if desired.
6. Fry the Chicken
Place chicken pieces in the hot oil without overcrowding. Fry for 15–18 minutes, turning occasionally, until golden and cooked through (165°F internal temperature).
7. Drain & Serve
Place fried chicken on a wire rack or paper towels to remove excess oil. Serve hot or cold.
Notes
- Rest the coated chicken for 5–10 minutes before frying for a stronger crust.
- Use a thermometer to keep the oil at the perfect frying temp.
- Don’t overcrowd the skillet; this prevents sogginess.
- Add extra cayenne for more heat or swap paprika for smoked paprika for a richer flavor.
- Place finished chicken on a wire rack to keep the crust crisp.
Nutrition Information:
Yield: 8 Serving Size: 1Amount Per Serving: Calories: 430Total Fat: 22gSaturated Fat: 4gCholesterol: 120mgSodium: 530mgCarbohydrates: 28gFiber: 1gSugar: 2gProtein: 31g