




If you’ve ever wished you could bring a little sunshine to your dessert table, this Hawaiian Wedding Cake might be exactly what you’re looking for. Bursting with tropical flavors, creamy layers, and that irresistible pineapple-coconut combination, it’s the kind of treat that instantly feels festive—whether you’re hosting a summer gathering, planning a luau-inspired celebration, or simply craving something sweet and refreshing.
What I love most about this recipe is how effortless it is. You start with a simple yellow cake mix, add a bright layer of crushed pineapple, then finish it with a light, dreamy cream cheese and pudding topping that gives the cake its signature “wedding-style” elegance without any fuss. It’s a crowd-friendly dessert that feels nostalgic, comforting, and just a little indulgent.
So if you’re searching for a tropical cake recipe that’s easy to make, beautiful to serve, and always a hit at potlucks or family dinners, you’re in the right place. Let’s dive into this slice of paradise—one creamy, pineapple-topped bite at a time.
Key Benefits & Why You Will Love This Hawaiian Wedding Cake
There’s something magical about a dessert that feels effortless yet tastes like you spent all day making it. That’s exactly why this Hawaiian Wedding Cake has become such a loved classic. It brings together simple ingredients—like crushed pineapple, cream cheese, and a light whipped topping—and turns them into a tropical treat that shines at any gathering.
Here’s why this recipe is worth adding to your go-to dessert list:
A Taste of the Tropics in Every Bite
The combination of pineapple, coconut, and cherries delivers that bright, refreshing flavor you’d expect from a tropical cake recipe—perfect for warm weather celebrations or anytime you want a hint of summer.
Incredibly Easy to Prepare
You don’t need advanced baking skills to pull off this dessert. Using a yellow cake mix saves time, while the simple layering process keeps the cake beginner-friendly and stress-free.
Crowd-Friendly & Potluck Approved
This sheet-style cake feeds a group and transports beautifully, making it ideal for potlucks, barbecues, holidays, or luau-inspired parties.
Light, Creamy, and Perfectly Sweet
The cream cheese–pudding topping gives the cake a silky, slightly tangy finish that balances the sweetness of the pineapple layer. It’s refreshing, not heavy—great for guests who prefer desserts on the lighter side.
Make-Ahead Convenience
Because this is a refrigerator-style cake, the flavors deepen as it chills. You can easily make it the night before and have a stunning, ready-to-serve dessert the next day.
Customizable for Any Occasion
Whether you want to add more coconut, swap in macadamia nuts, or decorate it with extra maraschino cherries, this cake adapts beautifully to your creativity.
If you’re looking for a simple, tropical dessert that brings joy to every table it touches, this Hawaiian Wedding Cake is definitely one you’ll fall in love with.
Ingredients
Before you begin, take a moment to gather everything you’ll need. One of the best parts about this Hawaiian Wedding Cake recipe is how simple the ingredient list is—just a few pantry staples and tropical add-ins come together to create a dessert that tastes bright, creamy, and unforgettable.
Cake Layer
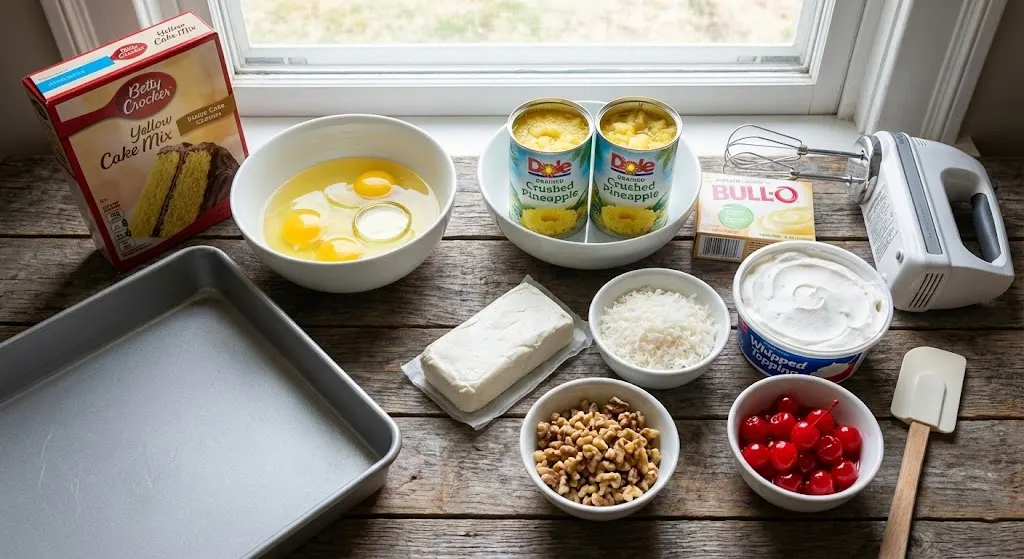
- 1 (15.25-ounce) box yellow cake mix
(prepared according to package directions)
Filling & Topping
- 2 (20-ounce) cans crushed pineapple, drained
- 1 (3.4-ounce) package instant vanilla pudding mix
- 1 (8-ounce) package cream cheese, softened
- 1 (8-ounce) container frozen whipped topping, thawed
- ½ cup flaked coconut
- ½ cup chopped walnuts
- ½ (10-ounce) jar maraschino cherries, drained and halved if desired
Instructions
This Hawaiian Wedding Cake comes together in simple, manageable steps—perfect for beginners and experienced bakers alike. Follow the guide below, and you’ll have a beautiful, tropical dessert ready to chill and serve.
1. Bake the Cake
- Prepare the yellow cake mix according to the package directions.
- Pour the batter into a 10×15-inch baking pan (also called a jelly roll pan) for an even, tender layer.
- Bake as directed, then set the cake aside to cool completely.
- Tip: Cooling is essential—adding toppings too early can cause the layers to melt or slide.
2. Add the Pineapple Layer
- Once the cake is fully cooled, gently spread the drained crushed pineapple evenly across the surface.
- This adds natural sweetness and keeps the cake wonderfully moist.
3. Make the Creamy Topping
- In a mixing bowl, prepare the instant vanilla pudding according to package instructions and set it aside.
- In a separate bowl, beat the cream cheese until smooth and fluffy.
- Add the prepared pudding to the cream cheese and mix until fully combined.
- Fold in the whipped topping to create a light, airy mixture.
4. Assemble & Decorate
- Spread the creamy pudding mixture evenly over the pineapple layer.
- Sprinkle with flaked coconut and chopped walnuts for texture and tropical flair.
- Top with maraschino cherries, placing them decoratively across the cake.
5. Chill Before Serving
- Place the cake in the refrigerator and allow it to chill until set—at least 2–3 hours, or overnight for best flavor.
Pro Tips & Variations
This Hawaiian Wedding Cake is already incredibly easy to prepare, but a few smart tips can elevate the texture, flavor, and presentation even more. Think of this section as your insider guide—little adjustments that make a big difference.
Pro Tips for Best Results
- Let the cake cool completely
Warm cake will melt the topping, causing it to slide or become runny. Cooling ensures clean layers and the perfect creamy texture. - Drain the pineapple very well
Excess liquid can make the cake soggy. Press lightly with the back of a spoon to remove extra juice without drying out the fruit. - Soften the cream cheese in advance
Room-temperature cream cheese blends more smoothly with the pudding mix, preventing lumps and ensuring a velvety topping. - Fold, don’t stir, the whipped topping
Folding keeps the mixture light and airy—exactly what gives this cake its “wedding-style” fluffiness. - Chill long enough for the flavors to set
A few hours in the fridge deepens the pineapple-coconut flavor and helps the layers firm up beautifully.
Easy Variations to Try
- Coconut Lover’s Version
Stir additional coconut flakes into the cream cheese topping for extra tropical flavor and texture. - Nut-Free Option
Simply omit the walnuts or swap them for crispy toasted coconut or crushed graham crackers. - Tropical Upgrade
Sprinkle toasted macadamia nuts on top for a more authentic island-inspired twist. - Poke Cake Version
Use the end of a wooden spoon to poke holes in the baked cake before adding the pineapple—this lets the fruit soak in even deeper. - Lighter Version
Use light cream cheese and reduced-fat whipped topping for a slightly lower-calorie dessert without losing the tropical flair. - Fresh Fruit Finish
Replace maraschino cherries with fresh berries, sliced kiwi, or chunks of fresh pineapple for a brighter, more natural look.
Serving & Pairing Suggestions
One of the joys of this Hawaiian Wedding Cake is how beautifully it fits into almost any occasion. Its cool, creamy layers and tropical flavors make it a standout dessert whether you’re hosting a backyard gathering, bringing something special to a potluck, or planning a luau-inspired celebration.
Here are some simple and creative ways to serve and pair this crowd-pleasing cake:
How to Serve It
- Serve chilled for the perfect texture.
The cream cheese–pudding topping is at its best when cold, giving each slice a refreshing, silky finish. - Use a sharp knife for clean layers.
A hot knife (run under warm water and dried) helps you cut through the topping and pineapple evenly. - Garnish just before serving.
Add extra coconut, chopped nuts, or a few fresh pineapple slices for a polished presentation. - Cut into small squares for parties.
This cake is rich yet light, making bite-sized servings perfect for large gatherings.
Perfect Pairings
- Tropical Drinks
Pair each slice with a fruity drink like pineapple iced tea, mango lemonade, or a coconut-lime spritzer. The flavors echo the cake’s tropical profile without overpowering it. - Fresh Fruit Bowls
Serve alongside a bowl of chilled mango, kiwi, or papaya for a refreshing contrast and a pop of color. - Vanilla Ice Cream or Coconut Sorbet
A small scoop transforms this dessert into something extra indulgent—and the cold creaminess pairs beautifully with the pineapple layer. - Light Main Dishes
This cake shines after meals like grilled chicken, BBQ skewers, seafood, or fresh summer salads. - Hawaiian-Inspired Party Menu
Round out a themed gathering with items like Hawaiian rolls, teriyaki chicken, macaroni salad, and grilled pineapple.
Tools and Equipment Guide
One of the best things about this Hawaiian Wedding Cake recipe is that you don’t need any fancy baking tools to make it. A few basic kitchen essentials are all it takes to create those beautiful layers of pineapple, creamy topping, and soft yellow cake. Here’s a quick guide to what you’ll need and why each tool matters.
Essential Tools
- 10×15-Inch Baking Pan (Jelly Roll Pan)
This size creates the perfect thin, even cake layer that supports the pineapple and creamy topping without becoming too heavy. - Mixing Bowls (at least two)
You’ll need separate bowls for preparing the cake batter, mixing the pudding, and whipping the cream cheese topping. - Electric Mixer or Hand Mixer
Helps beat the cream cheese until perfectly smooth and blend the pudding mixture evenly. Using a mixer saves time and prevents lumps. - Silicone Spatula
Ideal for folding in the whipped topping gently, which helps keep the topping light and airy. - Fine Mesh Strainer or Colander
Useful for draining the crushed pineapple to prevent excess liquid from making the cake soggy. - Offset Spatula or Spreader
Makes it easy to spread the pineapple layer and creamy topping evenly across the cake. - Sharp Knife
A clean, sharp knife (warmed under hot water and dried) ensures smooth cuts through the chilled layers.
Helpful Extras
- Parchment Paper
Lining the pan makes cleanup easier and helps the cake release more smoothly—especially handy for transporting. - Cooling Rack
Allows your baked cake to cool evenly and quickly, preventing the topping from melting once added. - Storage Container or Cake Carrier
Since this dessert needs to be refrigerated, a shallow container or cake carrier keeps it fresh and easy to transport.
Troubleshooting Common Issues
Even though this Hawaiian Wedding Cake is wonderfully simple to prepare, a few common hiccups can happen—especially when working with creamy toppings and fruit layers. Here’s how to avoid the most frequent issues and keep your cake looking (and tasting) perfect.
The Topping Is Too Runny
If your cream cheese–pudding layer isn’t setting properly, it’s usually due to one of these reasons:
- The cake wasn’t fully cooled.
Warm cake will melt the topping. Always allow the base to cool completely before layering. - The pineapple wasn’t drained well.
Excess juice can drip into the topping. Drain crushed pineapple thoroughly using a fine mesh strainer. - The whipped topping was over-mixed.
Stirring too aggressively can deflate the whipped topping and thin out the mixture. Gently fold to maintain structure.
The Cake Feels Too Soft or Soggy
Don’t worry—this is an easy fix.
- Ensure the pineapple is pressed lightly to remove extra liquid.
- Use the 10×15-inch pan as recommended; a smaller pan makes the cake thicker and harder to support the toppings.
- Chill the cake long enough (several hours or overnight) to allow the layers to firm up.
The Cream Cheese Mixture Has Lumps
This usually means the cream cheese was too cold.
- Always soften cream cheese to room temperature before mixing.
- Use an electric mixer to beat it thoroughly before adding the pudding mixture.
The Topping Is Sliding Off
This happens when the cake hasn’t chilled long enough.
- Place the assembled cake in the refrigerator for at least 2–3 hours, or until fully set.
- If serving outdoors in warm weather, keep the cake chilled until right before serving.
The Nuts or Coconut Keep Falling Off
Try sprinkling them on right after spreading the topping—this helps them adhere better.
- Lightly press them into the surface with your palm.
- You can also mix a small portion into the creamy topping to help anchor flavors.
The Cake Dries Out in the Fridge
Keep it covered tightly with plastic wrap or in a cake container.
The pineapple layer helps keep the cake moist, but exposure to air can dry the edges.
FAQs
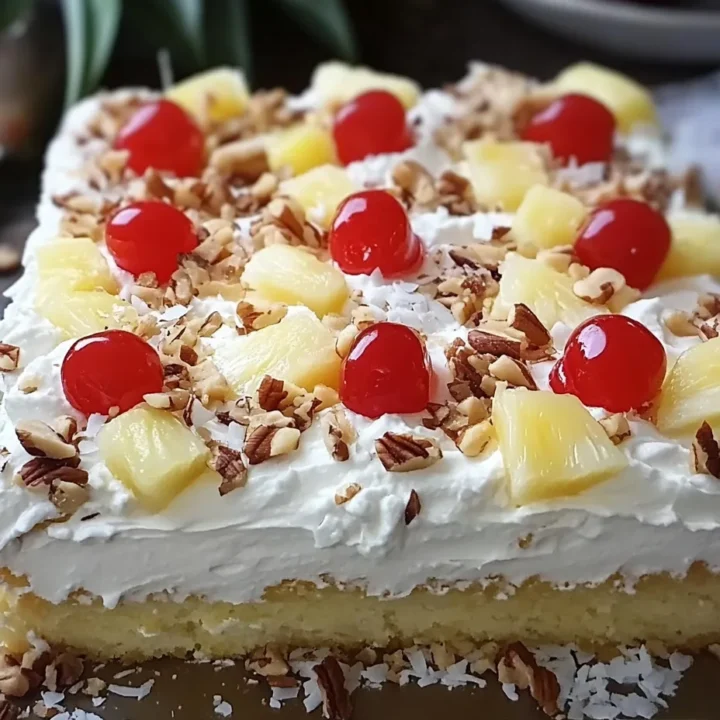
Hawaiian Wedding Cake
There’s something magical about a dessert that feels effortless yet tastes like you spent all day making it. That’s exactly why this Hawaiian Wedding Cake has become such a loved classic.
Ingredients
Cake Layer:
- 1 (15.25-ounce) box yellow cake mix, prepared as directed
Filling & Topping:
- 2 (20-ounce) cans crushed pineapple, drained
- 1 (3.4-ounce) package instant vanilla pudding mix
- 1 (8-ounce) package cream cheese, softened
- 1 (8-ounce) container frozen whipped topping, thawed
- ½ cup flaked coconut
- ½ cup chopped walnuts
- ½ (10-ounce) jar maraschino cherries, drained
Instructions
1. Bake the Cake
- Prepare the yellow cake mix according to package directions.
- Pour into a 10×15-inch baking pan and bake as instructed.
- Allow the cake to cool completely.
2. Add the Pineapple Layer
- Spread the drained crushed pineapple evenly over the cooled cake.
3. Prepare the Creamy Topping
- Prepare the vanilla pudding as directed and set aside.
- Beat the cream cheese until smooth.
- Mix the prepared pudding into the cream cheese.
- Fold in the whipped topping gently.
4. Assemble & Decorate
- Spread the creamy topping evenly over the pineapple.
- Sprinkle with coconut and walnuts.
- Top with maraschino cherries.
5. Chill
- Refrigerate for 2–3 hours, or until fully set.
Notes
- Drain pineapple thoroughly to avoid a soggy cake.
- Soften cream cheese for a smooth, lump-free topping.
- Chill overnight for deeper flavor and cleaner slices.
- Use a hot knife (warmed under water) for perfect cuts.
- To make it nut-free, omit the walnuts or swap with toasted coconut.
Nutrition Information:
Yield: 16 Serving Size: 1Amount Per Serving: Calories: 315Total Fat: 15gSaturated Fat: 8gCholesterol: 25mgSodium: 260mgCarbohydrates: 42gFiber: 1gSugar: 31gProtein: 3g