




There’s something undeniably comforting about the smell of cheesy pepperoni pizza roll-ups baking in the oven — that golden, melty goodness wrapped in a soft tortilla, bubbling with mozzarella cheese and savory pepperoni. Whether you’re planning a quick pizza night appetizer, a fun kid-friendly snack, or an easy lunch that everyone will love, these roll-ups hit the mark every time.
I still remember the first time I made them for a casual movie night — they disappeared faster than I could serve them! What makes this easy pizza roll-ups recipe so special is how effortlessly it brings all the flavors of classic pizza into a simple, hand-held treat. You don’t need fancy ingredients or hours in the kitchen — just a few pantry staples, a warm oven, and that irresistible garlic herb seasoning that ties it all together.
So, if you’re craving something quick, cheesy, and crowd-pleasing, these homemade pepperoni pizza roll-ups might just become your new favorite go-to for any occasion.
Key Benefits & Why You’ll Love This Recipe
If you love all things cheesy, crispy, and comforting, these Cheesy Pepperoni Pizza Roll-Ups will become a staple in your kitchen. They take everything you adore about traditional pizza — the gooey mozzarella cheese, zesty pizza sauce, and savory pepperoni — and wrap it all up in a soft tortilla for the ultimate handheld treat.
Here’s why you’ll want to make them again and again:
- Quick and Easy: With simple ingredients and just a few steps, you can have these pizza roll-ups ready in under 30 minutes. Perfect for busy weeknights, after-school snacks, or impromptu gatherings.
- Crowd-Pleaser: Whether it’s game night, a family movie evening, or a casual get-together, these cheesy bites always disappear fast. Everyone loves their crispy edges and melty centers.
- Kid-Friendly: These tortilla pizza roll-ups are fun to assemble — get the kids involved! They’ll enjoy layering the sauce, sprinkling cheese, and rolling up their mini pizzas.
- Customizable: Try swapping pepperoni for your favorite toppings — think mushrooms, bell peppers, or olives for a vegetarian twist. You can even use different cheese blends for a new flavor profile.
- Perfectly Portable: These roll-ups are great for lunchboxes, picnics, or on-the-go snacks. They reheat beautifully in the oven or air fryer, keeping their cheesy goodness intact.
💡 Pro Tip: For the best flavor, don’t skip the garlic herb sprinkle — it’s what gives these roll-ups that irresistible pizzeria-style aroma and a perfectly seasoned finish.
Ingredients
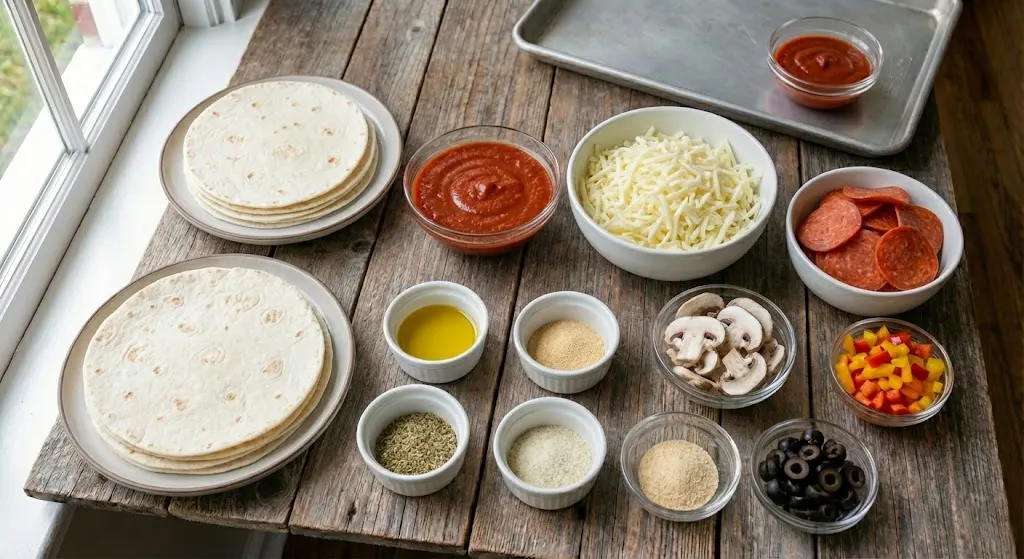
To make these irresistible Cheesy Pepperoni Pizza Roll-Ups, you’ll only need a handful of simple ingredients — most of which you probably already have in your kitchen. Each one plays an important role in creating that perfect balance of crispy, cheesy, and flavorful goodness.
Here’s what you’ll need:
Main Ingredients
- 20 small flour tortillas (about 5 inches each) — soft and flexible, ideal for rolling without cracking.
- 1 ½ cups pizza sauce (about 14 oz) — use your favorite brand or a homemade version for extra flavor.
- 3 cups shredded mozzarella cheese (about 24 oz) — the key to that perfect, gooey melt.
- 80 slices pepperoni (4 per tortilla) — classic and full of bold, savory flavor.
- 1 tablespoon olive oil (or neutral cooking oil) — helps crisp up the tops and gives a beautiful golden finish.
Garlic Herb Sprinkle
This simple seasoning blend adds a touch of gourmet flair to your pizza roll-ups:
- ½ teaspoon garlic powder
- ½ teaspoon Italian seasoning
- ½ teaspoon garlic salt
Optional Add-Ins & Variations
- Swap pepperoni for turkey pepperoni or vegetarian toppings like diced mushrooms, spinach, or roasted red peppers.
- Mix in a handful of Parmesan cheese for extra richness.
- Add a pinch of red pepper flakes if you love a little heat.
Instructions
Ready to make your Cheesy Pepperoni Pizza Roll-Ups? Follow these simple steps to create a batch of golden, crispy, and irresistibly gooey roll-ups that taste just like mini pizzas — but without the hassle of dough!
Step 1: Preheat the Oven
- Set your oven to 350°F (175°C).
- Lightly grease a large baking sheet or casserole dish with a bit of oil or nonstick spray. This prevents sticking and helps the roll-ups bake evenly.
Step 2: Assemble the Roll-Ups
- Lay out your flour tortillas on a clean surface.
- Spread about 1 tablespoon of pizza sauce evenly over each tortilla.
- Sprinkle with ¼ cup shredded mozzarella, then layer 4 slices of pepperoni on top.
- Roll each tortilla up tightly, keeping the seam side down so they stay secure while baking.
💡 Pro Tip: If your tortillas seem stiff, warm them in the microwave for 10–15 seconds to make them more pliable.
Step 3: Add the Topping
- Arrange all the rolled tortillas neatly in your prepared pan.
- Brush the tops lightly with olive oil for that golden finish.
- In a small bowl, mix together garlic powder, Italian seasoning, and garlic salt. Sprinkle this garlic herb blend evenly over each roll-up for a delicious burst of flavor.
Step 4: Bake to Perfection
- Place the pan in the oven and bake for 9–11 minutes, or until the cheese is melted and the tortillas are lightly golden around the edges.
- For extra crispiness, broil them for an additional 1–2 minutes — but keep a close eye to prevent burning.
Step 5: Serve and Enjoy
- Let them cool for a minute or two before serving.
- Serve warm with extra pizza sauce or marinara on the side for dipping.
✨ Pro Tip: These roll-ups taste best fresh out of the oven, but they also reheat beautifully in an air fryer for a few minutes if you’re enjoying leftovers.
Pro Tips and Variations
One of the best things about this Cheesy Pepperoni Pizza Roll-Ups recipe is how flexible and forgiving it is. You can easily adapt it to fit your tastes, dietary needs, or whatever ingredients you have on hand. Here are some tried-and-true tips and creative variations to help you make each batch your best yet.
Pro Tips for Perfect Roll-Ups
- Warm your tortillas: A few seconds in the microwave or on a warm skillet makes them easier to roll and prevents cracking.
- Seal the edges: Press the seam side firmly down or use a light brush of pizza sauce as “glue” to help the roll-ups stay closed.
- Don’t overload with filling: A little goes a long way! Too much cheese or sauce can cause them to unravel while baking.
- Bake on parchment paper: It prevents sticking and helps with easy cleanup.
- Get that golden finish: Brush the tops with olive oil before baking and give them a quick 1-minute broil at the end for that irresistible crisp texture.
Flavor Variations
- Vegetarian Delight: Skip the pepperoni and load up with sautéed mushrooms, bell peppers, spinach, or olives.
- Extra Cheesy Twist: Add a sprinkle of Parmesan or a mix of cheddar and mozzarella for deeper flavor.
- Spicy Kick: Add red pepper flakes or a drizzle of spicy marinara before rolling for heat lovers.
- BBQ Style: Swap the pizza sauce for BBQ sauce and the pepperoni for grilled chicken — a sweet and smoky surprise!
- Breakfast Roll-Ups: Fill with scrambled eggs, cheese, and crumbled bacon for a fun morning twist.
Make-Ahead & Storage Tips
- Make ahead: Assemble your roll-ups, cover tightly, and refrigerate for up to 24 hours before baking.
- Freeze for later: Place baked roll-ups in a single layer, freeze, then store in an airtight bag for up to 2 months. Reheat in the oven or air fryer for best results.
- Reheating: Warm leftovers at 350°F (175°C) for about 5–7 minutes or in an air fryer for 3–4 minutes until crisp again.
Serving & Pairing Suggestions
These Cheesy Pepperoni Pizza Roll-Ups aren’t just a snack — they’re a crowd-pleasing centerpiece that fits almost any occasion. Whether you’re hosting game night, packing a school lunch, or looking for a quick weeknight appetizer, these crispy, cheesy bites pair beautifully with a variety of dips and sides.
Perfect Dipping Sauces
Take your roll-ups to the next level with these delicious dips:
- Classic Marinara or Pizza Sauce – keep it traditional and complement the pepperoni flavor.
- Garlic Butter Dip – rich and indulgent, perfect for those who love extra savory notes.
- Ranch Dressing – creamy, cool, and a family favorite.
- Spicy Sriracha Mayo – add a tangy heat for adventurous eaters.
- Cheese Sauce – because you can never have too much cheese!
Tasty Side Pairings
Round out your meal with light, refreshing sides that balance the richness of the roll-ups:
- Crisp Garden Salad with Italian vinaigrette or Caesar dressing.
- Garlic Parmesan Fries or Zucchini Fries for extra crunch.
- Tomato Basil Soup – a cozy pairing that turns snack time into comfort food heaven.
- Fresh Veggie Platter with dip for color and crunch.
Drink Pairings
Pair your roll-ups with:
- A sparkling lemonade or iced tea for a light refresh.
💡 Hosting Tip: Serve the roll-ups on a platter with assorted dipping sauces in small bowls for an interactive appetizer experience — guests can mix, match, and dip to their heart’s content.
Tools and Equipment Guide
You don’t need a fancy kitchen setup to make these Cheesy Pepperoni Pizza Roll-Ups — just a few basic tools to help you assemble, bake, and serve them with ease. Having the right equipment ensures your roll-ups bake evenly, crisp perfectly, and stay beautifully intact.
Essential Tools
- Baking Sheet or Casserole Dish: A large, rimmed baking sheet works best for even browning. A casserole dish can also be used for softer, saucier roll-ups.
- Parchment Paper or Silicone Baking Mat: Keeps your roll-ups from sticking and makes cleanup a breeze.
- Mixing Bowl: Perfect for combining your garlic herb seasoning.
- Pastry Brush: Use it to lightly coat the tops of your roll-ups with oil for that golden finish.
- Measuring Cups & Spoons: Precision matters when it comes to seasoning and sauce!
- Tongs or Spatula: For easy transferring and serving without tearing the tortillas.
Helpful Extras
- Pizza Cutter: Makes slicing and portioning a breeze, especially if serving as appetizers.
- Air Fryer: Great for reheating or crisping leftovers without drying them out.
- Storage Containers: Airtight containers keep your pizza roll-ups fresh for meal prep or next-day snacking.
Troubleshooting Common Issues
Even the easiest recipes can hit a few bumps along the way. Don’t worry — with a little guidance, your Cheesy Pepperoni Pizza Roll-Ups will come out perfectly every time. Here’s how to tackle the most common challenges:
1. Roll-Ups Unrolling or Falling Apart
- Cause: Too much filling or loosely rolled tortillas.
- Fix: Spread a thin layer of pizza sauce and cheese, then roll tightly with the seam side down. A light dab of sauce along the seam acts as “glue” to hold it together.
2. Soggy Tortillas
- Cause: Excess sauce or underbaking.
- Fix: Use just enough pizza sauce to coat the tortilla (about 1 tablespoon each). Bake until the edges are lightly golden. Preheating the oven fully also helps achieve crispiness.
3. Cheese Not Melting Properly
- Cause: Oven temperature too low or cheese layered unevenly.
- Fix: Ensure your oven is preheated to 350°F (175°C) and distribute cheese evenly across the tortillas. For extra meltiness, cover the pan loosely with foil for the first 5–6 minutes, then uncover to brown the tops.
4. Uneven Baking
- Cause: Overcrowding the pan.
- Fix: Leave a small gap between each roll-up so hot air circulates. Use two baking sheets if needed to ensure all roll-ups cook evenly.
5. Burned or Overly Brown Tops
- Cause: Too much oil or baking too long.
- Fix: Brush lightly with oil, not heavily, and monitor the last few minutes of baking. Adjust the oven rack to the middle position to prevent burning.
FAQs
Here are some of the most common questions about making Cheesy Pepperoni Pizza Roll-Ups, along with helpful answers to ensure your cooking experience is smooth, flavorful, and stress-free.
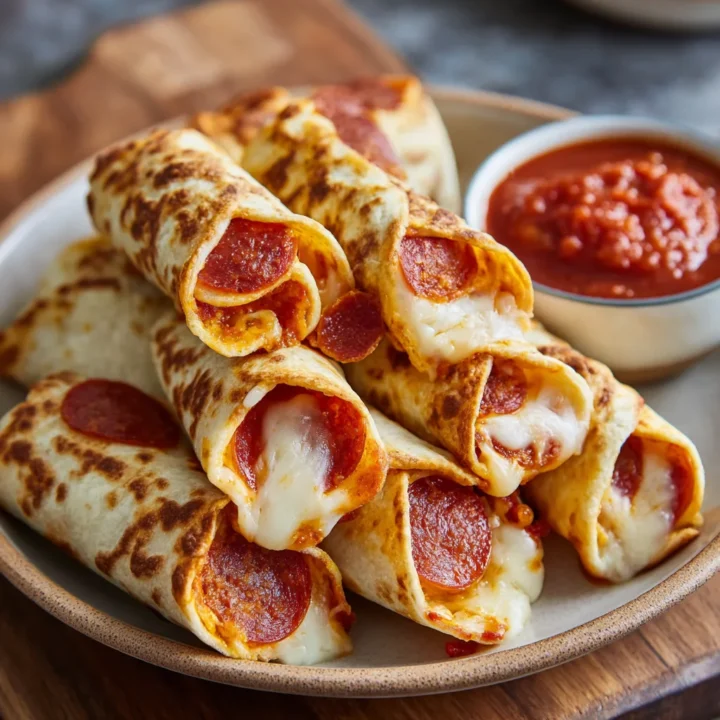
Cheesy Pepperoni Pizza Roll-Ups
If you love all things cheesy, crispy, and comforting, these Cheesy Pepperoni Pizza Roll-Ups will become a staple in your kitchen. They take everything you adore about traditional pizza — the gooey mozzarella cheese, zesty pizza sauce, and savory pepperoni — and wrap it all up in a soft tortilla for the ultimate handheld treat.
Ingredients
Main Ingredients:
- 20 small flour tortillas (about 5 inches each)
- 1 ½ cups pizza sauce (14 oz)
- 3 cups shredded mozzarella cheese (24 oz)
- 80 slices pepperoni (4 per tortilla)
- 1 tablespoon olive oil
Garlic Herb Sprinkle:
- ½ teaspoon garlic powder
- ½ teaspoon Italian seasoning
- ½ teaspoon garlic salt
Optional Add-Ins & Variations:
- Sautéed mushrooms, bell peppers, spinach, olives
- Parmesan cheese or mixed cheese blends
- Red pepper flakes for heat
Instructions
Preheat the Oven:
- Set oven to 350°F (175°C). Grease a baking sheet or casserole dish.
Assemble the Roll-Ups:
- Spread 1 tbsp pizza sauce on each tortilla.
- Sprinkle with ¼ cup mozzarella cheese.
- Layer 4 slices of pepperoni, then roll tightly, seam side down.
Add Topping:
- Arrange roll-ups in the pan.
- Brush tops lightly with olive oil.
- Mix garlic powder, Italian seasoning, and garlic salt; sprinkle over roll-ups.
Bake:
- Bake 9–11 minutes until cheese melts and tortillas turn lightly golden.
- Optional: Broil 1–2 minutes for extra crispiness.
Serve:
- Enjoy warm with extra pizza sauce or preferred dip.
Notes
- Warm tortillas slightly before rolling to prevent cracking.
- Don’t overfill — too much sauce or cheese may cause the roll-ups to unravel.
- Customize with vegetables, different cheeses, or proteins for variety.
- Make-ahead: Assemble and refrigerate for up to 24 hours before baking.
- Freezer-friendly: Bake, cool, then freeze in airtight containers for up to 2 months; reheat in oven or air fryer.
Nutrition Information:
Yield: 20 Serving Size: 1Amount Per Serving: Calories: 220Total Fat: 11gSaturated Fat: 5gCholesterol: 25mgSodium: 480mgCarbohydrates: 22gFiber: 1gSugar: 2gProtein: 10g