




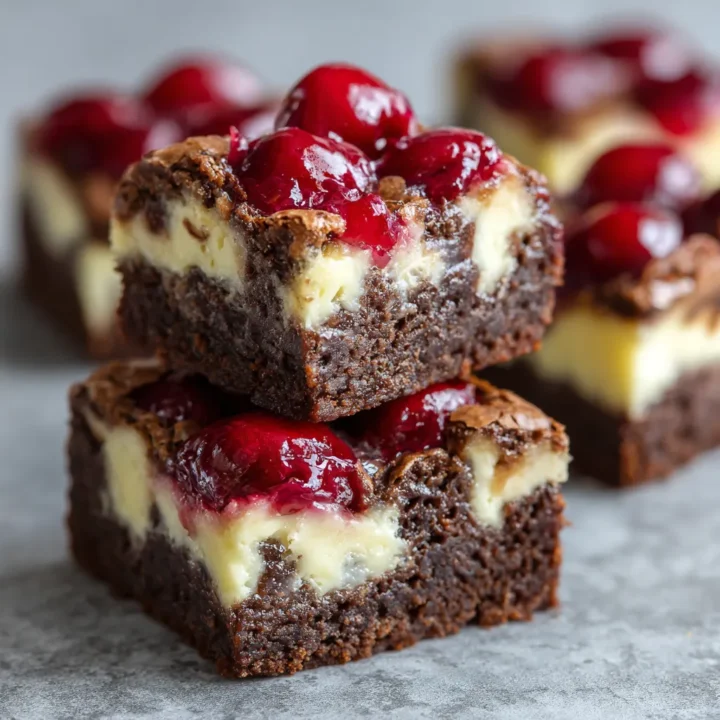
If you’ve ever stood in your kitchen torn between baking rich, fudgy brownies or a creamy cheesecake, this recipe was made for you. These Cherry Cheesecake Brownies bring together the deep chocolate flavor of homemade brownies with a smooth cheesecake swirl and bright bursts of cherry, creating a dessert that feels both indulgent and effortlessly elegant. It’s the kind of treat that looks bakery-worthy but is surprisingly approachable, even on a busy day.
I love this recipe because it’s more than just a dessert—it’s a conversation starter. Whether you’re baking for a family gathering, a casual weekend treat, or a special occasion, these cherry cheesecake brownie bars deliver bold flavor, beautiful contrast, and that irresistible balance of chocolate, creaminess, and fruit. If you enjoy desserts that are easy to make yet impressive to serve, you’re going to feel right at home with this one.
Why You’ll Love These Cherry Cheesecake Brownies
There’s something incredibly satisfying about a dessert that checks every box—rich, creamy, chocolatey, and just a little fruity. These Cherry Cheesecake Brownies do exactly that, making them a go-to recipe you’ll want to bake again and again. Whether you’re an experienced baker or just getting comfortable in the kitchen, this recipe is designed to feel rewarding, not overwhelming.
Here’s what makes these brownies truly special:
- Three irresistible layers in one pan
You get fudgy chocolate brownies, a smooth cheesecake swirl, and vibrant cherry topping all baked together into beautiful dessert bars—no complicated steps required. - Approachable ingredients, impressive results
Everything comes together with simple pantry staples and one baking pan, yet the final result looks and tastes like a bakery-style dessert. - Perfect balance of flavors and textures
The deep cocoa flavor pairs beautifully with the tangy cream cheese layer, while the cherries add brightness that keeps every bite from feeling too heavy. - Ideal for sharing and special occasions
These cherry cheesecake brownie bars slice cleanly, travel well, and always stand out on dessert tables, potlucks, and holiday spreads. - Beginner-friendly with room to customize
The recipe is forgiving, easy to swirl, and flexible—perfect if you enjoy reliable homemade brownies with a creative twist.
If you love desserts that feel comforting yet elevated, this is one of those recipes that quickly earns a permanent spot in your favorites. It’s simple enough for a weeknight bake and indulgent enough to feel like a celebration.
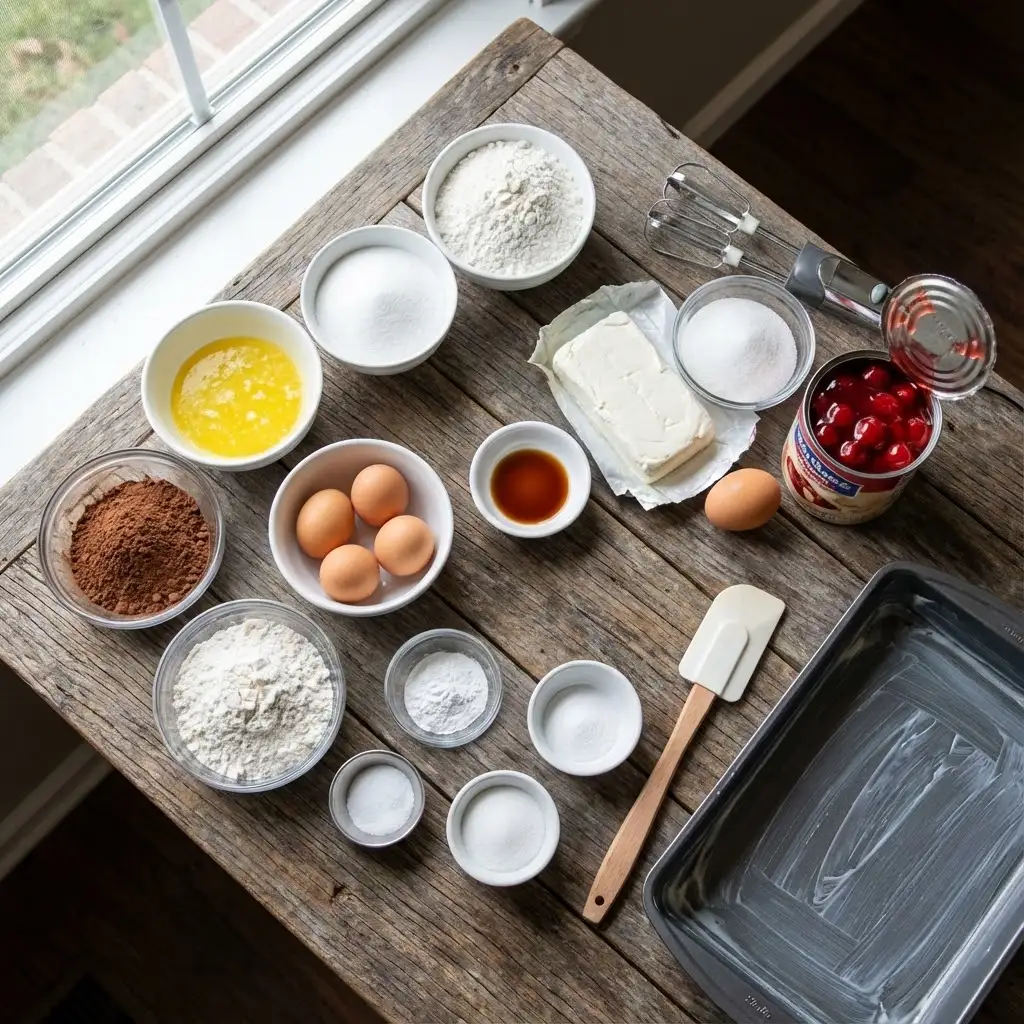
Ingredients You’ll Need
Before you begin, take a moment to gather everything—this recipe flows smoothly when all the ingredients are ready to go. Each component plays a clear role, working together to create rich cherry cheesecake brownie bars with distinct layers and balanced flavor.
Brownie Layer
These ingredients form the fudgy, chocolate-forward base that anchors the entire dessert:
- Butter – Adds richness and moisture, giving the brownies their dense, melt-in-your-mouth texture
- White sugar – Sweetens the batter while helping create a glossy, crackled top
- Cocoa powder – Delivers deep chocolate flavor without making the brownies too heavy
- Eggs – Provide structure and contribute to a soft yet sturdy crumb
- Vanilla extract – Enhances the chocolate notes and rounds out the sweetness
- Gluten-free all-purpose baking flour – Keeps the brownies tender while making them accessible for gluten-free baking
- Gluten-free baking powder – Adds just enough lift for balance without turning the brownies cakey
- Salt – Sharpens flavors and prevents the sweetness from overpowering the chocolate
Cheesecake Swirl & Cherry Layer
This layer brings contrast—creamy, tangy, and fruit-forward:
- Cream cheese (softened) – Creates the smooth, velvety cheesecake swirl
- White sugar – Sweetens the cheesecake layer without masking its tang
- Egg – Helps the cheesecake set softly as it bakes
- Cherry pie filling – Adds vibrant color and bursts of cherry flavor that cut through the richness
Tip: Softened cream cheese is key here—it blends effortlessly and gives you clean, beautiful swirls instead of lumps. Let it sit at room temperature for best results.
Instructions
Let’s bring everything together step by step. This process is straightforward and relaxed—think of it as layering flavors rather than rushing through technical steps. Take your time, and enjoy how easily these cherry cheesecake brownies come together.
Step-by-Step Baking Instructions
- Prepare the oven and pan
Preheat your oven to 350°F (175°C). Lightly grease a 9×13-inch baking pan to prevent sticking and ensure clean slices later. - Make the brownie batter
- Melt the butter in the microwave until fully liquid.
- Stir in the sugar and cocoa powder until smooth and glossy.
- Add the eggs one at a time, mixing well after each addition to build structure.
- Blend in the vanilla extract for depth of flavor.
- Incorporate the dry ingredients
In a separate bowl, whisk together the gluten-free flour, baking powder, and salt. Gradually mix this into the brownie batter until fully combined and smooth.
Pour the batter into the prepared pan and gently level the surface with a spatula. - Prepare the cheesecake swirl
In another bowl, beat the softened cream cheese, sugar, and egg until creamy and lump-free.
Spoon dollops of this mixture evenly over the brownie batter. - Add the cherry layer
Separate the cherries from the thick jelly in the pie filling. Dollop the cherries over the cream cheese layer, spacing them evenly for balanced bites. - Create the swirl
Using a knife or skewer, gently swirl the cheesecake and cherries into the brownie batter. Keep the motion light—overmixing will blur the layers instead of defining them. - Bake to perfection
Bake for 35–45 minutes, until the edges are set and slightly pulling away from the pan. The center should look just firm, not wet. - Cool before slicing
Remove from the oven and allow the brownies to cool completely. This step is essential for clean cuts and well-defined layers.
Once cooled, slice into bars and admire those beautiful swirls—you’ve just made a dessert that looks as impressive as it tastes.
Pro Tips and Variations
This is where small details make a big difference. These tips will help you get consistently fudgy cherry cheesecake brownies, while the variations give you room to make the recipe your own without sacrificing texture or flavor.
Pro Tips for Best Results
- Use room-temperature ingredients
Softened cream cheese and room-temperature eggs blend smoothly, creating clean cheesecake swirls without lumps. - Don’t overbake
The brownies will continue to set as they cool. Pull them from the oven when the center looks just set to keep the texture rich and fudgy. - Swirl gently, not aggressively
A few light passes with a knife are enough. Over-swirling blends the layers too much and dulls the visual contrast. - Cool completely before cutting
Chilling the brownies for 30–45 minutes after cooling helps achieve sharp, bakery-style slices.
Flavor Variations to Try
- Extra chocolate depth
Fold a handful of dark chocolate chips into the brownie batter for a richer chocolate base. - Almond-cherry twist
Add a drop of almond extract to the cheesecake mixture to enhance the cherry flavor. - Different fruit option
Swap cherry pie filling for raspberry or blueberry if you want a fresh spin on cheesecake brownie bars. - Slightly lighter texture
For a softer cheesecake layer, beat the cream cheese mixture just until smooth—avoid overmixing to keep it creamy.
These small adjustments let you tailor the brownies to your taste while keeping the recipe reliable and stress-free.
Serving & Pairing Suggestions
These Cherry Cheesecake Brownies are rich and flavorful on their own, but the right pairing can turn them into a truly memorable dessert experience. Whether you’re serving them casually or dressing them up for guests, a few thoughtful touches go a long way.
How to Serve Them
- Classic and simple
Serve the brownies at room temperature for the best balance of fudgy brownie and creamy cheesecake textures. - Chilled for clean slices
For sharper edges and a firmer bite, refrigerate before slicing—especially helpful when serving at events or parties. - Dessert-style plating
Add a light dusting of powdered sugar or a drizzle of melted chocolate for a polished presentation without overpowering the flavors.
Perfect Pairings
- Hot beverages
Pair with freshly brewed coffee, espresso, or black tea to balance the sweetness and highlight the chocolate notes. - Cold and creamy contrast
Serve with a scoop of vanilla ice cream or lightly sweetened whipped cream for a restaurant-style finish. - Fresh fruit accent
A few fresh cherries or berries on the plate add color and a refreshing bite alongside the rich brownie bars.
These brownies are versatile enough for everyday treats yet elegant enough for special occasions, making them easy to serve in a way that fits your moment.
Tools and Equipment Guide
Having the right tools on hand makes this recipe smoother and more enjoyable from start to finish. You don’t need anything fancy—just reliable basics that help you achieve evenly baked, beautifully swirled cherry cheesecake brownies.
Essential Baking Tools
- 9×13-inch baking pan
Provides the ideal depth for distinct brownie and cheesecake layers without overbaking. - Mixing bowls (2–3)
Separate bowls keep the brownie batter and cheesecake mixture clean and easy to manage. - Electric hand mixer or stand mixer
Helps achieve a smooth, lump-free cheesecake swirl with minimal effort. - Rubber spatula
Perfect for scraping bowls clean and leveling the brownie batter evenly in the pan. - Whisk
Ensures dry ingredients are well combined before mixing into the batter.
Helpful Extras
- Microwave-safe bowl
Makes melting the butter quick and mess-free. - Knife or skewer
Used for creating gentle swirls without overmixing the layers. - Parchment paper (optional)
Lining the pan allows for easy lifting and cleaner slices once the brownies have cooled.
Using these tools keeps the process efficient and stress-free, so you can focus on enjoying the baking—and the delicious results.
Troubleshooting Common Issues
Even simple recipes can raise a few questions while baking. If your cherry cheesecake brownies don’t turn out exactly as expected, these quick fixes will help you understand what happened and how to perfect them next time.
Brownies Are Too Dry
- Possible cause: Overbaking or measuring flour too heavily
- Solution: Check for doneness earlier and use the spoon-and-level method when measuring flour. The center should look just set, not fully firm.
Cheesecake Layer Looks Cracked
- Possible cause: Overmixing the cheesecake batter or baking too long
- Solution: Beat the cream cheese mixture only until smooth and remove the brownies as soon as the edges are set.
Swirls Look Muddy Instead of Defined
- Possible cause: Over-swirling the layers
- Solution: Use a light hand—just a few gentle passes with a knife will create clear, attractive swirls.
Center Feels Too Soft After Baking
- Possible cause: Underbaking or cutting while still warm
- Solution: Allow the brownies to cool completely, then chill briefly before slicing. They firm up as they set.
Brownies Stick to the Pan
- Possible cause: Insufficient greasing
- Solution: Grease the pan well or line it with parchment paper for easy release and clean edges.
Understanding these small details helps you bake with confidence and ensures consistent, bakery-quality results every time.
FAQs
Cherry Cheesecake Brownies
There’s something incredibly satisfying about a dessert that checks every box—rich, creamy, chocolatey, and just a little fruity.
Ingredients
Brownie Layer:
- 1 cup butter
- 2 cups white sugar
- ⅔ cup cocoa powder
- 4 eggs
- 2 teaspoons vanilla extract
- 1 cup gluten-free all-purpose baking flour
- ½ teaspoon gluten-free baking powder
- ¼ teaspoon salt
Cheesecake & Cherry Layer:
- 1 (8-ounce) package cream cheese, softened
- ⅓ cup white sugar
- 1 egg
- 1 (21-ounce) can cherry pie filling
Instructions
- Preheat the oven to 350°F (175°C) and grease a 9×13-inch baking pan.
- Melt the butter until liquid. Stir in sugar and cocoa powder until smooth.
- Add the eggs one at a time, mixing well after each addition. Stir in vanilla.
- In a separate bowl, whisk together flour, baking powder, and salt. Mix into the batter until fully combined.
- Pour the brownie batter into the prepared pan and smooth the surface.
- In another bowl, beat cream cheese, sugar, and egg until creamy and smooth.
- Spoon dollops of the cheesecake mixture over the brownie batter.
- Separate cherries from the pie filling and place cherries evenly on top.
- Gently swirl the layers together using a knife.
- Bake for 35–45 minutes, until the edges are set and slightly pulling from the pan.
- Cool completely before slicing into bars.
Notes
- For clean slices, chill the brownies for 30 minutes before cutting.
- Avoid over-swirling to keep the layers visually defined.
- The brownies will continue to set as they cool—slightly underbaking keeps them fudgy.
- Store leftovers refrigerated due to the cheesecake layer.
Nutrition Information:
Yield: 12 Serving Size: 1Amount Per Serving: Calories: 380Total Fat: 21gSaturated Fat: 12gSodium: 210mgCarbohydrates: 44gFiber: 2gSugar: 31gProtein: 5g