




There’s something magical about the scent of grilled corn on the cob sizzling over an open flame — especially when it’s brushed with rich herb butter that melts into every kernel. If you love easy summer sides that deliver big flavor with almost no effort, this grilled herbed corn on the cob recipe will instantly earn a spot on your warm-weather menu.
Have you ever wondered why corn tastes so much sweeter when it’s grilled? The heat caramelizes the natural sugars, giving each bite that irresistible charred, smoky edge. Add fresh herbs like parsley, basil, or thyme, and you get a side dish that feels both rustic and gourmet — the kind of recipe you’ll want to make for backyard barbecues, weeknight dinners, or whenever you’re craving something simple yet unforgettable.
I love how versatile this recipe is, too. Whether you pair it with grilled meats, serve it as a standalone snack, or bring it to a potluck, it always disappears fast. And the best part? You only need a few ingredients, a grill, and a handful of herbs to turn basic corn into something truly special.
Let’s dive in and bring this delicious, smoky, buttery goodness to your table.
Key Benefits & Why You’ll Love This Recipe
There’s a reason grilled herbed corn on the cob shows up at so many summer cookouts — it’s simple, flavorful, and almost impossible to mess up. Whether you’re a seasoned grill master or just firing up the barbecue for the first time this season, this recipe brings out the very best in fresh sweet corn with minimal effort.
Here’s what makes this recipe a keeper:
- Incredible Flavor with Minimal Ingredients: A little herb butter goes a long way. As the corn grills, the butter melts into every kernel, infusing it with a comforting mix of smoky, savory, and fresh herbal notes.
- Perfect for Any Occasion: Backyard BBQ? Weeknight dinner? Potluck side dish? This grilled corn fits them all. It’s the kind of easy grilled side dish everyone gravitates toward.
- Naturally Versatile: Change up the herbs, add a sprinkle of cheese, or finish with a squeeze of lime — this recipe is your blank canvas for creative twists.
- Foolproof for All Skill Levels: Wrapping the corn in foil keeps it moist and tender, making it a reliable method even if you’re new to grilling.
- Light, Fresh, and Summery: Grilled corn is one of those foods that just feels like sunshine on a plate. It adds color, sweetness, and smoky depth to any meal.
What I love most is how this foil-wrapped grilled corn gives you consistent, juicy results every single time. No guessing, no drying out — just perfectly cooked corn that bursts with flavor. Whether you’re hosting a crowd or cooking for two, this recipe brings an effortless, homemade charm to your table.
Let’s keep the momentum going and move into the ingredients you’ll need.
Ingredients
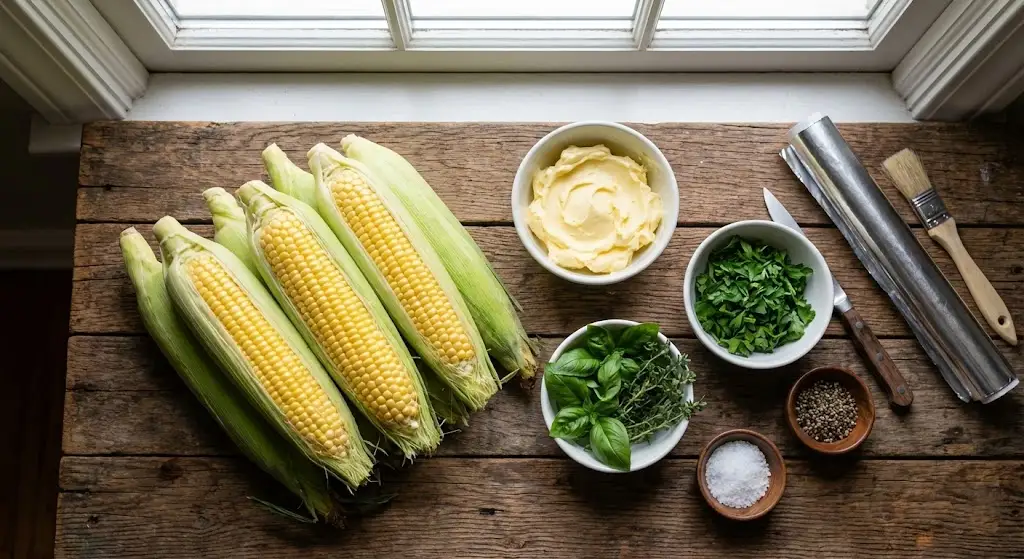
Before you start grilling, gather everything you need to make this flavorful herb-butter grilled corn on the cob. Keeping your ingredients prepped and ready makes the whole process smoother — and ensures every bite is packed with that delicious, smoky-herbed goodness.
Here’s what you’ll need:
- 4 ears of fresh corn, husked
Fresh sweet corn gives the best flavor and texture. Look for bright green husks and plump kernels.
- 1/4 cup unsalted butter, softened
Softened butter mixes easily with the herbs and spreads beautifully over the corn.
- 2 tablespoons fresh herbs, chopped
Parsley, basil, thyme — or a blend. Fresh herbs brighten the smoky flavor of the grilled corn.
- Salt and pepper, to taste
These simple seasonings enhance the natural sweetness of the corn.
- Aluminum foil
Essential for keeping the corn tender and preventing it from drying out on the grill.
Instructions
Follow these simple, foolproof steps to make perfectly grilled herbed corn on the cob every time. Think of this as your friendly, step-by-step guide to achieving tender, smoky, flavor-packed corn with minimal effort.
1. Prepare the Corn
Start by husking the corn and pulling away any remaining silk.
Give each ear a quick rinse under cold water — this helps remove stubborn strands and preps the corn for seasoning.
2. Make the Herb Butter
In a small bowl, combine the softened butter with your chopped fresh herbs.
Add a pinch of salt and pepper, then mix until everything is evenly blended.
You should end up with a fragrant, green-flecked butter that smells like summer.
3. Wrap the Corn
Tear off sheets of aluminum foil, each large enough to fully wrap an ear of corn.
Place a corn ear in the center, then spread a generous layer of herb butter all over it — don’t be shy, this is where the flavor comes from.
Wrap tightly to seal in moisture while grilling.
4. Preheat the Grill
Set your grill to medium-high heat.
A hot grill helps the corn cook evenly while giving it that signature smoky aroma.
5. Grill the Corn
Place the foil-wrapped corn directly on the grill grates.
Cook for 15–20 minutes, turning occasionally to ensure even heating.
The foil traps steam while allowing just enough heat to develop a subtle char and deep flavor.
6. Serve and Enjoy
Use tongs to remove the foil packets — be careful of the hot steam when unwrapping.
Serve the corn hot, and let the melted herb butter speak for itself.
It pairs beautifully with grilled meats, salads, or simply as a buttery, flavorful snack on its own.
Pro Tips and Variations
This recipe is wonderfully simple, but with a few clever tweaks, you can take your grilled herbed corn on the cob to a whole new level. Here are some helpful tips and fun variations to enhance both flavor and cooking results.
Pro Tips for Perfect Grilled Corn
- Use softened butter, not melted:
Soft butter clings to the kernels better, giving you richer, more even flavor.
- Don’t skip the foil:
Foil creates steam that keeps the corn tender while still allowing the grill’s smoky heat to work its magic.
- Turn frequently:
Rotating the corn every few minutes ensures each side cooks evenly without burning.
- Let it rest for a moment:
After grilling, leave the corn wrapped for 1–2 minutes to let the herb butter soak in before serving.
- Prep ahead:
You can assemble the foil-wrapped corn up to a day ahead. Store it in the fridge until grilling time — perfect for busy cookouts.
Flavor Variations to Try
- Garlic Herb Butter:
Mix in minced garlic or garlic powder for a deeper savory kick.
- Spicy Chili Butter:
Add chili flakes, smoked paprika, or a touch of cayenne for heat lovers.
- Cheesy Mexican-Inspired Twist:
After grilling, sprinkle the hot corn with cotija cheese, lime juice, and cilantro — a simple nod to Mexican street corn.
- Lemon Basil Freshness:
Stir in lemon zest for a bright, citrusy note that pairs beautifully with grilled flavors.
- Rosemary & Thyme Rustic Blend:
Perfect for fall grilling sessions, adding a cozy, woodsy aroma.
Serving & Pairing Suggestions
One of the best parts about grilled herbed corn on the cob is how effortlessly it fits into just about any meal. Its smoky sweetness, softened butter, and fresh herbs make it a standout side dish that complements a wide range of flavors — from light summer salads to hearty grilled meats.
Here are some delicious ways to serve and pair your corn:
Pair It with Grilled Proteins
This corn shines next to anything hot off the grill. Try serving it alongside:
- Juicy grilled chicken thighs
- BBQ ribs or pulled pork
- Lemon garlic shrimp skewers
- Classic backyard burgers or cheeseburgers
- Herb-marinated steak or kebabs
The smoky-herb flavor blends beautifully with savory, charred meats.
Add Freshness with Light Sides
Balance the richness of the herb butter with bright, refreshing sides:
- Garden salads with vinaigrette
- Tomato and cucumber salad
- Watermelon feta salad
- Coleslaw or cabbage crunch mix
These help round out the meal with color and crisp textures.
Bonus Sides for Bigger Meals
Turn your grilled corn into a full cookout spread by pairing it with:
- Warm garlic bread
- Baked potatoes
- Grilled vegetables like zucchini, peppers, or asparagus
- Creamy pasta salads
Everything comes together effortlessly for a satisfying summer plate.
Serving Tips
- Brush on extra herb butter before serving for a glossy, flavorful finish.
- Sprinkle fresh herbs or grated Parmesan for added color and richness.
- Add a squeeze of lime or lemon to brighten every bite.
Tools and Equipment Guide
You don’t need a fully stocked kitchen to make delicious grilled herbed corn on the cob — just a few simple tools that help you work efficiently and safely. Having the right equipment on hand ensures your corn cooks evenly, stays juicy, and picks up that irresistible smoky flavor.
Here’s what you’ll need:
Essential Tools
- Outdoor Grill (Gas or Charcoal)
A medium-high heat grill is the secret to getting perfectly tender corn with a subtle char. Both gas and charcoal work great — charcoal adds deeper smokiness.
- Aluminum Foil
This is your best friend for grilling corn. It traps steam, keeps the butter locked in, and prevents the kernels from burning.
- Tongs
A sturdy pair of long tongs helps you turn the corn safely while keeping your hands away from the heat.
Helpful Kitchen Items
- Small Mixing Bowl
Perfect for combining the softened butter with your chopped herbs. - Basting Brush or Butter Knife
Makes spreading the herb butter over the corn quick and even. - Cutting Board & Sharp Knife
Needed for chopping fresh herbs.
Optional but Nice to Have
- Corn Holders
Great for serving and eating without burning your fingers. - Grill Thermometer
Helps ensure your grill maintains consistent medium-high heat. - Heat-Resistant Gloves
Useful when handling hot foil packets.
Troubleshooting Common Issues
Even with a simple recipe like grilled herbed corn on the cob, a few small things can affect your results. Here’s a helpful guide to ensure your corn comes out tender, flavorful, and perfectly grilled every time — no surprises, no frustration.
Problem: The Corn Turns Out Dry
Cause: Not enough butter, or the foil wasn’t sealed properly.
Fix:
- Make sure each ear is generously coated in herb butter.
- Press the foil tightly around the corn with no gaps.
- If you prefer a drier charred finish, unwrap for the last 3–5 minutes — but only after it’s fully cooked.
Problem: The Corn Isn’t Cooking Evenly
Cause: Hot spots on the grill or not rotating often enough.
Fix:
- Turn the corn every 3–4 minutes to help distribute heat evenly.
- If your grill has uneven heat zones, shift the corn halfway through cooking.
Problem: The Herb Butter Leaks Out
Cause: Tears in the foil or loose wrapping.
Fix:
- Double-wrap the corn if your foil is thin.
- Ensure the seams are sealed and facing upward on the grill.
Problem: The Corn Takes Too Long to Cook
Cause: Grill temperature is too low.
Fix:
- Aim for medium-high heat (around 375–425°F).
- Preheat the grill fully before placing the corn on it.
Problem: The Herb Flavor Isn’t Strong Enough
Cause: Not enough herbs or uneven mixing.
Fix:
- Add more fresh herbs or a sprinkle of dried herbs for stronger flavor.
- Taste the herb butter before spreading — adjust salt and herbs as needed.
FAQs
Here are some of the most common questions people have when making grilled herbed corn on the cob, along with clear, helpful answers to make your cooking experience even easier.
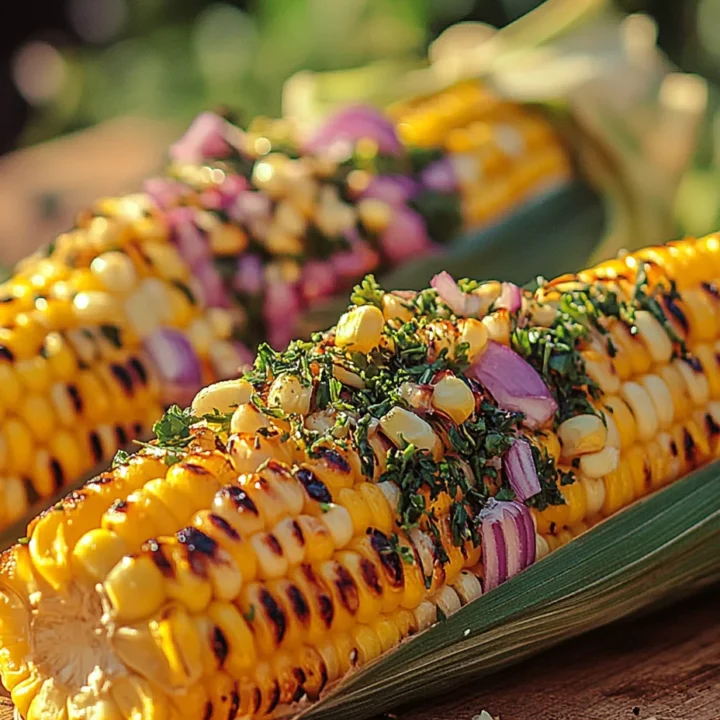
Grilled Herbed Corn on the Cob
There’s a reason grilled herbed corn on the cob shows up at so many summer cookouts — it’s simple, flavorful, and almost impossible to mess up.
Ingredients
- 4 ears of corn, husked
- 1/4 cup unsalted butter, softened
- 2 tablespoons fresh herbs (parsley, basil, or thyme), chopped
- Salt and pepper, to taste
- Aluminum foil
Instructions
1. Prepare the Corn
Remove husks and silk, then rinse the corn under cold water.
2. Make the Herb Butter
Mix softened butter with chopped herbs, salt, and pepper until smooth and well combined.
3. Wrap the Corn
Place each ear of corn on a piece of foil. Spread the herb butter evenly over the surface. Wrap tightly to seal.
4. Preheat the Grill
Set your grill to medium-high heat.
5. Grill the Corn
Place foil-wrapped corn directly on the grill. Cook 15–20 minutes, turning occasionally, until tender.
6. Serve
Carefully unwrap and enjoy hot, buttery, herbed corn.
Notes
- Seal tightly: A well-sealed foil pack keeps the corn moist and prevents butter leakage.
- Mix herbs: Combine basil, parsley, and thyme for a layered, aromatic flavor.
- Make ahead: Prepare foil-wrapped corn up to 24 hours in advance for easy grilling during gatherings.
- For stronger char: Unwrap during the last 3–4 minutes to expose the kernels directly to grill heat.
Nutrition Information:
Yield: 4 Serving Size: 1Amount Per Serving: Calories: 180Total Fat: 12gSaturated Fat: 7gCarbohydrates: 19gFiber: 2gSugar: 5gProtein: 3g