




Hey there, food lover! Ever tasted a dish that transports you straight to the heart of Brazil with just one bite? Today, I’m thrilled to share with you a recipe that does just that—Brazilian Salpicão Salad!
This isn’t just any salad; it’s a vibrant, flavorful explosion that combines tender shredded chicken, crunchy batata palha, and a creamy, zesty dressing. Imagine the perfect balance of textures and flavors, all wrapped up in a bowl. Whether you’re hosting a picnic or looking for a make-ahead dish to simplify your week, this Brazilian chicken salad is a game-changer.
Ever wondered how to turn a simple salad into a star of the table? Salpicão de frango is your answer. It’s a dish that’s as easy to make as it is impressive to serve. Plus, with ingredients like fresh carrots, peas, and a hint of tangy lemon, it’s a healthy delight that won’t weigh you down.
So, are you ready to elevate your culinary game with a touch of Brazilian magic? Let’s dive into this delightful recipe together and discover why Salpicão is a must-try for any food enthusiast.
Key Benefits of Brazilian Salpicão Salad
Why You’ll Love This Salad:
-
Protein-Packed: With shredded chicken breast as the star, this salad is a great source of lean protein, perfect for keeping you full and satisfied.
-
Nutrient-Rich: Packed with fresh vegetables like carrots and peas, it’s a powerhouse of vitamins and minerals.
-
Versatile: Whether you’re looking for a light lunch, a side dish for a barbecue, or a make-ahead option for a picnic, this salad fits the bill.
-
Cultural Delight: It’s a taste of Brazil in every bite, perfect for those who love exploring global flavors.
Health Benefits:
-
Low in Calories: Despite being filling, this salad is light on the calories, making it a guilt-free choice.
-
Heart-Healthy: The use of mayonnaise in moderation and fresh ingredients ensures a balanced, heart-healthy meal.
Cultural Significance:
-
Traditional Flavor: Salpicão is a beloved Brazilian dish, often served during holidays and special occasions. It’s a perfect way to bring a bit of Brazilian culture to your table.
-
Community Favorite: This salad is known for its ability to bring people together, making it a fantastic choice for gatherings and potlucks.
Practical Tips:
-
Make-Ahead: Prepare the salad a day ahead to let the flavors meld together. It tastes even better the next day!
-
Customizable: Feel free to add or substitute ingredients based on what you have on hand. It’s a very forgiving recipe.
Ingredients
Main Ingredients:
-
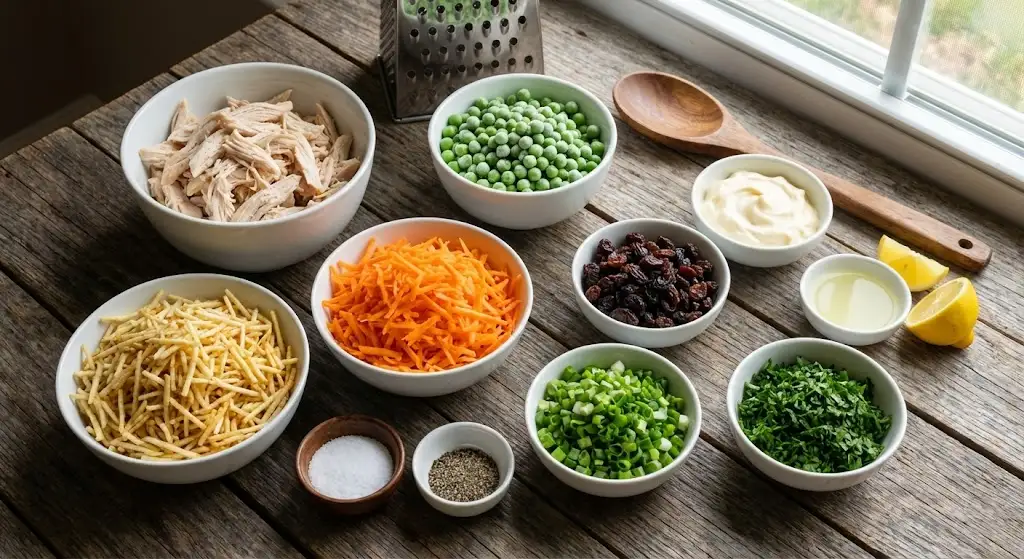
2 cups shredded chicken breast: You can use leftover chicken or cook fresh. It’s the star of the show here!
-
1 cup batata palha (thinly sliced potato sticks): These add a delightful crunch. You can find them at specialty stores or make your own.
-
1 cup shredded carrots: Fresh and crunchy, they add a nice pop of color.
-
1 cup peas: Fresh or frozen works great. Just make sure they’re thawed if using frozen.
-
1/2 cup raisins: A touch of sweetness that balances the savory elements.
-
1/4 cup finely chopped green onions: Adds a fresh, mild onion flavor.
-
1/4 cup finely chopped parsley: For a burst of freshness and a pop of green.
Dressing Ingredients:
-
1 cup mayonnaise: Creamy and smooth, it binds everything together.
-
1 tablespoon lemon juice: A splash of tanginess to brighten the flavors.
-
Salt and pepper to taste: Adjust to your liking for the perfect seasoning.
Optional Additions:
-
Celery: For extra crunch.
-
Bell peppers: Adds a bit of sweetness and more color.
-
Avocado: For a creamy twist.
Pro Tips:
-
Freshness is Key: Use fresh ingredients whenever possible for the best flavor.
-
Adjust to Taste: Feel free to tweak the amounts of mayonnaise and lemon juice based on your preference.
-
Storage: Keep the salad in an airtight container in the fridge to maintain its freshness.
Instructions
Step 1: Cook the Chicken
-
Boil the Chicken: Place the chicken breasts in a large pot, cover with water, and bring to a boil. Reduce the heat and simmer for about 15-20 minutes, or until the chicken is fully cooked.
-
Shred the Chicken: Once cooked, let the chicken cool slightly. Then, using two forks or a stand mixer, shred the chicken into small pieces. This is a great task for a food processor too!
-
Cool to Room Temperature: Let the shredded chicken cool to room temperature. This ensures the salad stays fresh and doesn’t get soggy.
Step 2: Prepare the Vegetables
-
Shred the Carrots: Use a grater or food processor to shred the carrots. Aim for fine shreds to ensure they mix well with the other ingredients.
-
Chop the Green Onions and Parsley: Finely chop the green onions and parsley. This adds a fresh, aromatic touch to the salad.
Step 3: Mix Everything Together
-
Combine Ingredients: In a large mixing bowl, combine the shredded chicken, batata palha, shredded carrots, peas, raisins, green onions, and parsley.
-
Prepare the Dressing: In a separate bowl, mix the mayonnaise, lemon juice, salt, and pepper. Adjust the seasoning to your taste.
-
Combine Dressing with Salad: Pour the dressing over the salad and mix well using a wooden spoon. Make sure all the ingredients are evenly coated.
Step 4: Chill and Serve
-
Refrigerate: Cover the bowl with plastic wrap or transfer the salad to an airtight container. Refrigerate for at least 2 hours to let the flavors meld together.
-
Serve Chilled: This salad tastes best when served cold. Give it a quick stir before serving to redistribute the dressing.
Pro Tips:
-
Make-Ahead: Prepare the salad a day ahead for even better flavor. The ingredients will have more time to marinate in the dressing.
-
Texture Tips: If you prefer a crunchier salad, add the batata palha right before serving to prevent it from getting soggy.
-
Storage: Keep any leftovers in an airtight container in the fridge for up to 3 days.
Pro Tips and Variations
Pro Tips:
-
Use Leftover Chicken: Save time by using leftover chicken from a roast or rotisserie chicken. Just shred it and you’re good to go!
-
Adjust the Dressing: If you prefer a tangier salad, add a bit more lemon juice. For a creamier texture, you can add a little more mayonnaise.
-
Cool Ingredients: Make sure all your ingredients are at room temperature before mixing them together. This helps the flavors blend better.
-
Storage Tips: Store the salad in an airtight container in the fridge. It will keep for up to 3 days, but it’s best enjoyed within the first 24 hours for the freshest taste.
Fun Variations:
-
Add Celery: For extra crunch, finely chop some celery and toss it in.
-
Bell Peppers: Add some color and sweetness with diced bell peppers.
-
Avocado: For a creamy twist, add some diced avocado right before serving.
-
Nuts: Sprinkle some chopped walnuts or pecans for added texture and flavor.
-
Herbs: Experiment with different herbs like cilantro or basil for a unique twist.
Seasonal Variations:
-
Summer: Add fresh corn kernels and cherry tomatoes for a burst of summer flavors.
-
Winter: Incorporate roasted sweet potatoes and cranberries for a cozy, seasonal touch.
Make-Ahead Tips:
-
Prepare in Advance: This salad is perfect for make-ahead meals. Prepare it the night before and let the flavors meld in the fridge.
-
Layer Ingredients: If you’re making it ahead, layer the ingredients in a container, keeping the batata palha on top to prevent it from getting soggy.
Serving Suggestions
As a Main Dish:
-
Solo Star: Serve the salad on its own in a large, colorful bowl. It’s hearty enough to be a satisfying main course.
As a Side Dish:
-
Grilled Meats: It pairs wonderfully with grilled chicken, steak, or ribs. The freshness of the salad complements the smoky flavors of the grill.
-
Seafood: Try it alongside grilled or baked fish. The light, tangy dressing works perfectly with seafood.
Picnic-Ready:
-
Outdoor Gatherings: Pack the salad in an airtight container and take it to your next picnic or outdoor gathering. It’s a crowd-pleaser!
-
Lunchboxes: Perfect for meal prepping and packing in lunchboxes for a refreshing midday meal.
Garnishes and Final Touches:
-
Fresh Herbs: Sprinkle some extra chopped parsley or cilantro on top just before serving for a burst of freshness.
-
Lemon Wedges: Serve with lemon wedges on the side for a burst of tanginess.
-
Crunchy Toppings: Add a handful of crushed potato chips or toasted nuts for extra crunch.
Presentation Tips:
-
Colorful Bowl: Use a bright, colorful bowl to serve the salad. It makes it more visually appealing.
-
Layered Look: For a stunning presentation, layer the ingredients in a clear glass bowl. Start with the shredded chicken, then add the vegetables, and top with batata palha and dressing.
Pairing Suggestions:
-
Brazilian Feijoada: Serve it alongside a hearty bowl of Brazilian feijoada for a complete meal.
-
Churrasco: Pair it with churrasco (Brazilian barbecue) for a traditional Brazilian feast.
-
Avocado Toast: For a lighter option, serve it with avocado toast for a refreshing brunch.
Tools and Equipment Guide
Essential Tools:
-
Large Mixing Bowl: Perfect for combining all your ingredients. A big bowl ensures everything mixes evenly without spilling.
-
Wooden Spoon: Great for gentle mixing. It won’t damage your bowl and works perfectly for folding in delicate ingredients.
-
Airtight Container: Essential for storing your salad. Keeps it fresh and prevents it from getting soggy in the fridge.
Optional Tools:
-
Food Processor: Makes shredding chicken and carrots a snap. Saves time and effort.
-
Stand Mixer: If you prefer, you can use a stand mixer with a paddle attachment to shred the chicken. It’s quick and efficient.
-
Grater: If you don’t have a food processor, a box grater works great for shredding carrots.
-
Knife and Cutting Board: For chopping green onions, parsley, and any other fresh ingredients.
Pro Tips:
-
Invest in Quality: A good-quality airtight container is worth the investment. It keeps your salad fresh and prevents it from absorbing other flavors in the fridge.
-
Multi-Purpose Tools: A large mixing bowl and wooden spoon are kitchen staples. They’re versatile and can be used for many recipes.
-
Safety First: Always use a sharp knife for chopping. It’s safer and more efficient than a dull one.
Quick Checklist:
-
✔️ Large mixing bowl
-
✔️ Wooden spoon
-
✔️ Airtight container
-
✔️ Food processor (optional)
-
✔️ Stand mixer (optional)
-
✔️ Grater (optional)
-
✔️ Knife and cutting board
Seasonal Variations
Summer Variation:
-
Fresh Corn: Add some freshly boiled or grilled corn kernels for a sweet and summery touch.
-
Cherry Tomatoes: Toss in some halved cherry tomatoes for bursts of fresh, juicy flavor.
-
Cilantro: Swap out the parsley for cilantro for a bright, zesty twist.
-
Avocado: Dice up some ripe avocado and add it right before serving for a creamy, healthy addition.
Fall Variation:
-
Roasted Butternut Squash: Cube and roast some butternut squash until tender. Add it to the salad for a warm, earthy flavor.
-
Pumpkin Seeds: Sprinkle some toasted pumpkin seeds on top for extra crunch and a festive touch.
-
Apple Cider Vinegar: Replace the lemon juice with a splash of apple cider vinegar for a tangy, autumnal twist.
Winter Variation:
-
Roasted Sweet Potatoes: Cube and roast sweet potatoes until caramelized. They add a natural sweetness and hearty texture.
-
Cranberries: Use fresh or dried cranberries for a pop of color and tartness.
-
Pomegranate Seeds: Add some pomegranate seeds for a burst of juicy, festive flavor.
-
Cinnamon: A pinch of cinnamon in the dressing adds a warm, winter spice.
Spring Variation:
-
Asparagus: Add some thinly sliced or blanched asparagus for a fresh, green touch.
-
Mint: Swap out the parsley for fresh mint leaves for a bright, springtime flavor.
-
Strawberries: Toss in some sliced strawberries for a sweet and tangy contrast.
-
Honey: Add a drizzle of honey to the dressing for a touch of natural sweetness.
Pro Tips:
-
Freshness is Key: Always use fresh, seasonal ingredients for the best flavor.
-
Experiment with Dressings: Don’t be afraid to tweak the dressing to match the season. For example, a vinaigrette might work better in the summer, while a creamier dressing might be more satisfying in the winter.
-
Texture Balance: Aim for a good balance of textures. If you add something soft like avocado, balance it with something crunchy like nuts or seeds.
Pairing Suggestions
Brazilian Feijoada:
-
How to Serve: Serve the salad on the side of a bowl of feijoada. The contrasting textures and flavors create a balanced and satisfying meal.
Churrasco:
-
Why It Works: Churrasco, or Brazilian barbecue, features grilled meats like steak, chicken, and sausage. The freshness of the salad complements the smoky, savory flavors of the grilled meats.
-
How to Serve: Offer the salad as a side dish at your churrasco feast. It’s a refreshing break from the rich meats.
Avocado Toast:
-
Why It Works: For a lighter, brunch-inspired meal, avocado toast is a perfect match. The creamy avocado and the tangy salad create a delightful combination.
-
How to Serve: Top slices of toasted bread with mashed avocado, a sprinkle of salt and pepper, and a dollop of Salpicão Salad on top.
Brazilian Rice and Beans:
-
Why It Works: A classic Brazilian combination of rice and beans provides a hearty base that pairs beautifully with the salad. The flavors blend seamlessly, creating a complete and satisfying meal.
-
How to Serve: Serve the salad alongside a plate of Brazilian rice and beans. You can also mix a bit of the salad into the rice for a unique twist.
Grilled Fish:
-
Why It Works: Grilled fish, such as salmon or tilapia, is light and flavorful. The tangy dressing in the salad complements the delicate taste of the fish.
-
How to Serve: Place a fillet of grilled fish on a plate and serve the salad on the side. A squeeze of fresh lemon over both the fish and salad enhances the flavors.
Picnic Pairings:
-
Why It Works: For a picnic, you want foods that travel well and taste great at room temperature. Salpicão Salad fits the bill perfectly.
-
How to Serve: Pack the salad in an airtight container and bring along some crusty bread, cheese, and fresh fruit. It’s a picnic-perfect combination.
Pro Tips:
-
Flavor Balance: Aim for a balance of flavors. If you’re serving something rich and hearty, pair it with the light, tangy salad.
-
Texture Contrast: Consider the textures of the dishes. A crunchy salad pairs well with soft, tender meats or grains.
-
Color Coordination: For a visually appealing meal, choose dishes that complement the vibrant colors of the salad.
Conclusion
Hey there, culinary explorer! We’ve reached the end of our journey through the vibrant and delicious world of Brazilian Salpicão Salad.
From the moment we started shredding that chicken to the final mix of the tangy dressing, you’ve shown just how easy and rewarding it is to bring a taste of Brazil to your kitchen. Whether you’re serving it as a refreshing side dish, a hearty main course, or packing it for a picnic, this salad is sure to delight your taste buds and impress your friends and family.
Remember, the beauty of Salpicão lies in its versatility. Feel free to customize it with your favorite ingredients, experiment with different dressings, and adapt it to any season. From summer’s fresh corn and cherry tomatoes to winter’s roasted sweet potatoes and cranberries, this salad can be a year-round favorite.
So, go ahead and enjoy the fruits of your labor. Savor every bite, share the joy of cooking with your loved ones, and keep exploring the rich flavors of Brazilian cuisine. After all, every meal is an adventure, and you’ve just taken a fantastic step into the heart of Brazil.
FAQs
Q: Can I use store-bought batata palha?
-
A: Absolutely! Store-bought batata palha works perfectly fine. Just make sure to choose a brand with thin, crispy slices for the best texture.
Q: How long can I store the salad in the refrigerator?
-
A: The salad will keep well in an airtight container in the fridge for up to 3 days. However, it tastes best when consumed within the first 24 hours for the freshest flavor.
Q: Can I make this salad ahead of time?
-
A: Yes, you can! In fact, making it a day ahead allows the flavors to meld together even better. Just store it in an airtight container in the fridge.
Q: What if I don’t have a food processor?
-
A: No problem! You can shred the chicken using two forks or a stand mixer. For the carrots, a box grater works just as well.
Q: Can I substitute the mayonnaise with something else?
-
A: Sure! You can use Greek yogurt for a healthier option, or a creamy dressing like aioli for a different flavor profile.
Q: Is this salad gluten-free?
-
A: Yes, it is! All the ingredients listed are naturally gluten-free. Just make sure to check the labels of any store-bought ingredients, like batata palha, to ensure they are gluten-free as well.
Q: Can I add more vegetables to the salad?
-
A: Absolutely! Feel free to add more vegetables like bell peppers, celery, or even some fresh spinach. The more, the merrier!
Q: What’s the best way to serve this salad?
-
A: It’s versatile! Serve it as a main dish, a side salad, or even pack it for a picnic. Pair it with grilled meats, fish, or enjoy it on its own.
Q: Can I use chicken thighs instead of chicken breast?
-
A: Yes, you can! Chicken thighs will be a bit more tender and flavorful. Just make sure to shred them the same way you would with chicken breast.
Q: How do I make sure the batata palha stays crispy?
-
A: Add the batata palha right before serving to prevent it from getting soggy. If you’re making the salad ahead, keep the batata palha separate and mix it in just before you’re ready to eat.
Q: Can I use frozen peas?
-
A: Yes, you can use frozen peas. Just make sure to thaw them before adding them to the salad.
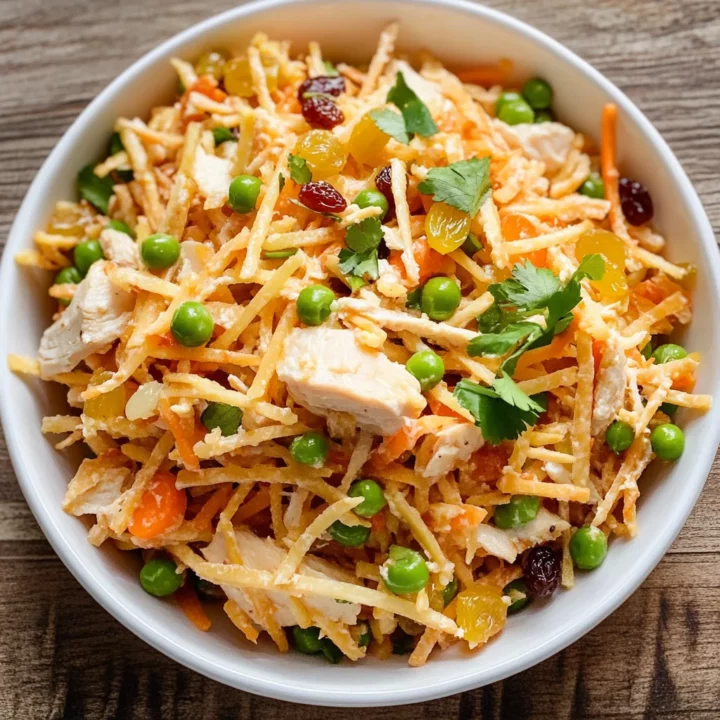
Brazilian Salpicão Salad
Discover the delight of Easy Brazilian Chicken Salad, or Salpicão de Frango! This crunchy salad features shredded chicken, veggies, raisins, and potato sticks.
Ingredients
Main Ingredients
- 2 cups shredded chicken breast
- 1 cup batata palha (thinly sliced potato sticks)
- 1 cup shredded carrots
- 1 cup peas
- 1/2 cup raisins
- 1/4 cup finely chopped green onions
- 1/4 cup finely chopped parsley
Dressing Ingredients
- 1 cup mayonnaise
- 1 tablespoon lemon juice
- Salt and pepper to taste
Instructions
Step 1: Cook the Chicken:
- Boil the Chicken: Place the chicken breasts in a large pot, cover with water, and bring to a boil. Reduce the heat and simmer for about 15-20 minutes, or until the chicken is fully cooked.
- Shred the Chicken: Once cooked, let the chicken cool slightly. Then, using two forks or a stand mixer, shred the chicken into small pieces.
- Cool to Room Temperature: Let the shredded chicken cool to room temperature.
Step 2: Prepare the Vegetables:
- Shred the Carrots: Use a grater or food processor to shred the carrots. Aim for fine shreds to ensure they mix well with the other ingredients.
- Chop the Green Onions and Parsley: Finely chop the green onions and parsley. This adds a fresh, aromatic touch to the salad.
Step 3: Mix Everything Together:
- Combine Ingredients: In a large mixing bowl, combine the shredded chicken, batata palha, shredded carrots, peas, raisins, green onions, and parsley.
- Prepare the Dressing: In a separate bowl, mix the mayonnaise, lemon juice, salt, and pepper. Adjust the seasoning to your taste.
- Combine Dressing with Salad: Pour the dressing over the salad and mix well using a wooden spoon. Make sure all the ingredients are evenly coated.
Step 4: Chill and Serve:
- Refrigerate: Cover the bowl with plastic wrap or transfer the salad to an airtight container. Refrigerate for at least 2 hours to let the flavors meld together.
- Serve Chilled: This salad tastes best when served cold. Give it a quick stir before serving to redistribute the dressing.
Notes
Pro Tips:
- Use Leftover Chicken: Save time by using leftover chicken from a roast or rotisserie chicken. Just shred it and you’re good to go!
- Adjust the Dressing: If you prefer a tangier salad, add a bit more lemon juice. For a creamier texture, you can add a little more mayonnaise.
- Cool Ingredients: Make sure all your ingredients are at room temperature before mixing them together. This helps the flavors blend better.
- Storage Tips: Store the salad in an airtight container in the fridge. It will keep for up to 3 days, but it’s best enjoyed within the first 24 hours for the freshest taste.
- Texture Tips: If you prefer a crunchier salad, add the batata palha right before serving to prevent it from getting soggy.
Nutrition Information:
Yield: 4 Serving Size: 1Amount Per Serving: Calories: 350Total Fat: 20gSodium: 300mgCarbohydrates: 20gFiber: 3gSugar: 5gProtein: 25g