




Ever crave pizza night but wish for something light, gluten-free, and irresistibly crisp? These Almond & Tapioca Flour Mini Pizzas are the perfect bite-sized solution — a wholesome twist on a classic favorite. With a nutty aroma from almond flour and the delightful chew of tapioca starch, each mini crust bakes up golden and satisfying without a trace of gluten or grains.
I love how these little pizzas come together in minutes — simple ingredients, no special equipment, and plenty of room for creativity. Whether you’re planning a fun family dinner, meal-prepping freezer-friendly lunches, or experimenting with new gluten-free baking techniques, this recipe fits right in.
Get ready to enjoy the comfort of homemade pizza with a lighter, nutrient-rich crust that holds up beautifully under your favorite toppings — from classic mozzarella and pepperoni to colorful veggies and fresh basil. Let’s turn your kitchen into a mini pizzeria, one crispy crust at a time!
Key Benefits & Why You’ll Love This Recipe
If you’ve ever struggled to find a gluten-free pizza crust that’s crisp on the outside, tender inside, and full of flavor — you’re in for a treat. These Almond & Tapioca Flour Mini Pizzas combine wholesome ingredients with an easy, foolproof method that delivers both taste and texture.
Here’s why this recipe deserves a spot in your weekly rotation:
- Naturally Gluten- & Grain-Free: Using almond flour and tapioca starch, this crust skips the wheat without sacrificing that classic pizza chew.
- Quick & Easy Prep: No yeast, no waiting for dough to rise — just mix, shape, and bake. Perfect for busy weeknights or spontaneous pizza cravings.
- Crispy Yet Tender Texture: The combination of tapioca flour dough and olive oil gives each mini crust a light crunch with a soft, slightly elastic bite.
- Customizable for Every Craving: Whether you love gooey mozzarella, vibrant veggies, or savory pepperoni, these grain-free mini pizzas are a blank canvas for your favorite toppings.
- Meal-Prep Friendly: Make a batch, bake, and freeze for up to three months — then reheat for an instant, homemade gluten-free pizza night.
💡 Pro Tip: Serve these minis as appetizers at gatherings, or let everyone build their own during family dinners — they’re fun, interactive, and always a hit!
This recipe is more than just pizza; it’s a quick gluten-free meal that brings joy back to the table. Simple, healthy, and full of flavor — that’s what makes these mini pizzas truly irresistible.
Ingredients
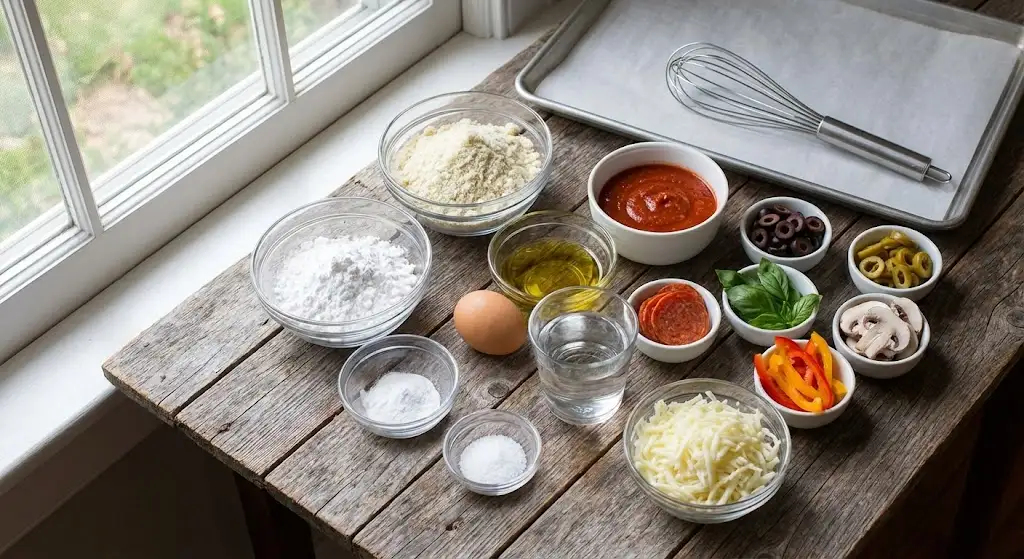
Let’s start with what you’ll need to create these gluten-free mini pizzas. The ingredients are simple, wholesome, and easy to find — yet they come together to form a crispy, flavorful crust that rivals any traditional pizza base.
Dry Ingredients
- 1 ½ cups almond flour – Adds a rich, nutty flavor and provides structure to the crust.
- 1 cup tapioca starch (tapioca flour) – Gives the dough its light, chewy texture — the secret to that perfect bite.
- ½ tsp baking soda – Helps the crust rise slightly for a soft interior.
- ½ tsp sea salt – Balances the flavors and enhances the nutty undertones.
Wet Ingredients
- 1 large egg – Acts as a binder, giving the dough elasticity and helping it hold together.
- 2 Tbsp olive oil – Adds moisture and a subtle, savory depth.
- ¼ cup warm water – Brings the dough together into a smooth, pliable texture.
Toppings
- ½ cup pizza or marinara sauce – Choose your favorite gluten-free sauce for the perfect flavor base.
- 1 cup shredded cheese – Mozzarella, cheddar, or any melty blend you love.
- Optional toppings: sliced olives, pepperoni, fresh basil, bell peppers, mushrooms — or any toppings that make your pizza night special.
💬 Tip: Don’t be afraid to get creative! These grain-free mini pizzas are incredibly versatile. Try dairy-free cheese for a lighter version or load up on colorful veggies for a nutrient-packed twist.
Instructions
Ready to bake your way to the perfect gluten-free mini pizzas? Follow these easy steps — no fancy tools or pizza stones required. Each step is simple, quick, and designed to help you achieve a crispy, golden crust that holds all your favorite toppings beautifully.
1. Preheat the Oven
- Set your oven to 400°F (200°C).
- Line a large baking sheet with parchment paper to prevent sticking and make cleanup effortless.
💡 Pro tip: Preheating ensures that your mini crusts start baking immediately, giving them that irresistible crisp edge.
2. Mix the Dry Ingredients
- In a medium mixing bowl, whisk together:
- Almond flour
- Tapioca starch
- Baking soda
- Sea salt
- Mix well to evenly distribute the leavening and salt for a balanced flavor.
3. Form the Dough
- Add the egg, olive oil, and warm water to the dry ingredients.
- Stir with a spatula until a soft dough forms, then gently knead with your hands for about 2 minutes.
📝 Note: The dough will feel slightly sticky — that’s normal for tapioca flour dough. Lightly oiling your hands makes it easier to handle.
4. Shape the Mini Crusts
- Scoop out golf ball–sized portions of dough.
- Flatten each ball directly onto the parchment paper into 3–4 inch circles.
- Aim for even thickness so they bake uniformly.
5. Bake the Bases
- Bake for 7 minutes, just until the crusts begin to firm up but not brown completely.
- This pre-bake step ensures the crust holds its shape once toppings are added.
6. Add the Toppings
- Remove the tray from the oven and spread a spoonful of sauce on each crust.
- Top with cheese and your chosen extras — think pepperoni, olives, or fresh basil.
7. Finish Baking
- Return to the oven and bake for another 7–8 minutes, or until the cheese is bubbling and lightly golden.
💡 Tip: For an extra-crispy bottom, place the pizzas on the lowest oven rack for the final few minutes.
8. Serve or Store
- Let them cool slightly before serving — they’ll be easier to handle and even tastier.
- To store, cool completely and freeze in an airtight container for up to 3 months. Reheat in the oven until crisp.
Pro Tips & Variations
One of the best parts about these Almond & Tapioca Flour Mini Pizzas is how easily you can adapt them to your preferences. Whether you’re aiming for a low-carb pizza option, exploring dairy-free alternatives, or simply looking to perfect your gluten-free baking technique, these tips and variations will help you make every batch even better.
Pro Tips for Perfect Results
- Measure accurately: Gluten-free flours are sensitive to ratios. Use level measuring cups or a kitchen scale for consistency.
- Don’t skip the pre-bake: This step sets the crust’s shape, ensuring it stays crisp even under layers of sauce and cheese.
- Oil your hands: Since tapioca flour dough can be sticky, lightly coat your hands with olive oil when shaping.
- Watch your oven time: Every oven runs slightly differently. Keep an eye during the final bake to prevent over-browning.
- Cool before storing: Let your mini pizzas cool completely before freezing to prevent sogginess when reheated.
Creative Variations
- Dairy-Free Delight: Swap out traditional cheese for your favorite dairy-free meltable cheese — it still gives you that ooey-gooey topping!
- Keto-Friendly Twist: Reduce the tapioca flour slightly and increase almond flour for fewer carbs and a denser, nutty crust.
- Veggie Boost: Pile on roasted bell peppers, spinach, mushrooms, or zucchini for extra flavor and color.
- Mini Breakfast Pizzas: Use scrambled eggs, turkey bacon, and a sprinkle of cheddar for a fun morning spin.
- Spice It Up: Add a pinch of garlic powder, oregano, or chili flakes to the dough for a more savory bite.
✨ Pro Insight: The combination of almond flour and tapioca starch gives a balance between crispness and chew — ideal for gluten-free pizza lovers craving that authentic texture. Experiment with ratios until you find your personal sweet spot!
Serving & Pairing Suggestions
Once your gluten-free mini pizzas emerge from the oven, golden and bubbling, the fun really begins — serving and pairing! These little delights fit effortlessly into almost any occasion, from cozy family dinners to party appetizers or even quick lunchbox meals.
Serving Ideas
- Family Pizza Night: Set up a DIY pizza bar! Lay out bowls of sauces, cheeses, and toppings so everyone can build their own mini masterpiece.
- Appetizer Platters: Serve these grain-free mini pizzas as finger food at gatherings — they’re easy to grab and stay crisp longer than you’d expect.
- Meal Prep Magic: Freeze a batch and reheat when you need a fast, satisfying meal or snack. They crisp right back up in the oven.
- Kid-Approved Lunches: Smaller portions make these perfect for lunchboxes — they’re fun to eat and totally mess-free.
Pairing Suggestions
Balance your pizzas with fresh, colorful sides to round out the meal:
- Salads: Pair with a simple arugula and cherry tomato salad, or go classic with Caesar for a refreshing contrast.
- Soups: Try a light tomato basil soup or vegetable minestrone for the ultimate cozy pairing.
- Drinks: A chilled sparkling lemonade, iced herbal tea complements the nutty undertones of the almond flour crust.
💬 Serving Tip: Warm your mini pizza crusts directly on the oven rack for a few minutes before serving — this keeps the bottoms crisp while melting the cheese just enough for that irresistible pull.
Tools & Equipment Guide
Making these Almond & Tapioca Flour Mini Pizzas doesn’t require any fancy kitchen gadgets — just a few reliable tools that make the process smoother and more enjoyable. With the right setup, you’ll create perfectly crisp, evenly baked crusts every time.
Essential Tools
- Mixing Bowls (Medium & Large): For combining dry and wet ingredients. A medium bowl works perfectly for kneading the dough.
- Whisk & Spatula: Use a whisk to blend your dry ingredients evenly, and a sturdy spatula to fold in wet ingredients until the dough forms.
- Measuring Cups & Spoons: Precision matters in gluten-free baking — even a small difference in flour can change the texture.
- Baking Sheet: A flat, rimmed baking sheet ensures even heat distribution for those crisp, golden mini crusts.
- Parchment Paper: Keeps your pizzas from sticking and makes cleanup quick and effortless.
- Cooling Rack: Helps prevent soggy bottoms by allowing air to circulate beneath freshly baked pizzas.
Helpful (but Optional) Tools
- Silicone Baking Mat: A reusable alternative to parchment paper that promotes even browning.
- Mini Pizza Pan or Ring Mold: For perfectly uniform shapes and a professional look.
- Kitchen Scale: Ideal for accurate measurements, especially when working with almond flour or tapioca starch, which can pack differently by volume.
- Pastry Brush: Lightly brush olive oil over the crusts for extra color and crispness before baking.
💡 Pro Tip: If you bake pizza often, investing in a pizza stone or steel can take your crust to the next level. It retains heat beautifully, helping you achieve a crispy gluten-free pizza base every single time.
Troubleshooting Common Issues
Even experienced cooks can run into small hiccups when working with gluten-free dough, but don’t worry — most problems have simple fixes. Here’s how to handle the common challenges with Almond & Tapioca Flour Mini Pizzas so your crusts come out perfect every time.
1. Dough is Too Sticky
- Why it happens: Tapioca flour can make dough slightly tacky.
- Fix: Lightly oil your hands or dust them with a pinch of almond flour when shaping the mini crusts. Avoid adding too much extra flour, which can dry the dough.
Crust Not Crisping
- Why it happens: Moisture from toppings or uneven heat distribution.
- Fix: Pre-bake the crust for 7 minutes before adding toppings, and finish baking directly on the oven rack for extra crispness.
Cheese or Toppings Sliding Off
- Why it happens: Dough is slightly underbaked or toppings are too heavy.
- Fix: Ensure the crust is firm from pre-baking, and distribute toppings evenly. Avoid piling too many wet ingredients on one mini pizza.
Crust Spreading Too Much
- Why it happens: Dough too warm or over-handled.
- Fix: Chill the dough for 5–10 minutes before shaping if it’s too soft. Handle gently when forming mini crusts.
Freezing & Reheating Issues
- Why it happens: Condensation can make crust soggy.
- Fix: Cool completely before freezing. Reheat in a preheated oven until the edges are crisp again.
💡 Extra Tip: Keep notes of any tweaks you make — gluten-free baking is wonderfully adaptable, and a small adjustment can turn a good batch into a perfect one next time.
FAQs
Here are answers to some of the most common questions about making Almond & Tapioca Flour Mini Pizzas. Whether you’re new to gluten-free baking or looking to perfect your technique, these tips will help you get the best results.
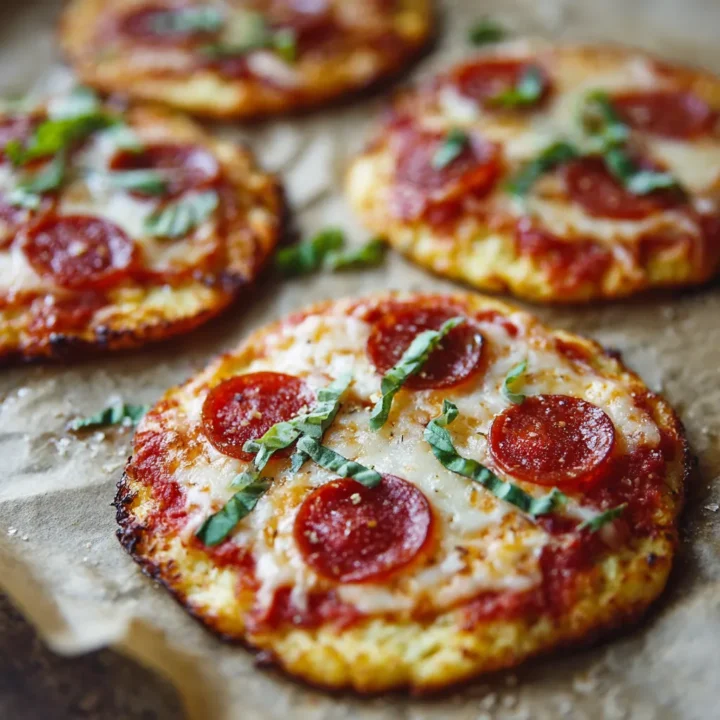
Almond & Tapioca Flour Mini Pizzas (Gluten-Free)
If you’ve ever struggled to find a gluten-free pizza crust that’s crisp on the outside, tender inside, and full of flavor — you’re in for a treat. These Almond & Tapioca Flour Mini Pizzas combine wholesome ingredients with an easy, foolproof method that delivers both taste and texture.
Ingredients
Dry Ingredients:
- 1 ½ cups almond flour
- 1 cup tapioca starch (tapioca flour)
- ½ tsp baking soda
- ½ tsp sea salt
Wet Ingredients:
- 1 large egg
- 2 Tbsp olive oil
- ¼ cup warm water
Toppings:
- ½ cup pizza or marinara sauce
- 1 cup shredded cheese (mozzarella, cheddar, or blend)
- Optional: sliced olives, pepperoni, fresh basil, bell peppers, mushrooms
Instructions
- Preheat Oven: 400°F (200°C); line a baking sheet with parchment paper.
- Mix Dry Ingredients: Whisk almond flour, tapioca starch, baking soda, and salt in a medium bowl.
- Form Dough: Add egg, olive oil, and warm water; stir until combined, then knead 2 minutes. Dough will be slightly sticky.
- Shape Mini Crusts: Scoop golf ball–sized portions and flatten to 3–4 inch circles on the tray.
- Pre-Bake: Bake 7 minutes until the crust begins to firm.
- Add Toppings: Spread sauce, sprinkle cheese, and add any optional toppings.
- Finish Baking: Bake another 7–8 minutes until cheese is bubbly and golden.
- Serve or Store: Enjoy warm or cool completely and freeze for up to 3 months; reheat until crisp.
Notes
- Sticky Dough Tip: Lightly oil your hands when shaping the dough.
- Crispy Crust: Pre-baking is key — it prevents soggy bottoms.
- Topping Tips: Avoid piling on too many wet ingredients; distribute evenly.
- Storage: Fully cool before freezing to maintain crispness.
- Variations: Swap cheese for dairy-free options, add extra veggies, or adjust flour ratios for a lower-carb version.
Nutrition Information:
Yield: 6 Serving Size: 1Amount Per Serving: Calories: 220Total Fat: 16gSaturated Fat: 4gCholesterol: 37mgSodium: 270mgCarbohydrates: 11gFiber: 2gSugar: 1gProtein: 9g