




When I first tasted Pão Francês, I was instantly transported to the bustling streets of Brazil. This traditional Brazilian French bread roll is more than just a snack—it’s a cultural experience. Have you ever savored a bread with a crispy crust that gives way to a soft, fluffy interior? Pão Francês does just that, and it’s incredibly versatile. Whether enjoyed for breakfast with a cup of cafézinho or as a side with your favorite stew, this bread is a staple in Brazilian homes and bakeries.
What makes Pão Francês truly special is its simplicity. With just a few key ingredients like flour, yeast, and salt, you can create a bread that feels like a gourmet treat. Plus, the no-knead and no-rise options make it accessible for even the busiest of home cooks. Whether you’re a seasoned baker or just starting out, this recipe will delight your taste buds and impress your friends and family. Ready to bring a taste of Brazil into your kitchen? Let’s dive into the world of Pão Francês and discover why this bread is a must-try for any food lover.
Key Benefits of Pão Francês
Hey there, bread lover! If you’re looking to add a touch of Brazilian warmth to your kitchen, Pão Francês is the perfect recipe to start with. This traditional Brazilian French bread roll is not just a delicious treat—it’s a cultural experience that brings the flavors of Brazil right to your doorstep. Here’s why you’ll love making and enjoying this bread:
-
Authentic Flavor: Pão Francês captures the essence of Brazilian baking with its crispy crust and soft, fluffy interior. It’s like having a little piece of Brazil in every bite!
-
Versatile Delight: Whether you’re enjoying it for breakfast with a dollop of butter and jam, using it for a delicious sandwich, or serving it alongside your favorite soup, Pão Francês fits the bill perfectly.
-
Easy to Make: Don’t worry if you’re new to baking! This recipe is designed to be accessible for all skill levels. With a no-knead and no-rise option, you can create bakery-quality bread without breaking a sweat.
-
Healthy and Wholesome: Made with simple, high-quality ingredients like bread flour, yeast, salt, and water, Pão Francês is a healthy choice that doesn’t compromise on flavor.
-
Cultural Connection: Baking Pão Francês is a wonderful way to explore Brazilian culture and traditions. It’s a recipe that has been passed down through generations, and now you can be a part of that legacy.
Why You’ll Love This Recipe
-
Simple Ingredients: You won’t need any fancy ingredients or equipment. Just basic pantry staples like flour, yeast, and salt.
-
No-Knead Option: Save time and effort with a no-knead method that still delivers fantastic results.
-
No-Rise Option: Perfect for those who need a quick fix. No long waiting times for the dough to rise.
-
Authentic Flavor: Get that true Brazilian taste with this easy-to-follow recipe.
-
Versatile Uses: From breakfast to dinner, Pão Francês is a versatile bread that can be enjoyed in many ways.
Tips for Success
-
Warm Water: Use warm water to activate the yeast. This helps the dough rise evenly.
-
Light Touch: When shaping the rolls, be gentle. Overworking the dough can make it tough.
-
Preheat the Oven: Make sure your oven is fully preheated before baking. This ensures a crispy crust.
-
Steam: Adding a bit of steam to the oven can help create that perfect crust. You can do this by placing a pan with water on the bottom rack.
-
Cool Completely: Let the bread cool completely before storing it. This prevents it from becoming soggy.
Ready to Get Started?
Now that you know all the benefits and tips for making Pão Francês, are you ready to dive in? This recipe is not only delicious but also a fantastic way to connect with Brazilian culture. Let’s get started and bring the flavors of Brazil into your home!
Ingredients
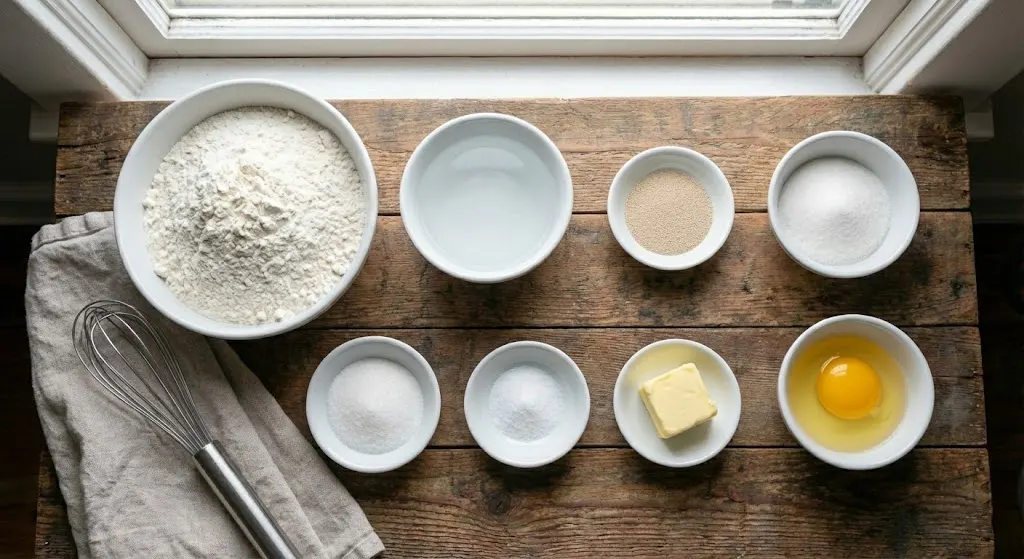
Alright, let’s dive into the ingredients you’ll need to make this delicious Pão Francês. Don’t worry, it’s all about keeping it simple and using ingredients you likely already have in your pantry. Here’s what you’ll need:
Ingredients:
-
2 cups bread flour (or all-purpose flour)
-
1 teaspoon active dry yeast
-
1 teaspoon sugar
-
1/2 teaspoon salt
-
1 cup warm water (about 110°F or 45°C)
-
1 tablespoon butter (optional, for a richer flavor)
-
1 egg (optional, for egg wash to enhance the crust)
Why These Ingredients?
-
Bread Flour: This gives the bread a bit more structure and chewiness. If you don’t have bread flour, all-purpose flour works just fine.
-
Yeast: The star of the show! It helps the dough rise and gives the bread its light, airy texture.
-
Sugar: Just a touch to feed the yeast and add a hint of sweetness.
-
Salt: Essential for enhancing the flavor and balancing the yeast activity.
-
Warm Water: Activates the yeast and helps the dough come together.
-
Butter: Optional, but it adds a rich flavor and a slightly softer texture.
-
Egg Wash: Optional, but it gives the bread a beautiful golden color and a shiny crust.
Tips for Preparing Your Ingredients:
-
Check Your Yeast: Make sure your yeast is fresh and active. Expired yeast won’t rise properly.
-
Measure Accurately: Using a kitchen scale for flour and other dry ingredients ensures accuracy.
-
Warm Water: Not too hot, not too cold. Around 110°F (45°C) is perfect for activating the yeast without killing it.
-
Room Temperature Ingredients: Ensure your butter and eggs are at room temperature for even mixing.
Ready to Mix?
Now that you have all your ingredients ready, let’s move on to the fun part—mixing and shaping the dough! Don’t worry, I’ll guide you through it step by step. Let’s get baking!
Instructions
Alright, my friend! Let’s roll up our sleeves and get to work. Making Pão Francês is a breeze, and I’m here to guide you through it step by step. Here’s how you can bring this delicious Brazilian bread to life in your kitchen.
Step-by-Step Instructions:
-
Activate the Yeast:
-
In a small bowl, combine the warm water, sugar, and yeast. Stir gently and let it sit for about 5-10 minutes until it becomes frothy. This step is crucial as it activates the yeast and ensures your bread will rise beautifully.
-
-
Mix the Dough:
-
In a large mixing bowl, combine the bread flour and salt. Make a well in the center and pour in the activated yeast mixture.
-
If using butter, add it now. Mix everything together until a dough forms. You can use a wooden spoon or your hands to combine the ingredients.
-
-
Knead the Dough (Optional):
-
If you prefer a more traditional kneaded dough, turn the dough out onto a lightly floured surface and knead for about 5-7 minutes until smooth and elastic. If you’re going for the no-knead option, skip this step.
-
-
Shape the Rolls:
-
Divide the dough into small, equal portions. Shape each portion into a small roll or oval shape. This is where you can get creative with the shape, but traditional Pão Francês is usually shaped like a small baguette.
-
-
Preheat the Oven:
-
Preheat your oven to 425°F (220°C). If you have a baking stone, place it in the oven to preheat as well. This will help create a crispy crust.
-
-
Prepare the Baking Sheet:
-
Line a baking sheet with parchment paper. Place the shaped rolls on the parchment paper, leaving a little space between each roll.
-
-
Optional Egg Wash:
-
If you want a shiny, golden crust, beat the egg and brush a thin layer over the rolls.
-
-
Bake:
-
Place the baking sheet in the preheated oven. Bake for about 15-20 minutes until the rolls are golden brown and sound hollow when tapped.
-
-
Cool and Enjoy:
-
Remove the rolls from the oven and let them cool on a wire rack. Enjoy them while they’re still warm for the best flavor and texture.
-
Tips for Success:
-
Be Gentle: When shaping the rolls, be gentle with the dough to avoid deflating it.
-
Preheat Thoroughly: Ensure your oven is fully preheated before baking. This helps in creating a crispy crust.
-
Steam: For an extra crispy crust, you can add steam to the oven by placing a pan with water on the bottom rack.
-
Cool Completely: Let the bread cool completely before storing it to prevent it from becoming soggy.
Pro Tips and Variations
Alright, you’ve got the basics down, and now it’s time to take your Pão Francês game to the next level! Whether you’re looking to perfect your technique or experiment with new flavors, these pro tips and variations will help you elevate your bread-making experience.
Pro Tips for Success:
-
Use Fresh Ingredients: Fresh yeast and flour make a big difference in the final result. Check the expiration dates on your ingredients.
-
Keep It Warm: Ensure your kitchen is at a comfortable room temperature. A cold environment can slow down the rising process.
-
Light Touch: When shaping the rolls, handle the dough gently. Overworking it can make the bread tough.
-
Preheat Thoroughly: A fully preheated oven is essential for that perfect crispy crust. Don’t rush this step!
-
Add Steam: For an extra-crispy crust, place a pan with water on the bottom rack of your oven. The steam will help create a beautiful, crackly exterior.
Fun Variations to Try:
-
Cheese-Filled Pão Francês: Add a sprinkle of grated cheese (like cheddar or mozzarella) inside each roll before shaping. This adds a delightful twist to the classic recipe.
-
Herbed Pão Francês: Mix in some fresh herbs like rosemary or thyme into the dough for a fragrant, savory bread.
-
Sweet Pão Francês: For a sweeter version, add a bit of honey or cinnamon to the dough. This makes a perfect breakfast bread.
-
Whole Wheat Pão Francês: Substitute some of the bread flour with whole wheat flour for a healthier, nuttier flavor.
-
Garlic Pão Francês: Add minced garlic to the dough or brush the rolls with garlic butter after baking for a deliciously aromatic bread.
Tips for Experimenting:
-
Small Batches: When trying new variations, start with a small batch to test the flavors and textures.
-
Keep Notes: Jot down your changes and observations. This will help you refine your recipes and perfect your techniques.
-
Be Creative: Don’t be afraid to mix and match flavors. The beauty of baking is in the experimentation!
Serving Suggestions
Now that you’ve mastered the art of making Pão Francês, let’s talk about how to enjoy it! This versatile bread is perfect for a variety of occasions and can be paired with many different foods. Here are some delicious and creative ways to serve your freshly baked Pão Francês.
For Breakfast:
-
Butter and Jam: Slice your Pão Francês and spread with a generous layer of butter and your favorite jam. It’s a simple yet delightful way to start your day.
-
Avocado Toast: Mash some ripe avocado and spread it on top of your bread. Add a sprinkle of salt, pepper, and a squeeze of lemon for a healthy and tasty breakfast option.
-
Egg Sandwich: Use your Pão Francês as the base for a delicious egg sandwich. Add a fried or poached egg, some bacon or ham, and a slice of cheese for a protein-packed meal.
As a Snack:
-
Cheese and Cold Cuts: Pair your bread with a selection of cheeses, cold cuts, and olives for a delicious and satisfying snack.
-
Dips and Spreads: Serve your Pão Francês with hummus, guacamole, or a creamy cheese dip. It’s a great way to enjoy the bread with a variety of flavors.
For Dinner:
-
Soup Companion: Pão Francês is the perfect side for any soup or stew. Its crispy crust and soft interior make it ideal for dipping.
-
Sandwiches: Use your bread to make a variety of sandwiches. Fill with roast beef, turkey, or your favorite vegetables for a hearty meal.
-
Garlic Bread: Brush the bread with garlic butter and bake until golden brown. It’s a delicious addition to any dinner table.
For Special Occasions:
-
Holiday Spread: Serve your bread with a selection of cheeses, charcuterie, and seasonal fruits for a festive and elegant presentation.
-
Dinner Party: Impress your guests by serving Pão Francês with a variety of dips and spreads. It’s a great conversation starter and a delicious treat.
Tips for Serving:
-
Serve Warm: Pão Francês tastes best when served warm. If you have leftovers, reheat them in the oven for a few minutes to restore their crispiness.
-
Pair with Beverages: Enjoy your bread with a cup of coffee or tea. The right beverage can enhance the flavors of the bread.
-
Presentation Matters: Arrange your bread and toppings beautifully on a platter. A well-presented dish is more inviting and enjoyable.
Tools and Equipment Guide
Alright, bread baker! Now that you know how to make and serve Pão Francês, let’s talk about the tools and equipment you’ll need to bring this delicious bread to life. Don’t worry, you probably already have most of what you need in your kitchen. Here’s a quick guide to help you get started.
Essential Tools and Equipment:
-
Mixing Bowls: You’ll need a large mixing bowl for combining your ingredients and a smaller bowl for activating the yeast.
-
Measuring Cups and Spoons: Accurate measurements are key to a successful bread recipe. A kitchen scale is even better for precise measurements.
-
Wooden Spoon or Dough Whisk: For mixing the dough until it comes together.
-
Baking Sheet: A large baking sheet lined with parchment paper is perfect for baking the rolls. Parchment paper helps prevent sticking and makes cleanup a breeze.
-
Pastry Brush: For applying egg wash to the rolls, which gives them a beautiful golden color and shiny crust.
-
Oven: A preheated oven is essential for baking. If you have a baking stone, use it for an even crispier crust.
-
Wire Cooling Rack: For cooling the rolls after baking. This prevents the bread from becoming soggy as it cools.
Optional Tools:
-
Dough Cutter or Bench Scraper: Helps in dividing the dough into equal portions without sticking.
-
Kitchen Scale: For precise measurements of ingredients, especially flour and water.
-
Instant-Read Thermometer: To check the temperature of the water and ensure it’s at the right temperature for activating the yeast.
-
Proofing Basket: If you want to get fancy, a proofing basket can help shape the rolls and give them a beautiful texture.
Tips for Using Your Tools:
-
Preheat Your Oven: Always preheat your oven to the correct temperature before baking. This ensures even baking and a crispy crust.
-
Use Parchment Paper: Line your baking sheet with parchment paper to prevent sticking and make cleanup easier.
-
Light Touch: When shaping the rolls, be gentle with the dough to avoid deflating it.
-
Egg Wash: If you’re using an egg wash, apply it just before baking for a shiny, golden crust.
-
Cool Completely: Let the bread cool completely on a wire rack before storing it to prevent it from becoming soggy.
Troubleshooting Common Issues
Alright, my friend! Even the best bakers encounter a few bumps along the way. Let’s tackle some common issues you might face while making Pão Francês and how to fix them. Don’t worry, I’ve got your back!
Common Issues and Solutions:
-
Dough is Too Sticky:
-
Problem: The dough sticks to your hands or the surface.
-
Solution: Add a little more flour, one tablespoon at a time, until the dough is manageable. Be careful not to add too much flour, as it can make the bread dense.
-
-
Dough is Too Dry:
-
Problem: The dough is crumbly and doesn’t come together.
-
Solution: Add a little more water, one tablespoon at a time, until the dough is smooth and elastic.
-
-
Bread Doesn’t Rise:
-
Problem: The dough doesn’t rise properly.
-
Solution: Ensure your yeast is fresh and activated properly. Check the expiration date on the yeast package. Also, make sure your water is at the right temperature (110°F or 45°C). If the water is too hot, it can kill the yeast.
-
-
Bread is Dense:
-
Problem: The final bread is heavy and dense.
-
Solution: Knead the dough just enough to bring it together. Over-kneading can develop too much gluten, making the bread dense. Also, ensure the dough has enough time to rise properly.
-
-
Crust is Too Hard:
-
Problem: The crust is too hard and tough.
-
Solution: Preheat your oven thoroughly and use steam to create a crispy crust. You can place a pan with water on the bottom rack of your oven to add steam. Also, let the bread cool completely on a wire rack to prevent it from becoming soggy.
-
-
Bread is Too Soft:
-
Problem: The bread lacks a crispy crust.
-
Solution: Ensure your oven is preheated to the correct temperature and use parchment paper to prevent sticking. Adding steam to the oven can also help create a crispy crust.
-
-
Bread is Unevenly Baked:
-
Problem: Some rolls are more baked than others.
-
Solution: Ensure all rolls are shaped to a similar size and placed evenly on the baking sheet. Rotate the baking sheet halfway through baking to ensure even cooking.
-
Tips for Avoiding Issues:
-
Check Your Ingredients: Ensure your yeast is fresh and your flour is measured accurately.
-
Preheat Thoroughly: A fully preheated oven is essential for even baking.
-
Use Steam: Adding steam to the oven can help create a crispy crust.
-
Cool Completely: Let the bread cool completely on a wire rack to prevent it from becoming soggy.
History of the Recipe
Now that we’ve tackled the practical side of making Pão Francês, let’s take a moment to delve into the rich history behind this beloved Brazilian bread. Understanding the origins and cultural significance of Pão Francês can add a whole new layer of appreciation for this delicious bread.
The Origins of Pão Francês
Pão Francês, which translates to “French Bread” in Portuguese, has a fascinating history that reflects Brazil’s colonial past and its unique culinary evolution. The story of Pão Francês begins with the arrival of the Portuguese in Brazil in the 16th century. As the Portuguese colonized Brazil, they brought with them their culinary traditions, including the art of bread-making.
The Influence of French Baking
In the late 19th and early 20th centuries, Brazil experienced a wave of European immigration, including many French bakers. These bakers introduced French baking techniques and recipes to Brazil, which influenced the local bread-making traditions. The French baguette, with its crispy crust and soft interior, became particularly popular. Brazilian bakers adapted these techniques to create their own version of French bread, which eventually evolved into what we know today as Pão Francês.
The Role of Pão Francês in Brazilian Culture
Pão Francês quickly became a staple in Brazilian cuisine and a symbol of Brazilian identity. It is a versatile bread that is enjoyed in various ways, from breakfast to snacks and even as a side dish. The bread’s popularity is also evident in the numerous bakeries (padarias) that dot the Brazilian landscape. These bakeries are an integral part of Brazilian daily life, offering a variety of breads, pastries, and snacks.
The Evolution of Pão Francês
Over time, Pão Francês has evolved to suit Brazilian tastes and preferences. While it retains the characteristics of French bread, such as a crispy crust and soft interior, it has also incorporated local ingredients and flavors. For example, some variations include cheese, herbs, or even sweet fillings, reflecting the diverse culinary influences in Brazil.
Cultural Significance
Pão Francês is more than just a bread; it is a symbol of Brazilian culture and tradition. It is a daily staple that brings people together, whether enjoyed at home with family or purchased from a local bakery. The bread’s simplicity and versatility make it a beloved part of Brazilian life, cherished by generations.
Why This Recipe Matters
Understanding the history of Pão Francês adds a deeper appreciation for the bread and its cultural significance. By making this recipe at home, you’re not only creating a delicious treat but also connecting with a rich culinary tradition that spans centuries. Whether you’re a fan of Brazilian cuisine or just looking to explore new flavors, Pão Francês is a wonderful way to bring a piece of Brazil into your kitchen.
Conclusion
Wow, what a journey we’ve had! From understanding the rich history of Pão Francês to mastering the art of baking it in your own kitchen, you’ve come a long way. Whether you’re a seasoned baker or just starting out, I hope this guide has given you the confidence and inspiration to create delicious, authentic Brazilian French bread rolls.
Final Thoughts
Baking Pão Francês is more than just making bread; it’s about connecting with a rich culinary tradition and bringing a taste of Brazil into your home. Whether you’re enjoying it fresh out of the oven with a cup of coffee or sharing it with friends and family, this bread is sure to delight your taste buds and warm your heart.
Encouragement to Try It Out
Don’t be intimidated by the process. Baking is a wonderful way to explore new flavors and cultures, and Pão Francês is a fantastic recipe to start with. It’s simple, versatile, and incredibly rewarding. So, roll up your sleeves, gather your ingredients, and let’s get baking!
Ready to Bake?
I can’t wait to hear about your baking experience and see the delicious Pão Francês you create. Remember, every loaf is a step closer to mastering the art of baking, and every bite is a celebration of Brazilian culture. Happy baking, and enjoy every moment of it!
FAQs
Hey there! I know you might have some questions about making Pão Francês, so I’ve put together a list of frequently asked questions to help you out. Whether you’re a beginner or just looking for some extra tips, these FAQs should cover everything you need to know.
1. What is Pão Francês?
Pão Francês, which translates to “French Bread” in Portuguese, is a traditional Brazilian bread roll known for its crispy crust and soft, fluffy interior. It’s a staple in Brazilian cuisine and is enjoyed for breakfast, snacks, and as a side dish.
2. What ingredients do I need to make Pão Francês?
You’ll need bread flour (or all-purpose flour), active dry yeast, sugar, salt, warm water, and optionally, butter and an egg for the egg wash. These simple ingredients come together to create a delicious and authentic bread.
3. Can I use all-purpose flour instead of bread flour?
Absolutely! While bread flour gives the bread a bit more structure and chewiness, all-purpose flour works just fine. The key is to measure accurately and follow the recipe closely.
4. How do I activate the yeast?
To activate the yeast, mix it with warm water (about 110°F or 45°C) and a bit of sugar. Let it sit for 5-10 minutes until it becomes frothy. This step ensures the yeast is active and will help the dough rise properly.
5. Do I need to knead the dough?
No, you don’t have to knead the dough. This recipe is designed to be no-knead, making it accessible for all skill levels. However, if you prefer a more traditional kneaded dough, you can knead it for about 5-7 minutes until smooth and elastic.
6. How do I shape the rolls?
Divide the dough into small, equal portions and shape each portion into a small roll or oval shape. Be gentle to avoid deflating the dough. Traditional Pão Francês is usually shaped like a small baguette.
7. How long should I bake the rolls?
Preheat your oven to 425°F (220°C) and bake the rolls for about 15-20 minutes until they are golden brown and sound hollow when tapped.
8. How can I make the crust crispy?
Preheat your oven thoroughly and use parchment paper to prevent sticking. Adding steam to the oven can also help create a crispy crust. You can place a pan with water on the bottom rack of your oven to add steam.
9. Can I add fillings to the bread?
Yes, you can get creative with fillings! Try adding grated cheese, herbs, or even sweet fillings like cinnamon and sugar. Simply place the filling inside the dough before shaping the rolls.
10. How should I store leftover Pão Francês?
Let the bread cool completely on a wire rack before storing it in an airtight container or a bread box. For the best flavor, reheat the rolls in the oven for a few minutes before serving.
11. Can I freeze Pão Francês?
Yes, you can freeze the rolls. Let them cool completely, then wrap them individually in plastic wrap and place them in a freezer-safe bag. To reheat, let them thaw at room temperature and then reheat in the oven for a few minutes.
12. What can I serve with Pão Francês?
Pão Francês is incredibly versatile. Enjoy it with butter and jam for breakfast, use it for sandwiches, or serve it alongside soups and stews. You can also pair it with cheeses, cold cuts, and dips for a delicious snack.
13. How can I tell if my yeast is active?
If your yeast mixture becomes frothy and bubbly after 5-10 minutes, it’s active and ready to use. If it doesn’t change, the yeast might be expired, and you should try again with fresh yeast.
14. What if my bread doesn’t rise?
Ensure your yeast is fresh and activated properly. Check the expiration date on the yeast package. Also, make sure your water is at the right temperature (110°F or 45°C). If the water is too hot, it can kill the yeast.
15. Can I make Pão Francês in a bread machine?
Yes, you can adapt this recipe for a bread machine. Follow the manufacturer’s instructions for making bread rolls. You might need to adjust the timing and settings slightly.
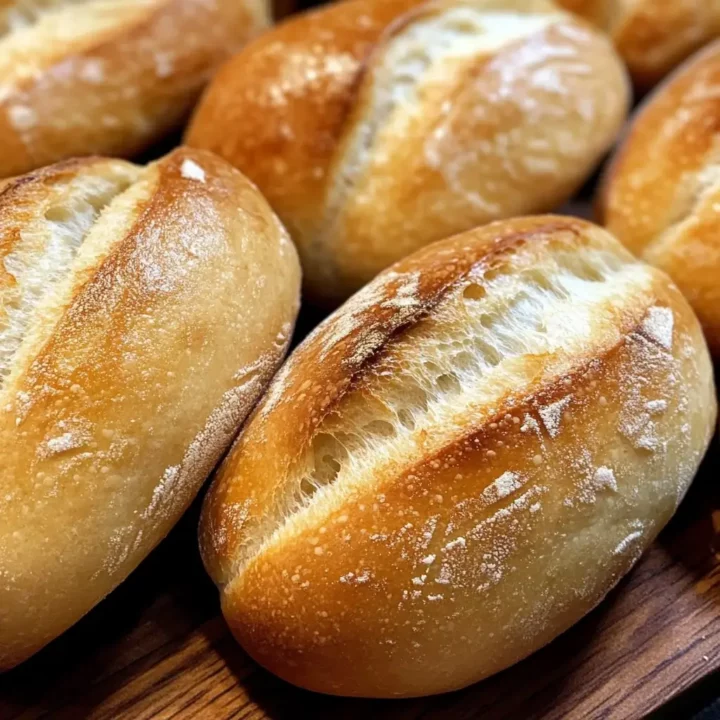
Brazilian French Bread
Savor authentic Pão Francês, the beloved Brazilian French bread roll! Perfect for breakfast or a delicious sandwich, bake it fresh with simple ingredients today!
Ingredients
- 2 cups bread flour (or all-purpose flour)
- 1 teaspoon active dry yeast
- 1 teaspoon sugar
- 1/2 teaspoon salt
- 1 cup warm water (about 110°F or 45°C)
- 1 tablespoon butter (optional, for a richer flavor)
- 1 egg (optional, for egg wash to enhance the crust)
Instructions
Activate the Yeast:
- In a small bowl, combine the warm water, sugar, and yeast. Stir gently and let it sit for about 5-10 minutes until it becomes frothy. This step activates the yeast and ensures your bread will rise beautifully.
Mix the Dough:
- In a large mixing bowl, combine the bread flour and salt. Make a well in the center and pour in the activated yeast mixture.
- If using butter, add it now. Mix everything together until a dough forms. You can use a wooden spoon or your hands to combine the ingredients.
Shape the Rolls:
- Divide the dough into small, equal portions. Shape each portion into a small roll or oval shape. Be gentle to avoid deflating the dough. Traditional Pão Francês is usually shaped like a small baguette.
Preheat the Oven:
- Preheat your oven to 425°F (220°C). If you have a baking stone, place it in the oven to preheat as well. This will help create a crispy crust.
Prepare the Baking Sheet:
- Line a baking sheet with parchment paper. Place the shaped rolls on the parchment paper, leaving a little space between each roll.
Optional Egg Wash:
- If you want a shiny, golden crust, beat the egg and brush a thin layer over the rolls.
Bake:
- Place the baking sheet in the preheated oven. Bake for about 15-20 minutes until the rolls are golden brown and sound hollow when tapped.
Cool and Enjoy:
- Remove the rolls from the oven and let them cool on a wire rack. Enjoy them while they’re still warm for the best flavor and texture.
Notes
Pro Tips:
- Fresh Ingredients: Ensure your yeast is fresh and your flour is measured accurately.
- Preheat Thoroughly: A fully preheated oven is essential for even baking and a crispy crust.
- Light Touch: When shaping the rolls, handle the dough gently to avoid deflating it.
- Add Steam: For an extra-crispy crust, place a pan with water on the bottom rack of your oven to add steam.
- Cool Completely: Let the bread cool completely on a wire rack before storing it to prevent it from becoming soggy.
Nutrition Information:
Yield: 12 Serving Size: 1Amount Per Serving: Calories: 120Total Fat: 2gSodium: 100mgCarbohydrates: 24gFiber: 1gSugar: 1gProtein: 4g